On today’s blog, we flew to North Carolina and got the chance to visit our Industrial Dealer, Fox Company in Charlotte, a shop that offers users like you industrial machine options, repairs from a certified JUKI team, and a hidden gem; their Sewing Machine Museum! Follow along as we meet up with Kevin Berzack, President of the Fox Company, and go behind the scenes.
Since its founding in 1932, The Fox Company has been specializing in machinery for the sewn-products industry and allied industries. They’re known to distribute leading international brands like JUKI and manufacture their own products! On our visit, we also discover their hidden gem, the Sewing Museum you’ll see we’re filming in today! This museum was started by Mr. Henry Berzack, father to the current president, who was a sewing machine collector that found machines from all over the world, excited to showcase designs that have long been changed.
Stay until the end to get a close-up look at some of the vintage sewing machines we saw while visiting, and watch as history changed the sewing machine we know today!
Follow along below for the transcript version of our interview with Kevin Berzack, President of the Fox Company.
My name is Kevin Berzak, I’m the president of the Fox Company. I’ve been president for about two years since the passing of my father and the company is as a family-owned entity and I’m assisted by my sister Nicole who’s the vice president.
What is the history behind the Fox Company?
Fox company traces its roots back to the 1930s where Johnny Fox was a distributor for the Eastman machine company mainly focusing in the cutting rooms. My family bought the company from him in the mid 70s, so my family started in South Africa my grandfather was the first basically importer of industrial sewing machines to South Africa and way back in the 50s I believe started a relationship with JUKI and was the first company to bring JUKI machines into South Africa and southern Africa.
That relationship we carried forward to when we emigrated to this country when we started in the 70s. We approached JUKI and asked if we could please; because we had the experience, and the comfort with JUKI, that we could be able to distribute the equipment here, and luckily we were able to and we’ve had a great relationship since then.
What can a customer find at Fox Company?
Fox company obviously sells to some products industry. Our main selling item is obviously industrial sewing machinery equipment; of which JUKI and the other Japanese brands are the vast majority of our sales, JUKI being the number one product by far. And on the spreading and cutting side we get into cutting rooms across the country, as well as carry a huge amount of spare parts.
With Fox company you’re not just getting a machine in a box, you’re getting the complete package. As I started to say, we’re going to be there in the factory with you, we’re going to see what you needs are, we’re going to present a machine, when you get the machine it’s going to be sewn off to your specifications and more than likely one of our Representatives is going to follow the installation back to the factory and make sure that the machine is working to your satisfaction.
Fox company is going to continue to be a customer focused entity. We’re putting customer service number one. We will go where the customer is and where our customers are, and try to continue to gain experience from JUKI and other manufacturers and try to represent the equipment in the best light possible.
What is the history of The Sewing Museum we’re in today?
This happens to be my father’s passion, Harry Berzak, it’s his Museum and considered probably one of the top five to ten museums of antique sewing machines in the world today, encompassing many of the early American and European brands.
Where can customers locate The Fox Company?
We are located here in headquarters in North Carolina in Charlotte. We’re also available on the web. We have an office that basically handles our cutting products; including pool cut machinery and measuring machinery and other specialized equipment in Auburn, Georgia which is just North of Atlanta, and we have our offices in San Pedro Soule and Honduras
To learn more about the Fox Company, visit their website here! Thank you for joining us today in getting to know Kevin Berzackand our Industrial Dealer, the Fox Company.
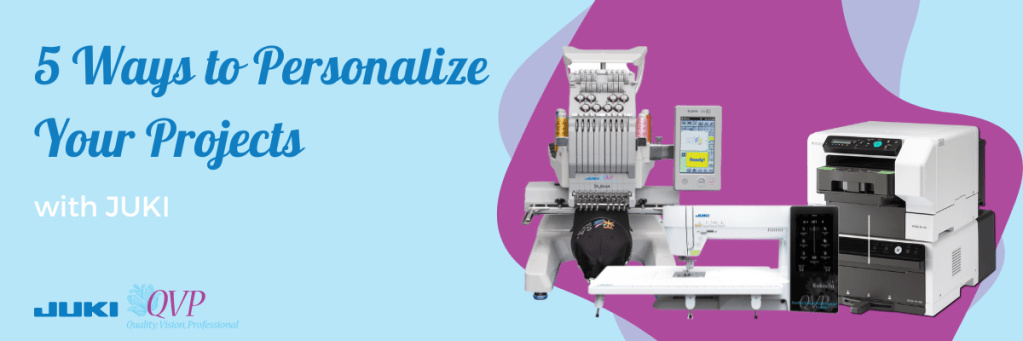
As creators, we love being inspired by other sewist and quilters, but how do we take their inspiration and personalize it? Today we will discuss five ways to personalize your sewing and quilting projects. From adding lettering to printing on designs, there are so many ways we can find a project and turn it into our style. So follow along and check out what machines and accessories we recommend for your personalization touches.
Adding Lettering
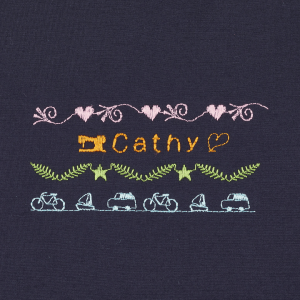
Whether you’re inspired to create a tote bag, or a sweater, adding lettering to your projects can be just the touch of personalization you need! Add your initials with your partners on a sleeve to create the perfect valentines gift, place your child’s name on their new school bag, or gift a quilt with a quote to your loved one using the lettering feature on your creations.
To add this personalization technique, you can use an electric computerized sewing machine that offers lettering, like the Kokochi DX-4000QVP! An electronic computerized sewing machine like the DX-4000QVP offers lettering stitch choices, ranging in different fonts, that will allow you to quickly and easily stitch in your child’s name, favorite quote, or number one sports team name!
Adding lettering is an easy way to personalize your next project and can be done with just a tap of your finger and a stitch!
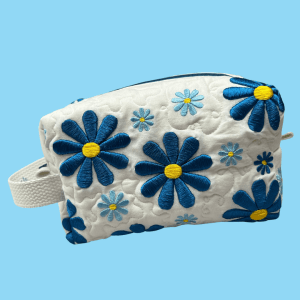
Adding Embroidery Designs
Using a specialized embroidery machine, you can start adding your designs and bring texture to your projects by adding a touch of your personality! For example, add a cool design to sneakers, pet collars, or even a child’s teddy bear to create a project representing you or the gift receiver.
A machine like the JUKI/Tajima Sai 8 Needle Embroidery Machine is an example of a machine that can offer this feature! With 8 different color options, you can create beautiful flowers, animals, and a scenic view from your last hike. Art is limitless with what you can create on an embroidery machine. Adding embroidery can be an exciting art form when creating personalized projects!
Want to try your hand at embroidering and creating a makeup bag? Learn how to create this makeup bag with our JUKI Ambassador Nicole Moore here!
Designing Your Fabric
Have you found yourself wanting a specific fabric design? Been drawing some designs of your own? Then take the leap and design your own fabric! With a machine like a Direct-To-Garment printer, the options in patterns and designs for your projects are now endless, thanks to the ability to design your own fabrics right from your studio.
The RICOH Ri 100 can help you print your art designs and patterns onto fabric easily and quickly. From canvas fabrics for your tote bags to cotton for your memory quilts, enjoy the freedom of designing and creating anything for your imagination, and enjoy a material that no one else would have!
Try your hand at printing your own fabric with this east mini quilt project! Learn how to create your own with our JUKI Ambassador Nicole Moore here!
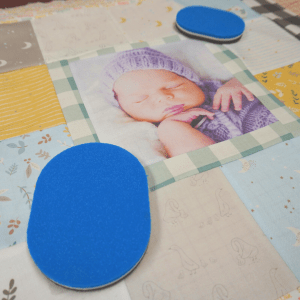
Adding in Photos
Whether it’s a family photo or a memory from your favorite trip with friends, adding a memory photo to a project like a t-shirt or a quilt is a great way to personalize your projects! Whether you’re embroidering designs with free motion quilting, using a Direct-To-Garment printer, or using an embroidery machine, there are limitless ways you can get to designing and including your photos in your projects.
Our favorite projects are memory quilts users create with photos! From sweet newborn gifts to anniversaries and holidays, a quilt created with personalized love is an excellent idea for your next gift project! Using a machine like our Direct-To-Garment printer, the RICOH Ri 100 can easily print and place your photos directly onto the fabric you’re creating, letting you put your focus on your quilt block designs.
Want to create your own memory quilt like the one shown for your loved one? Follow along here to learn more here!
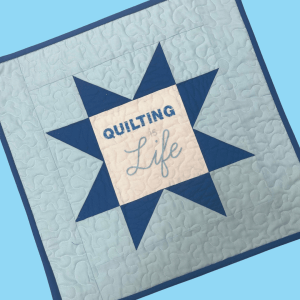
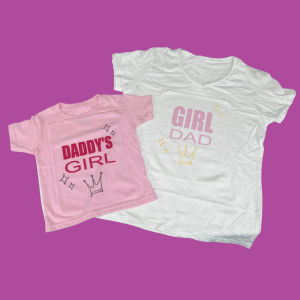
Creating a Set
One of the best things about personalization is the freedom to be creative in what we embroider and print on. Personalize your next gift by creating a matching set! Whether it’s a set of make-up bags for traveling, or a matching set of t-shirts for the father and daughter duo, sets can be a fun gift that allows you to try different project ideas.
One of the best ways to create sets is to intermix your work! Print on your fabric, embroider your design and sew it all together to create something unique and different. Whether your project is small, like a glasses case, or large, like a king quilt, adding these touches of personalization will bring the whole idea together!
So the next time you create a project, add your name, embroider a design, or print on a pattern and show your personality when showing off your project!
Want to try your hand at creating a matching set? Check out our Daddy and Daughter duo set project here!
Want to personalize your next project? Then, visit us here today to find your nearest JUKI dealer!
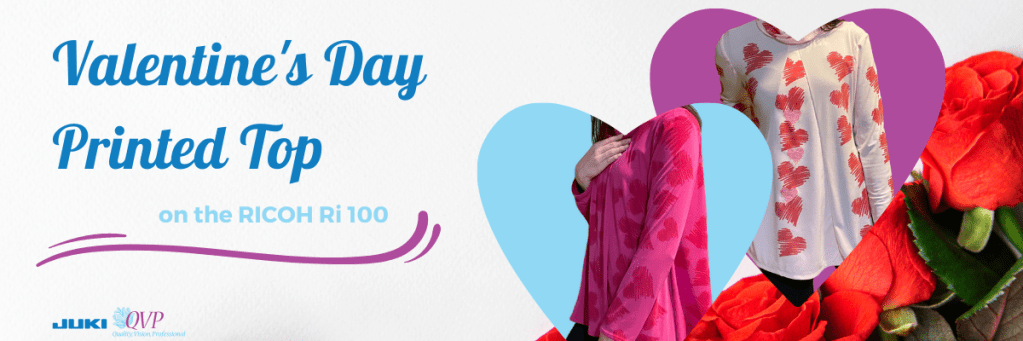
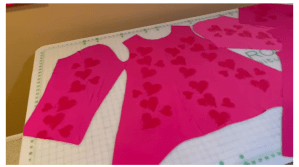
Join us for this month’s project as we create a printed fabric valentines top using the RICOH Ri 100, with a touch of texture thanks to the TAJIMA Sai 8-needle embroidery machine! For this project, our JUKI National Account Kelly will show us how she used the RICOH Ri 100 to personalize her top and make a love-filled gift!
With the direct-to-garment printer (RICOH Ri 100), you can complete a multitude of projects! From designing your own fabric, like you’ll see done in this project video, to placing images on already constructed bags and home décor, a machine like this will help you personalize your next dream project.
The first step when using a RICOH Ri 100 to print on your fabric is to cut out the blouse pattern from the fabric of your choosing. The reason we want to cut the pattern out first before printing on our fabric is so we can precisely place our designs, save ink, and save fabric!
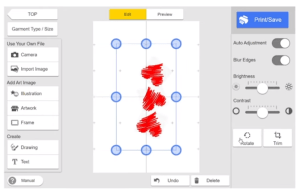
Now that your pieces are all cut out let’s move on to the RICOH Ri 100 designer app that can be installed onto your laptops and computers. Depending on your material and project choice, you’ll set up the RICOH to understand the dimensions and print type you need before moving on to designing. In our project today, we’ll be choosing t-shirts and thin material since we’re working on a Knit jersey material. Keep in mind what tray you’ll be using because the program will ask!
Next is placing and choosing your designs. The best thing about printing is the ability to place almost any design on your material. In today’s project, we’ll be installing our own graphics, but keep in mind the selection of designs offered on the RICOH Ri program when first starting out. Place the designs as you’d like to see them printed. What you see on the screen is what you’ll see printed!
Once you’ve finished your design, you’ll pre-iron your fabric and then place it into the direct-to-garment printer. The time process depends on your designs; the more intricate and colorful, the more time for printing! Once your designs have been printed onto the fabric, go ahead and place your tray in the heater for finishing.
Having our completed fabric, we can now begin constructing our project and creating the blouse! Sewn on our MO-2000QVP and DX-4000QVP, Kelly puts together her pattern pieces to complete a beautiful Valentine’s blouse!
Lastly, if you’d like to add a special touch of personalization, we follow Kelly as she moves over to the JUKI TAJIMA Sai! This is our 8-needle embroidery machine which allows you to embroider a multitude of projects, including shoes, sweaters, hats, and so much more. To start off using the TAJIMA Sai, we’ll use the Writer Plus software that includes designs to choose from, as well as the ability to upload your own, like the RICOH Ri 100.
Like the RICOH Ri 100 software, you’ll choose your project type, material type, and segments that focus on how your stitching will look. If you choose to add embroidery, make sure to do this before constructing your project on the sewing machines.
Once you’ve completed your steps, you’re ready for a night out with your loved one in this cute blouse! We hope you enjoyed learning more about the RICOH Ri 100, and we hope this inspires you to begin making your own fabric and going the extra mile with personalization!
It’s almost time for spooks and candy JUKI Lovers! For today’s blog, we will share our top 5 favorite Halloween projects you can begin creating this weekend. So whether you’re going trick-or-treating, or staying at home, follow along below for ideas you can start today!
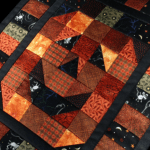
Halloween Patchwork Quilt
Stay warm this fall and create a Halloween patchwork quilt! Using a variety of Halloween fabric pieces, think witches, pumpkins, and ghosts, you can begin making your very own patchwork quilt. Quilts are the perfect accessory to any home, used and loved by everyone.
We recommend checking out your local quilt shop for holiday quilt bundles. Great options when you want to create a patchwork quilt, and don’t have the scraps, are browsing charm bundles, jelly rolls, and mini-charms! Also, don’t forget to grab batting for your quilts and have fun by bringing texture to the surface using free-motion quilting techniques.
The perfect addition to so many costumes, a cape can be used for various characters ranging from royals to superheroes. To use this cape multiple times, create your piece using basic colors like white, red, or black so you can enjoy this project through the years.
For creating a cape, we recommend having fabrics like stretch velvet, fleece, or wool! Usually, you’ll use about 2 yards of fabric for an adult cape and 1 yard for a child’s cape. This is an excellent apparel project for a beginner to try their hand at. For more advanced sewers, you can add features like trims and a hood for a more finished and professional look.
We recommend having aCording Foot on hand if you plan to attach a string inside for the cape hood. Also, use a Decorative Stitch Presser Foot to add designs on your cape’s ends for extra personalization!
Spooky Placemats and Table Runner
Decorate your home with a spooky table runner and matching placemats! A fun and easy home project, you can accessorize and personalize your kitchen and dining table with fun fabric designs and colors.
When creating placemats and table runners, we recommend having some tools on hand. Inside your placemats and table runner, you’re going to place a fleece or batting; this will stabilize your project. Spray glue is an excellent adhesive for this! Once you’ve pieced together your mat, you can choose to leave it as is or add designs with free motion quilting.
For yardage, we recommend 2-3 yards of fabric. With one yard, you can create up to 8 basic-sized placemats, and with your other yards, you can create your table runner depending on your table length! Keep a ¼ presser foot on hand when you’re ready to complete your project, so you can quickly finish the edging.
Halloween Garland
Decorate your archways and doorways with a fun garland! Easily created with less than a yard of fabric for the hanging pieces and string, this décor piece is the perfect touch. For the hanging details, we recommend using backing fabric for stabilization.
For this project, keep your ¼” presser foot nearby! Perfect for creating a clean edging on each hanging piece and the edging on the hanging string, this accessory can be the only foot you need for the project.
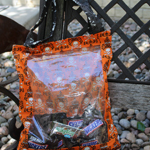
Trick–or–Treat Bag
Lastly, don’t forget to have your trick-or-treat bag ready! Wishing you a happy spooky season, download our free instructions for our see-through trick-or-treat bag here. With a finished size of 14″ x 16″, this bag will carry all those treats home!
As we grow our sewing and quilting skills, we sometimes wish we had more features, feet accessory options, stitch options, and more. It can be hard to decide when it’s time to upgrade our beloved sewing machines, but an upgrade may be needed if you face issues like needle breakage, your machine stalling on large products, or not having enough space to create.
Today we’re going to cover upgrades in JUKI. From our beginner machines to more advanced options, we recommend the best upgrade options depending on your current JUKI. Whether you’re a quilter, garment creator, or focus on home décor, creating is best done when your machine is ready to handle your projects.
Things to Consider Before Upgrading
Before you search for a new machine, sit down and think about what features, presser feet, stitches, and more you’ll want to use on your sewing machine. Keeping these notes in mind, you’ll be able to begin your search with a clear idea of what you need, and then you can focus on the more bell and whistle options that you want.
Workspace
Do you have a dedicated space for your sewing and quilting? Or are you commonly moving your machine around to create? An important thing to remember when shopping is your machine’s size and weight. For example, if you’re a quilter with a designated room, you can plan for stand-up or sit-down machine options with large workspace areas. However, if your workspace is your dining table on the weekends, consider a machine that can be easily moved and put away.
Features and Accessories
If you’ve been working on a simple beginner machine, chances are you’re working with a small number of stitch options and a few features. However, sewing machines are now equipped with many features and capabilities that can make your sewing experience fun and easy!
Depending on the type of projects you want, features like button sewing, zig-zag stitch, and more can help you build your skills and create professionally finished projects. If you enjoy quilting, finding a machine with a dual feed function can be extremely useful when creating, helping you enjoy the process better. If you’re a common user of heavy fabrics, you’d want to find a machine that offers durability and semi-industrial strength.
Completing a Test-Run
Don’t forget to try it out before your buy! If you can test-drive your dream machine options, you can see if you like the features, power, and size of a machine before purchasing. When we upgrade our sewing machine, we’re looking for one that will be durable and long-lasting, which means this can be an investment. Before purchasing, you want to ensure that the machine can handle your current and future project ideas while allowing you to learn new skills and techniques easily.
5 Features to Keep In Mind
Finally, before purchasing your sewing machine, we want to share five features we believe sewists shouldn’t live without! Making your experience easier, these features were created to help you create your projects easier and faster while teaching you new techniques.
Needle Down/Up
If you’re creating quilts, home décor, or even garments having needle up/down features can be essential in creating clean finished projects. By setting the machine, so it stops with the needle down in the fabric, you now have greater control and can turn or pivot the fabric you’re working on.
2. Automatic Buttonhole
Any project requiring a button can be completed faster and more efficiently with an automatic buttonhole. Machines that offer this feature usually come with a small variety of buttonhole options, allowing you to create pieces for garments, quilts, or decorations. Test-drive the machine before purchasing, test out the button holes to ensure you like the options available, and check out how easy this feature is to work.
3. Needle Position
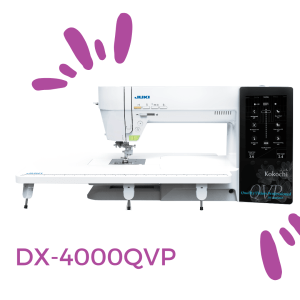
While some sewists may overlook this feature, being able to change the needle position can help you achieve particular looks on your projects. For example, you can change the needle position from left to right if your machine has a zig-zag stitch. In addition, some machines come with multiple options for needle positions, like our DX-4000QVP, which allows you to quickly move the needle to the ¼ position with a tap of a button.
4. Automatic Tension
If you’re quilting or creating a garment piece, you know that changing tension between your project pieces can be a hassle and time-consuming when you first begin. A feature sewists appreciate is the Automatic Tension. Allowing you to switch between fabrics with ease, the machine will automatically pick up the tension it needs to be at for you to create your projects and lower the amount of work you need to do!
5. Dual Feed
Lastly, a Dual Feed feature is perfect for you if you’re a quilter. By allowing the fabric to feed from both top and bottom evenly, this feature can easily handle fabrics that shift or are bulky. So now, when you’re creating your family quilts, you’ll have less stress in dealing with shifty fabric or those thick seams.
Upgrade Recommendations
If you’re planning to upgrade your sewing machine, we’ve created a list below of machine recommendations depending on your current model. Whether creating quilts, apparel, or handbags, having the right features as you grow your skills will help you make those professionally finished projects you’re aiming for.
Suppose you’ve found more room to create and a designated space for your machine to fill, look into a sit-down or stand-up quilting machine! While a table-top quilting machine is perfect for many quilters, upgrading to a sit-down quilting machine will allow your projects to grow and flourish.
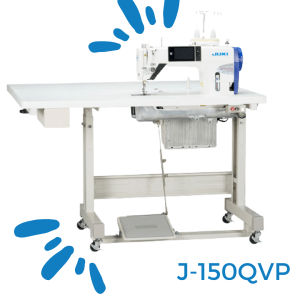
A sit-down machine like the J-150QVP offers straight-stitch and quilting like your TL-18QVP. This way, you can create your quilt pieces while working on other projects like your garment pieces and home décor. The throat space is larger on this machine as well! Now you’ll have a 12-inch spacious throat space and a 30″ x 30″ table where you can open optional leaves for even more room and easily create larger quilts!
For an even larger workspace, we recommend the J-350QVP! Like the J-150QVP, you’ll have a 12″ throat space for creating. However, your quilt space has just expanded immensely! You now have the option to convert your machine to a 5′, 7′, 10′, and 12′ frame. This frame will allow you to create quilts as large as king size.
If your focus is quilting, and you have a designated space in your home for your machine, we recommend checking out the J-350QVP Stand-Up! Upgrading from the J-150QVP to the J-350QVP will allow you to upgrade your quilt size and use new features like the Quilt Creative Touch 5.
The J-350QVP Stand Up offers options in 5′, 7′, 10′, and 12′ feet frames. From twin-sized quilts to king-sized, you’ll easily be able to free-motion quilt designs onto your quilts and enjoy the new digital aspect of quilting. Thanks to the QTC5 program that you can get as an add-on to your machine, you can now free-motion quilt with the tap of a finger.
The Quilter’s Creative Touch 5 is a user-friendly add-on that allows you to easily design and layout your projects using a Windows tablet or PC. Powered by quilt motion, the system will stitch designs onto your quilt with over 220 options. You can also master creating your designs and personalizing your quilts!
Creating apparel is fun and exciting, but it’s best when you have the right machine! If you’ve been working on clothing projects and notice you wish you had more stitch options.
Compared to the 70-HW, which holds 80 stitch patterns and five buttonhole patterns, the F Series begins with 106 stitches, including 16 professional buttonholes and three lettering fonts! Decorative stitches are a fun and easy way to add personality and texture to your garment pieces. Line your skirts, add them to your handbags or use them in home décors like table runners and pillows. The lettering options let you go the extra mile and personalize your projects!
Another bonus of upgrading your machine to the HZL-F or DX Series is the accessories available to you. Now you can use presser feet like the 1/4″ Guide Foot, Invisible Zipper Foot, Smooth Presser Foot, and more. These accessories will help your skills in garment sewing grow and allow you to test new techniques you couldn’t do on your other model machine before.
If you’re looking for a machine upgrade that goes the extra mile, we recommend the DX Series! Using a touchscreen, you can easily master the stitches and feature options on your machine. Beginners and sewists can enjoy the large selection of options available for decorative stitches, letter stitching, buttonhole options, and other features like needle positions and automatic tension.
The HZL-G Series is an excellent machine for a beginner sewist. Still, if you find your project skills outgrowing the capabilities of your sewing machine, we recommend upgrading to the DX series. While both sewing machines are computerized, the DX-4000QVP offers a 7″ touch screen that goes the extra mile for sewists testing new techniques.
While the G series offers excellent features like the automatic needle threader, free motion quilting, and powerful feeding for heavy projects, the DX offers these features and more that can ease the creation process. Now, with the DX series, you’ll be able to adjust stitch length easily, presser foot pressure, combine decorative stitching, and much more.
Designed to help you create everything under the sun, the DX series is perfect for the sewist ready to dive into their sewing journey! With the ability to make home décor, quilt, and sew garment projects, you’ll be able to excel in new techniques and project types while enjoying the ease of sewing due to the intelligent technology used in the DX machines. With features like a bobbin thread sensor and the visualization of stitches on the DX-4000QVP, you now have a concrete idea of your stitches and designs before creating.
Whether upgrading to a computerized or a stand-up quilting machine, finding the right one that can grow with you is crucial! It can be exciting to test our skills and create projects we’ve been dreaming of, so make sure to have the suitable machine and tools on hand when you need them. If you were upgrading your machine today, which one would you choose? Let us know down below!
To find a JUKI dealer near you, visit us here today!