JUKI’s Business Plus Dealers are here to help you take the first step toward building your business. The benefits of being your own boss are endless—from a flexible schedule to the freedom to pursue your passion, all while unlocking new income opportunities.
At JUKI, we are committed to supporting aspiring entrepreneurs and small business owners, which is why we created JUKI Business Plus—offering high-quality machines designed for professional results. By choosing JUKI, you gain reliable tools and expert support to help turn your creativity into a thriving business! Whether you’re launching a custom embroidery shop, a home quilting service, or expanding your sewing studio, JUKI Business Plus Dealers are ready to help you succeed.
Lone Star Quilt Shop
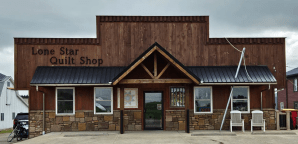
Lone Star Quilt Shop, located in the heart of Ohio’s Amish country, has honored quilting artistry and tradition for over 40 years!
With more than 4,000 bolts of fabric, handmade quilts, JUKI sewing machines, and locally made sewing cabinets, the shop is a true haven for crafters and small business owners alike. They also offer quilting and sewing classes that welcome everyone from beginners to experienced quilters.
As a JUKI Business Plus Dealer, they’re equipped to help entrepreneurs find the tools they need to launch or grow their creative ventures. Stop by their Millersburg location to experience the beauty of Amish craftsmanship and expert sewing support.
Location: Mount Hope, Ohio
Pocono Sew & Vac
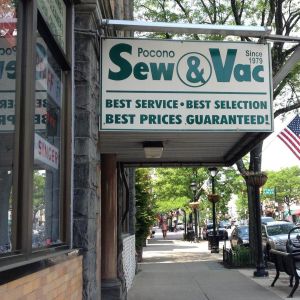
Pocono Sew & Vac has been a trusted name in sewing since 1979, providing everything from JUKI sewing machines and sergers to expert advice and repairs!
Their expansive 7,000-square-foot showroom allows customers to test machines and receive hands-on support before making a purchase. Their experienced staff is ready to help you choose the right machine for business or personal use, and their ongoing classes offer skill development for every level.
As a Business Plus Dealer, they’re passionate about helping customers turn their hobbies into income-generating ventures. Whether in-store or online, they bring decades of experience to every interaction.
Location: Stroudsburg, Pennsylvania
Ready Set Sew

Ready Set Sew is a creative hub in Chattanooga founded by Melanie Coakley, whose lifelong love for textiles and quilting led her to open the shop!
The store carries an extensive line of sewing machines, fabrics, notions, and offers a range of classes that inspire creativity in sewists of all backgrounds. As an authorized JUKI dealer and Business Plus partner, they support customers looking to transition their sewing skills into business opportunities.
Their friendly staff takes pride in providing a welcoming and informative environment where customers can explore and grow. It’s more than a shop—it’s a community where sewing dreams take root.
Location: East Ridge, Tennessee
1st Sewing Center

With over six decades of experience, 1st Sewing Center has become a trusted name in the Minnesota sewing scene!
As a family-owned business with locations in Faribault, Burnsville, and Bloomington, they’ve helped generations of makers find the tools they need for both personal and professional sewing success. Their designation as a VDTA/SDTA Hall of Fame dealership speaks to their commitment to excellence and service. Customers can try machines before buying, get personalized support, and learn how to maximize their investment with expert guidance.
Their JUKI Business Plus offerings make them a reliable partner for anyone starting or growing a sewing-related business.
Location: Various locations in Minnesota
The Sewing Machine Shop

Serving the San Francisco Bay Area, The Sewing Machine Shop offers a broad selection of JUKI machines, quilt frames, and sergers for hobbyists and professionals alike!
Their large showroom gives customers a chance to compare top brands and find the perfect equipment for their business goals. Known for award-winning service and repair expertise—including on industrial and older machines—they provide ongoing support long after the sale. Their classes and staff expertise help customers feel confident and capable as they grow their skills.
As a JUKI Business Plus Dealer, they’re the ideal place to kickstart or expand a sewing-based business in Northern California.
Location: Walnut Creek, California
No matter where you are on your business journey, JUKI Business Plus Dealers offer the tools, training, and support you need to bring your vision to life. These trusted dealers understand the challenges and rewards of creative entrepreneurship and are ready to help you choose the right machine and grow with confidence. From expert advice to in-store demos and ongoing classes, you’ll have everything you need to get started and keep going.
Visit a JUKI Business Plus Dealer near you by finding your nearest one here and take the first step toward turning your passion into a profitable business.