Sew the Heavy Stuff

Heavy fabrics like denim, canvas, and upholstery-weight materials don’t just feel different in your hands; they behave differently under the needle. Their density creates more resistance as you sew, seam allowances stack into bulk quickly, and every layer adds pressure that can affect stitch quality and control. Understanding how these materials move and respond is the key to getting clean, professional results without frustration.

Whether you’re building structured garments, durable bags, or home décor pieces, working with heavy fabrics is all about control, preparation, and the right machine setup from start to finish.

This blog will cover why heavy fabrics behave differently, how to prepare and set up your machine for thicker materials, ways to manage seam bulk and resistance while sewing, and how to finish heavy-duty projects cleanly for long-lasting results.

Why Heavy Fabrics Feel Different

Heavy materials don’t simply weigh more. They respond differently under the presser foot, through feed dogs, and across seams. Fabrics like denim and canvas are dense, less flexible, and often layered during construction. That means your machine works harder to move the fabric evenly while maintaining balanced stitches.

Seam bulk is one of the biggest challenges. When multiple layers stack at hems, pockets, or intersections, the thickness increases quickly and can affect how smoothly the fabric feeds. Without proper preparation, this can lead to uneven stitches, skipped stitches, or difficulty moving over thick areas.

Resistance is also higher in heavy fabrics, especially during long seams or layered construction. Managing that resistance through proper setup and technique is key to consistent results.

Choosing the Right Needle and Thread for Heavy Fabrics

When working with denim, canvas, and upholstery-weight fabrics, your needle and thread selection play a major role in stitch quality and durability.

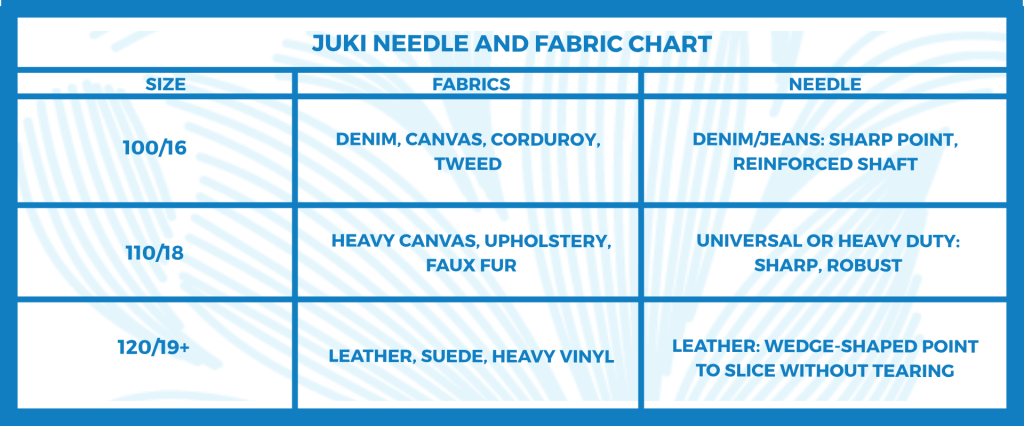
Needle Sizes for Heavy Fabrics

  • 100/16 – A great starting point for denim, twill, duck cloth, and lighter canvas projects
  • 110/18 – Better for heavyweight denim, thicker canvas, upholstery fabrics, and bulky layered seams
  • 120/19+ – Usually used for extra-thick upholstery projects, industrial-weight canvas, or really dense seam intersections, depending on your machine setup

Needle Types

  • Denim/Jeans needles – Built for dense woven fabrics
  • Sharp/Microtex needles – Clean stitching on tightly woven materials
  • Topstitch needles – Best for visible seams with heavier thread
Thread Recommendations

  • Bonded polyester thread – Strong, durable, and versatile for heavy sewing
  • Heavy-duty polyester (Tex 40–70) – Common for denim and structured projects
  • Topstitch thread – Used for bold, decorative seam lines

Matching thread strength to fabric weight ensures smoother stitching, fewer breaks, and better long-term durability.

Setting Up the TL-15 for Heavy Fabrics
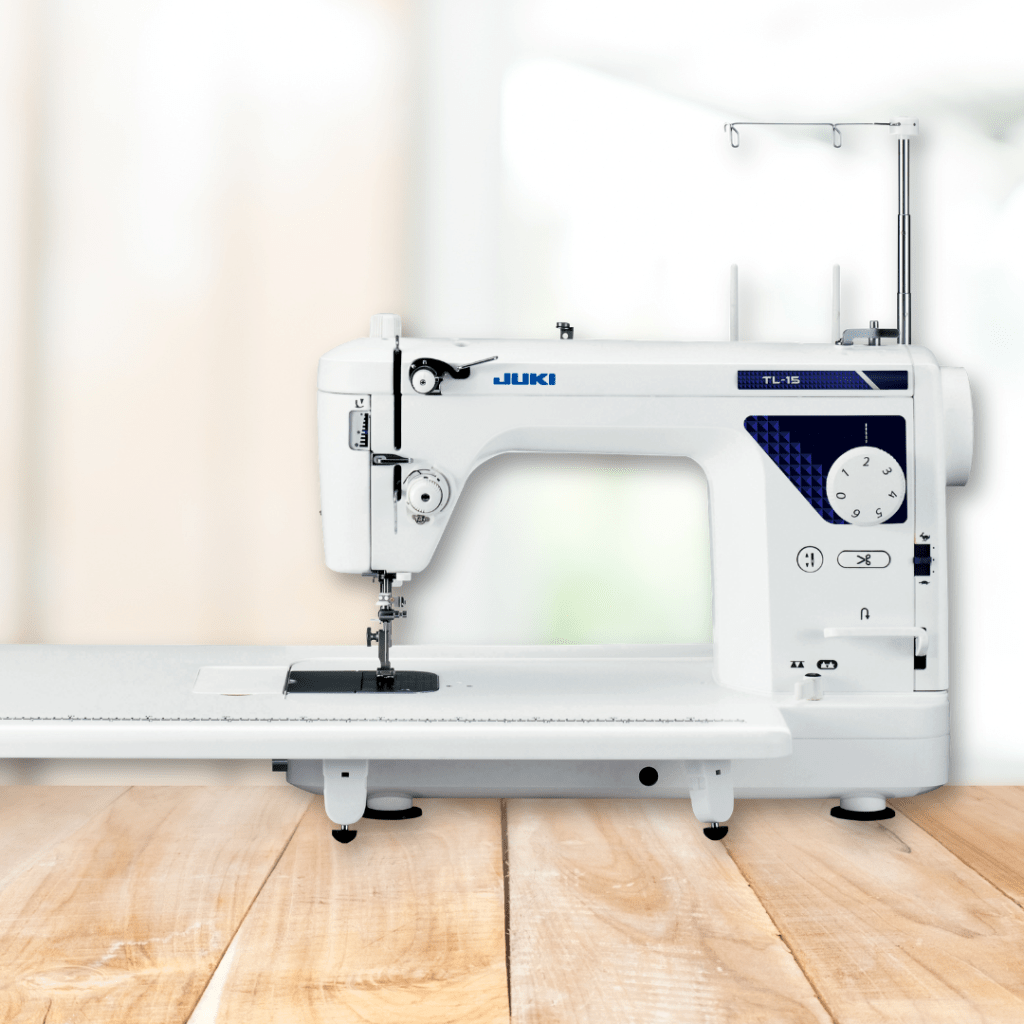
The JUKI TL-15 is designed for controlled, high-quality straight stitching on these types of materials. Proper setup helps you get the most out of its precision when working with heavy fabrics.

  1. Start with the correct needle-and-thread combination before sewing. A fresh heavy-duty needle can be essential for clean penetration through thick layers.
  2. Test tension on fabric scraps before starting your project to ensure balanced stitches on both sides. Adjust gradually if needed, depending on fabric thickness and thread weight.
  3. When sewing, let the machine feed the fabric naturally and slow down when approaching bulky seams. Supporting the fabric without forcing it helps maintain consistent stitch quality across layered sections.

Finishing Heavy Fabrics with the MO-655

A strong serger like the JUKI MO-655 can be essential for turning heavy fabric projects into clean, durable finished pieces. After construction, finishing seam edges properly helps reduce bulk, prevent fraying, and improve long-term wear — especially in fabrics like denim and canvas that can naturally unravel over time.

Heavy fabrics often create thick seam allowances that can become bulky inside garments, bags, and structured items. Serging helps refine those edges, enclosing raw fibers while reducing excess material that can add unnecessary weight inside the project.

One of the key advantages of the MO-655 is its ability to handle a wide range of fabric weights, making it useful when a project combines different materials. Whether you’re working with a canvas outer layer and cotton lining, or mixing denim with lighter interior fabrics, the serger helps keep finishes consistent across all sections.
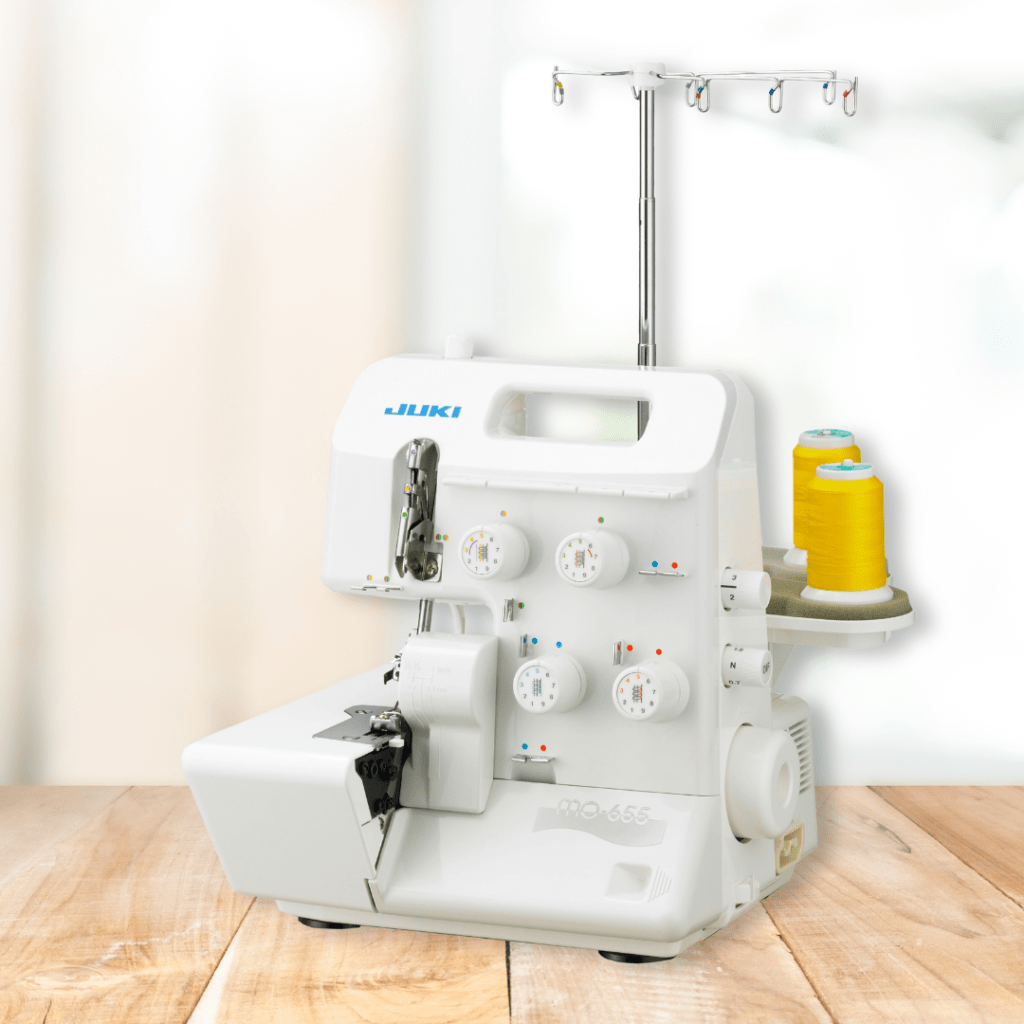
In high-stress areas like bag handles, corners, waistbands, or reinforced seams, serging adds durability by locking fibers in place and preventing fraying after repeated use. This strengthens the structure of the project without adding stiffness or unnecessary bulk.

The differential feed also helps maintain smooth, even stitching when transitioning between thick and thin sections, ensuring a clean finish even on uneven seam allowances.

The result is a more refined interior that feels intentional and professional, where every seam is clean, controlled, and built to last.

Ready to Sew Heavy Fabric Projects?

From strong, controlled construction on the JUKI TL-15 to clean, durable finishing with the JUKI MO-655, heavy fabric sewing becomes much more manageable with the right setup and workflow.

Whether you’re working with denim, canvas, upholstery fabrics, or layered structured projects, having the right machine setup can make the entire sewing process feel smoother and more controlled. Explore the machines, accessories, and tools that fit your sewing style by visiting JUKIHome.com to find your local JUKI dealer and discover the right sewing partner for your next heavy fabric project.
Sewing Storage Made Simple with JUKI

For passionate sewists and crafters, sewing machines, fabrics, and accessories are prized possessions. Whether you sew occasionally or every day, proper storage is essential to protect your investments and ensure they remain in optimal condition. In this guide, we’ll explore the best practices for storing your sewing machines, fabrics, and accessories to keep them safe and well-maintained.

Sewing Machine Storage:

Your sewing machine is the heart of your craft, so safeguarding it is crucial. Here are some detailed tips for storing your sewing machine effectively:

a. Clean Before Storage: Before stowing away your machine, thoroughly clean it. Start by removing any visible lint, dust, and debris from the bobbin case, feed dogs, needle plate, and other parts using a soft brush or lint roller. You can check out our blog on machine maintenance here.

b. Cover It Up: Use your JUKI machine cover, invest in a dedicated sewing machine cover, or use a soft, breathable fabric to shield your machine from dust and sunlight. Ensure the cover fits snugly but is not too tight, allowing for adequate airflow. Avoid plastic covers, which can trap moisture and create a breeding ground for mold and mildew.

c. Store in a Cool, Dry Place: Choose a storage location away from direct sunlight, heat sources, and areas prone to humidity for your sewing machine. Extreme temperatures or moisture exposure can damage delicate components such as electronics, motors, and metal parts. Consider storing your machine in a climate-controlled room or closet to maintain stable environmental conditions.

d. Proper Positioning: When storing your sewing machine, ensure it is placed in a flat, stable position to prevent it from tipping over or being knocked around. If your machine comes with an original case or storage container, utilize it for added protection during storage. Alternatively, opt for a sturdy storage box or cabinet that provides ample cushioning and support for your machine.

By following these guidelines, you can ensure that your sewing machine remains in optimal condition between uses, ready to bring your creative visions to life whenever inspiration strikes.

Fabric Storage:

Fabrics come in various textures, weights, and fibers, making proper storage essential for preserving their quality and longevity. Here’s an in-depth look at how to store your fabrics effectively:

a. Fold, Don’t Hang: Resist the temptation to hang your fabrics, as this can cause them to stretch out of shape over time. Instead, opt for folding to maintain their integrity. Neatly fold fabrics and store them vertically on shelves, bins, or drawers. This method not only saves space but also prevents creases and wrinkles.

b. Protect from Light: Sunlight can be detrimental to fabrics, causing colors to fade and fibers to weaken over time. Store your fabrics in a dark or dimly lit area to shield them from harmful UV rays. Consider using opaque storage containers or covering windows with curtains or blinds to minimize exposure to sunlight.

c. Use Acid-Free Storage Containers: Acidic materials can accelerate the deterioration of fabrics, leading to discoloration and weakening of fibers. To safeguard your fabrics, opt for acid-free cardboard boxes or plastic bins for storage. These containers are specifically designed to maintain a neutral pH level, ensuring that your fabrics remain pristine for years to come.

d. Maintain Air Circulation: Adequate airflow prevents musty odors and mildew growth in stored fabrics. Avoid tightly packing fabrics together, which can restrict ventilation and create a breeding ground for moisture. Instead, allow some space between fabric stacks to promote air circulation. Consider using breathable storage bags or containers with ventilation holes to enhance airflow further.

With these tips, you can ensure that your fabric collection remains impeccable and ready to inspire your next sewing project with its vibrant colors and luxurious textures!

Accessory Storage:

Sewing accessories such as needles, threads, scissors, and rulers are indispensable tools for any sewing enthusiast. To ensure they remain organized and safe, we recommend these guidelines for storage:

a. Organize by Category: Start by categorizing your sewing accessories into needles, threads, zippers, buttons, and other miscellaneous items. Use clear bins, drawer dividers, or labeled containers to keep each category separate and easily identifiable. This organization system not only saves time but also prevents clutter and frustration when searching for specific items.

b. Keep Sharp Objects Secure: Sharp tools like scissors, rotary cutters, and pins pose a safety hazard if unprotected. Store these items in dedicated storage containers or pouches with secure closures to prevent accidental injuries. Consider using magnetic strips or pin cushions to keep needles and pins within easy reach while minimizing the risk of pricks.

c. Moisture Control: Moisture can wreak havoc on sewing accessories, leading to rust and deterioration, especially for metal tools. Protect your accessories by storing them in a dry environment away from sources of moisture. Add silica gel packets to storage containers to absorb excess humidity and maintain optimal conditions. Additionally, periodically inspect your storage area for signs of moisture buildup and address any issues promptly.

d. Regular Maintenance: Like your sewing machine, sewing accessories require regular maintenance to ensure optimal performance and longevity. Periodically inspect your accessories for signs of wear, damage, or corrosion. Replace worn-out needles, sharpen dull scissors, and discard any damaged items to prevent accidents during use. Additionally, clean your accessories regularly to remove lint, dust, and debris buildup, ensuring they remain in top condition for your next sewing project.

By implementing these comprehensive storage and maintenance practices, you can keep your sewing accessories organized, safe, and ready for use whenever inspiration strikes. Happy sewing!

JUKI Tip: Air Thread Sergers VS. Traditional Manual Sergers

In this month’s tip, JUKI National Account Trainer, Alba, demonstrates the difference between an air threading serger and a non-air threading serger. The first serger we’ll showcase is the non-air threading serger, the Mo 114D. This is a non-air thread surger so this is a manually threading serger and the main difference is the way that the machine is threaded.

The other thing is that with a traditional serger, you must follow a specific order and usually it is an upper looper gets threaded first then the lower looper and then the needles in order; so there is a specific order that needs to be followed with this serger. When there is a thread breakage within this serger, it is often recommended that you start rethreading the machine from beginning to end.

Now with the air thread serger, here we’re showcasing the MO-2800, we’re going to show you their differences. Now what the air threading capability is all about, is the mechanism on the inside of the machine and its tubes, allow that jet stream of air to go through. Now in order to activate or start the air thread process we need to flip one lever, shown on video, and it really is as simple as that!

I will be turning the hand wheel towards me and what that does is if you watch this action that tube closes and you hear that click where I am now ready to activate and use the air thread. What is really nice about an air thread serger is it does not matter the order that you thread in! So I am going to go in the opposite order of the one right next to me. Now, I get my thread, I hold it with the tweezers, and I am putting between half an inch and an inch of thread in there. I have 8 to 10 in of loose thread in front of me and that lower looper has been threaded. This is typically the one that takes the most amount of time to thread on a serger and you could see just how easily. Now in order to close the door you will have to lower the lever and that’s usually where I get the call where people will say oh my door isn’t closing and that’s exactly why.

Another feature I was so excited about is the needle threader! I left one needle unthreaded and I’m going to open up the door just to make it easier to see on video, and I’m going to lower my foot and I have a lever that goes right and left. I’m threading my left needle, I have it to that position on video, and I am going to lower my needle threader and I am going to place the thread right in.

There’s a little groove on your needle threader that hugs around your needle and the thread goes right in there. You’ll notice I left it really nice and loopy and when I raise that needle threader up it threads the needle quickly.

Those are some of the differences between a regular serger and an air thread serger! I hope you enjoy these updated features, stay tuned and make sure to hit like and give us your comments!

To learn more about our JUKI Serger, visit your nearest dealer by visiting here.

JUKI Tip: Trimming Your Tajima SAI Thread

Don’t you hate when you’re about to start an embroidery and you have that thread tail hanging out? On this JUKI Tip video today we’re going to show you how quick and easy it is to trim that right up on the machine.

In the video above, you’ll see on the screen I am going to go to the icon that looks like four needles with arrows on either side. When you tap on this icon you can move to whichever needle you need to trim with ease, without disrupting your current project.

In our video you’ll see it’s set up on needle number one and needle number one is the one with the thread that we direct you to. You’ll see me press and hold the scissor icon, and it will cut and remove that thread from your needle.

We hope this quick and easy tip helps you the next time you’re creating on the TAJIMA Sai Embroidery machine! What tip do you want to see next? Let us know down below!

Crafting Your JUKI Sewing Ritual

Whether you’re an amateur enthusiast or a seasoned seamstress, this new year, JUKI will help you establish a ritual you can follow before diving into your sewing endeavors. These steps can significantly elevate your crafting experience! Crafting a dedicated routine for your JUKI sewing machine ensures a smooth and gratifying sewing journey.

Embrace the Ritual
Before the machine’s hum fills the air with creative promise, embark on a ritual that sets the stage for a seamless sewing session. Here’s a guide to crafting a pre-sewing routine specifically tailored for your JUKI machine:

  1. Needle Check:
    Every project starts with the first stitch. Before commencing your project, inspect the needle for any signs of wear, such as dullness or bends. Ensure it’s securely fastened and aligned correctly. Replace the needle if it shows any signs of damage or has been used for an extended period.

A damaged needle can cause many issues in your project process and creation. Your stitch quality can go down with a broken needle, as this can lead to skipped or uneven stitching. The fabric you’re working on can be damaged and lost due to nonrepairable holes. The needle can break if already chipped and damage your machine or yourself, and lastly, you won’t get the results you’re looking for.

The needles are an important first step to ensuring your machine is ready to create.

  1. Bobbin Space Cleaning:
    A clutter-free bobbin area is vital for smooth stitching. Remove the bobbin case and clean out any lint, dust, or stray threads that might have accumulated. Use a small brush or the machine’s cleaning tools to ensure the area is pristine.

Cleaning your bobbin space will help you prevent any malfunctions while creating like uneven stitches, thread breakage, or skipped stitches. We’re also aiming to avoid those thread jams, maintain consistent tension, and extend the lifespan of your machine.

Lastly, debris in the bobbin area can transfer onto the fabric, causing stains or marks, so keep your projects clean and smooth with a quick sweep of your bobbin area.

  1. Thread Space Maintenance:
    Keeping the upper thread path clean ensures consistent tension and prevents thread snags. Use a lint brush or compressed air to remove debris from the tension discs, thread guides, and around the needle. A clean thread path is crucial for optimal stitching quality.

When you don’t clean your thread space, you might notice inconsistent tension due to dust or lint accumulating, which can interfere with the tension discs or thread guides. You’ll also be able to extend the lifespan of your thread and needle with clean thread space and preserve your fabric from dealing with stains or marks from the debris.

Keeping this area clean is optimal for getting that excellent quality finish you want on your projects!

  1. Stitch Plate Selection:
    Ensure the appropriate stitch plate is installed depending on your project and the type of stitch you’ll be using. Swap to a straight stitch plate for delicate fabrics or a zigzag stitch plate for decorative or stretch stitches.

The right plate will help you achieve quality stitch accuracy, protect your needle from breaking or damage, and reduce puckering in your projects. JUKI also has different options for plate selection on light or heavy-weight fabrics.

  1. Bobbin Thread Compatibility:
    Confirm that the bobbin thread matches the upper thread in weight and type. Consistency in thread choices ensures uniform and balanced stitching.

Having the correct bobbin will also help you with tension control, as mismatched bobbin thread could lead to difficulties in achieving balanced tension. Having the correct tension will also ensure that your fabric doesn’t receive any damage.

And remember, specific sewing projects, such as quilting, may require specific types or weights of bobbin thread for optimal results.

  1. Foot Selection and Attachment:
    Choose the appropriate presser foot for your project. Attach it securely to the machine to guarantee smooth fabric feeding and precise stitching. Different feet cater to various sewing techniques; ensure you have the correct one for your intended stitches.

Having the right foot is an important step to a smooth sailing project. The right presser foot will allow you to maintain excellent stitch quality, and certain feet have markings or guides that assist in maintaining precise seam allowances or stitching lines.

For example, some sewing projects require specialized techniques that can only be achieved with specific presser feet. An edge-stitching foot helps create precise edge stitches. Check out your JUKI options by visiting here!

  1. Test Stitching:
    Before beginning your project, perform a test stitch on a scrap fabric. This allows you to verify the thread tension, stitch length, and stitch quality before starting on your main project.

Testing stitches will help ensure your machine is calibrated correctly, that your tension settings are in order, and that your stitches will finish clean. Taking the time to perform test stitching or practice stitches before beginning your main project is a valuable step.

Crafting a pre-sewing ritual for your JUKI sewing machine establishes a foundation of consistency and attention to detail. By diligently checking the essentials – from needles to thread paths and stitch plates – you pave the way for a hassle-free and enjoyable sewing experience!

Embrace this ritual as a series of steps and a meaningful ceremony that honors your craft. Let your JUKI machine reflect your dedication to precision and commitment to turning every sewing project into a masterpiece. Start your sewing journey on the right foot by embracing the art of preparation with your trusted JUKI machine!