Embrace the Cozy Season

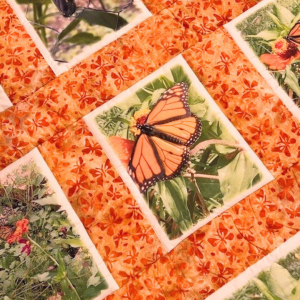
It’s almost time for Fall JUKI lovers, so let’s indulge in sewing projects that capture the essence of Fall! Whether you’re a sewist or a quilter, Fall offers a beautiful opportunity to create cozy, stylish, and functional items for yourself and your loved ones.

In this blog, we have three projects you can create this autumn and recommendations for JUKI machines, accessories, fabrics, notions, and threads to ensure your creations turn out beautifully! Let’s go ahead and dive into one project we’ll be sharing later this month.

  1. Autumn Throw Pillows

The JUKI TL-18QVP is ideal for creating autumn throw pillows. It offers precision and versatility for piecing and quilting. Its robust build and advanced features, like the automatic needle threader and adjustable presser foot pressure, make it perfect for adding decorative touches to your pillow project.

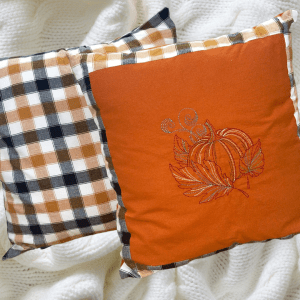
We recommend using autumn colors like deep oranges, rich browns, and forest greens in fabrics like cotton or linen. These materials are durable, easy to work with, and ideal for home décor. Consider patterns with leaves, pumpkins, or plaid for a seasonal touch!

When it comes to notions, choose a high-quality pillow form for a plush finish, or use the stuffing for a custom shape like a leaf, ensuring it’s filled to your desired firmness. For marking your design, use a fabric marking pen or chalk marker, preferably with disappearing ink for easy removal.

When it comes to thread, select a high-quality polyester in a matching or contrasting color to enhance your pillow’s design. This will provide durability and a smooth finish. A universal 80/12 needle works well for most cotton and linen fabrics, while a 90/14 needle is better suited for heavier materials, such as vinyl, if you’re planning to use it in your projects.

Stay tuned here for our project release!

JUKI Accessories:

  • Walking Foot: This foot is ideal for sewing through multiple layers of fabric, ensuring smooth feeding of the fabric for a professional finish. It’s handy when working with thicker fabrics or multiple layers.
  • Free Motion Foot: Perfect for adding custom quilting designs and free-motion embroidery to your pillow. It allows for greater control over stitching patterns and design elements.

Additional Tips:

  • Pre-Wash Fabric: Pre-wash and iron your fabrics before cutting to prevent shrinkage and ensure smooth sewing.
  • Press Seams: Press seams open or to one side to create a crisp, professional finish.

2. Cozy Beanie

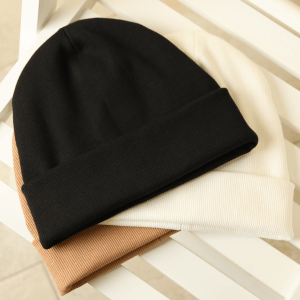
The next project we’d recommend trying your hand at is a cozy beanie! For a cozy beanie, select warm and stretchy fabrics like fleece or jersey in autumn colors or patterns. These materials provide comfort and warmth on chilly days, and those with spandex or elastane offer added stretch.

The JUKI MO-2000QVP serger is a good choice for this project. Our sergers can efficiently handle knit fabrics and sew and finish edges with precision in one step. You can incorporate an elastic band to keep the beanie in place and maintain its shape to ensure a snug fit. Fabric clips can help hold knit fabric layers together without causing snags or distortions.

Remember your thread! Polyester thread offers both stretch and durability to prevent breakage or unraveling with the fabric’s stretch. A ballpoint needle, size 70/10 or 80/12, is ideal for knit fabrics, as its rounded tip helps avoid snags and skipped stitches.

JUKI Accessories:

  • Elastic Foot: Attach elastic bands evenly and securely.
  • Gathering Foot: Create ruffles or gather fabric; it can add decorative elements to your beanie.

Additional Tips:

  • Stretch Stitch Settings: Use the serger’s stretch stitch options or differential feed settings to ensure the fabric maintains its stretch and does not distort.
  • Use Fabric Clips: Instead of pins, use fabric clips to hold knit layers together to avoid snagging and ensure a smooth sewing experience.

3. Quilted Autumn Table Runner

For this project, check out the JUKI Kirei HZL-NX7. Like our other computerized machines, The HZL excels in quilting projects by providing ample space and quilting features perfect for crafting detailed and beautiful autumn table runners. The ample throat space and quilting capabilities make it ideal for handling larger projects.

For a quilted autumn table runner, choose cotton quilting fabrics in warm autumn colors and patterns. Fabrics like flannel or cotton with leaf or plaid designs will give your table runner a seasonal touch. Quilting cottons are durable and come in a range of fall-themed prints!

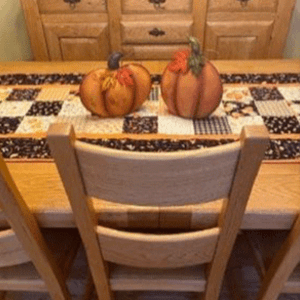
Check out medium-weight batting to provide coziness and structure to your table runner. Cotton or polyester batting works well for quilting projects, too. We recommend keeping your quilt ruler and rotary cutter nearby for precise cutting and piecing of quilt blocks. This helps to ensure accurate measurements and clean edges.

And, of course, thread! We recommend using 100% cotton quilting thread to achieve a smooth, durable finish. This thread can be used for both piecing and quilting since it blends seamlessly with quilting fabrics. The quilting needle, size 75/11 or 80/12, both are suitable for handling multiple layers of fabric and the thickness of batting.

JUKI Accessories:

  • Quilting Foot: This is essential for free-motion quilting. It allows you to maneuver your quilt with ease and helps create intricate quilting designs without getting caught in the fabric.
  • Extension Table: If you need extra space, we recommend this one. It’ll provide extra space for quilting larger projects and help maintain smooth fabric movement. It’s beneficial for managing the bulk of a quilted project.

Additional Tips:

  • Quilt Designs: Experiment with different quilting designs, such as meandering or echo quilting, to add texture and interest to your table runner.

These fall projects are a delightful way to decorate your home and wardrobe with seasonal charm! Creating projects like throw pillows, beanies, and table runners brings a touch of Fall into your daily life and enjoyment in making something beautiful and functional.

Each project offers an opportunity to experiment with seasonal fabrics and patterns, transforming simple materials into cozy, personalized décor and accessories that reflect the theme of Fall.

With the right JUKI machine and accessories, you’ll have the tools to craft these fall projects easily! Whether you’re using a serger, computerized, or semi-industrial sewing machine, these machines’ quality and versatility ensure your projects turn out beautifully. Find the right fabrics, notions, and threads, and you’ll be equipped to produce stunning pieces that celebrate the fall season in style. Happy sewing!

Adventures in JUKI Decorative Stitches

When it comes to sewing, the magic is in the details, and nothing adds a touch of flair quite like the right decorative stitch! Whether you’re embellishing a cape or creating a statement dress, JUKI’s decorative stitches open up a world of creative possibilities. In this adventure, we’ll dive into our favorite stitches and share tips on when and where to use them to make your costume stand out!

Machine Options

Before we dive into specifics, let’s take a moment to talk about the JUKI sewing machines that offer decorative stitches. Known for their precision and durability, JUKI machines come equipped with a wide variety of stitches that cater to every sewing need, from basic to intricate projects.

  • JUKI HZL-F Series: The HZL-F Series are powerhouse options that can reach over 250 built-in stitches, including decorative. You’ll find everything from floral patterns to geometric designs, perfect for adding unique touches to your projects. This model also includes alphanumeric stitches, so you can personalize your creations with names or messages!
  • JUKI DX QVP Series: The DX QVP Series offers up to 287 stitch patterns, including several exclusive decorative stitches designed for quilters and fashion creators alike. This machine is perfect for costume accessories that require precise stitching and detailed embellishments! The machine’s advanced features, like the floating presser foot, make it easy to work with thick fabrics or multiple layers.
  • JUKI HZL-DX Series: Reaching up to 287 stitches, including 16 different buttonhole styles and various decorative stitches, the HZL-DX Series is ideal for those who want to experiment with various designs in one project. The machine’s intuitive controls make it easy to switch between stitches, allowing you to quickly add intricate details to your projects.

Decorative Stitches On JUKI

Now, let’s talk about some decorative stitches in your machines. These stitches are more than just pretty patterns—they’re functional add-ons that can elevate your sewing projects. Here are a few recommendations on how to make the most of these stitches in your next creation:

  1. Scallop Stitch: The scallop stitch adds a delicate, feminine touch to the edges of the fabric. It’s perfect for finishing off a scarf with a soft, wavy edge or adding a whimsical border to a cape. Pair it with a contrasting thread for extra pop. It is perfect for the edges of scarves, capes, and hems.
  2. Chevron Stitch: The Chevron stitch brings your projects a bold, geometric flair. This is a fantastic choice for accenting belts or bag straps, offering durability and a stylish design. It also works wonderfully around the brim of a hat, adding texture and visual interest. Perfect for belts, bags, and much more!
  3.  Leaf Stitch: The leaf stitch is ideal for nature-inspired designs. Imagine a flowing cape with a vine of leaves winding around the edges or a bag with leafy embellishments. This stitch adds an organic feel to your projects, making it perfect for costumes with a natural or fantasy theme. Perfect for capes, bags, and collars.
  4. Star Stitch: The star stitch is playful and eye-catching, perfect for superhero-themed costumes. It can be used to create star-studded borders on capes, add a touch of sparkle to hats, or embellish belts and bags. This stitch is a must for any costume that needs a bit of magic. Perfect for capes, hats, and superhero or space-themed accessories.
  5. Candlewicking Stitch: The candlewicking stitch creates a textured, almost bead-like effect on the fabric. Use it to create intricate designs on scarves or add texture to belts. It’s a great way to introduce a three-dimensional element to your accessories. It is perfect for scarves, belts, and detailed embellishments.

Bringing It All Together: Creating the Perfect Costume Accessories

Now that we’ve covered some of our favorite decorative stitches let’s talk about how to bring them together in your projects. When designing costume accessories, consider the overall theme and how the stitches can enhance it. Here are a few ideas:

  • Hats: Add a chevron or star stitch around the brim to create a statement piece that ties in with your costume’s theme.
  • Capes: Use a combination of leaf and scallop stitches to add movement and elegance to the edges.
  • Belts: A bold chevron or candlewicking stitch can transform a simple belt into a standout accessory.
  • Bags: Incorporate a variety of stitches like the leaf and star to add personality and texture.

Remember, the key to successful decorative stitching is practice and experimentation. Try different thread colors, stitch lengths, and placements to see what works best for your project.

Whether creating a full costume or adding a special touch to an accessory, JUKI’s decorative stitches offer endless possibilities. We hope this guide inspires you to experiment and have fun with your sewing projects. Don’t forget to share your creations with us—happy stitching!

Personalize Back-to-School Gear

As the back-to-school season approaches, there’s excitement in the air for students and parents alike! This time of year often comes with the hunt for the perfect school supplies. But why settle for ordinary when you can make their school items uniquely theirs? Enter the TAJIMA Sai 8-needle embroidery machine from JUKI, a game-changer for personalizing back-to-school gear with intricate and vibrant designs! In this blog, we will cover ways you can bring a personal touch to your child’s school gear with the TAJIMA Sai.

Transform Those School Essentials

Whether it’s a laptop sleeve, sneakers, binder zipper bag, or pencil bag, the TAJIMA Sai allows you to add a personal touch to all your child’s school items. The versatility and precision of this machine mean that you can create detailed embroidery on various fabrics and surfaces, turning everyday items into something extraordinary.

Laptop Sleeve: Keep your child’s laptop safe and stylish. With the TAJIMA Sai, you can embroider their name, initials, or favorite quote on their laptop sleeve. Choose from a wide range of fonts and colors to match their personal style.

Learn how to create your very own laptop sleeve here! Using the TAJIMA Sai, you can easily elevate this project with your touch of personalization.

Sneakers: Stand out in the school hallway with customized sneakers. Add patterns, icons, or your child’s favorite sports team’s logo. The possibilities are endless, and with the TAJIMA Sai’s 8-needle system, you can mix and match colors seamlessly!

Design your very own sneakers by visiting here!

Binder Zipper Bag: Organize your child’s school supplies in a personalized binder zipper bag. Embroider their name, class schedule, or motivational words to inspire them throughout the day. It’s a perfect blend of function and flair.

Create your own binder zipper bag by visiting us here and learning more about the Writer Plus program below to add that touch of personalization!

Pencil Bag: Always keep your child’s pencil bag intact. With custom embroidery, you can add their name, favorite hobby icons, or even cute designs that reflect their personality.

Learn how to personalize your pencil bag with the TAJIMA Sai by visiting here!

TAJIMA Writer Plus Program

The TAJIMA Writer Plus program is your gateway to endless creativity. This software comes pre-installed with various design options that you can easily apply to your projects. Here’s a closer look at what it offers:

Pre-Installed Designs: The program includes a rich library of pre-installed designs, such as floral patterns, geometric shapes, animal motifs, and more. These designs are perfect for quick projects and adding a touch of fun to your child’s school items.

Custom Design Creation: Feeling creative? The TAJIMA Writer Plus program allows you to create your designs from scratch! You can draw inspiration from your child’s interests, hobbies, or favorite themes. Whether a complex pattern or a simple monogram, the software gives you the tools to bring your vision to life.

Easy-to-Use Interface: Even if you’re new to embroidery, the TAJIMA Writer Plus program is user-friendly. The intuitive interface makes selecting, customizing, and embroidering your designs easy. Plus, the program supports various file formats, so you can import and work with external designs effortlessly.

Design Ideas for Your Embroidery Projects

Names and Initials: Adding your child’s name or initials is a classic way to personalize their school items. Choose from different fonts and thread colors to make it truly theirs.

Favorite Sports Teams: Show off their school spirit or support their favorite professional sports team by embroidering their logo or mascot. It’s an excellent way for your child to connect with fellow fans and display their loyalty!

Hobbies and Interests: Whether they love music, art, science, or sports, you can reflect their passions on their gear. Embroider icons like musical notes, paintbrushes, basketballs, or telescopes showcase what they love.

Inspirational Quotes: Keep your child motivated with inspirational quotes or affirmations. A few words of encouragement on their pencil bag or laptop sleeve can go a long way in keeping their spirits high!

Fun Patterns and Icons: From cute animals and whimsical patterns to edgy graphics and abstract designs, the TAJIMA Sai allows you to experiment with various styles. Mix and match designs to create something uniquely theirs.

Back-to-school season is the perfect opportunity to express your child’s individuality through their school supplies. With the TAJIMA Sai 8-needle embroidery machine and the TAJIMA Writer Plus program, you can quickly transform everyday items into personalized masterpieces. Whether adding their name, showcasing their interests, or simply having fun with different patterns, embroidery brings a touch of uniqueness to everything you create. So, head back to school in style and make this year your child’s most personalized one!

From Fiber to Fabric with JUKI

Immersing ourselves in a new hobby may lead us to questions we never thought of asking! For example, at the heart of our beloved sewing and quilting projects lies fabric, the canvas upon which sewists and quilters weave their magic. But have you ever wondered about your fabric’s journey before it reaches your fingertips?

Here, we’ll cover the fascinating fabric creation process, where raw fibers transform into the vibrant materials that inspire our projects! Whether you’re a seasoned sewist or just starting, understanding this journey adds a new layer of fascination to your crafting experience.

Let’s Talk Fibers

Natural fibers, such as cotton, wool, and silk, are sourced from plants or animals. Cotton cultivation occurs primarily in warm climates where mature cotton bolls are picked from the plants and then subjected to ginning. This process separates the fibers from the seeds and other impurities.

Wool is obtained through shearing sheep. It’s followed by cleaning the wool to remove dirt and grease, carding to align the fibers, and optional dyeing for coloration. Silk production involves rearing silkworms, harvesting their cocoons, boiling cocoons to soften the sericin coating, and then reeling the silk filaments to produce yarn.

Then, we have synthetic fibers like polyester and nylon, made from oil-based chemicals. Polyester is created by combining small molecules from petroleum, a process called polymerization. These combined molecules are then melted and pushed through tiny holes called spinnerets to form long strands of fibers.

Nylon goes through a similar process where specific chemicals derived from petroleum are mixed to form polymers, which are then pushed through spinnerets and cooled down to create nylon fibers. Essentially, polyester and nylon are made by melting oil-based ingredients and shaping them into fibers.

These processes highlight the contrasting methods of obtaining raw materials for natural and synthetic fibers, each contributing to the diverse range of products available in the textile industry!

Spinning

After the fibers are harvested from natural sources or synthesized from petrochemicals, the next step in the textile production process is spinning them into yarn! The spinning process involves aligning the fibers and twisting them together, forming a continuous thread. This process is crucial as it imparts strength and coherence to the yarn!

Several methods of spinning are employed in the industry. One method is ring spinning, a traditional technique for producing fine, strong yarn. The fibers are drawn out, twisted, and wound onto a bobbin in a ring spinning.

Another method is open-end spinning, a faster alternative that results in bulkier yarn. In open-end spinning, the fibers are fed into a rotor that rotates rapidly, pulling and twisting them together to form yarn. Each spinning method offers distinct advantages and is chosen based on the final yarn’s desired characteristics and the production efficiency required.

Dyeing

Dyeing is the next process in textile manufacturing, where color and patterns are infused into yarn or fabric. This step is versatile and can be carried out at different stages of production!

Fiber dyeing, also known as stock dyeing, is a method in which the fibers are dyed before being spun into yarn. This approach ensures uniform coloration throughout the yarn and fabric.

Yarn dyeing, in contrast, involves dyeing the yarn after it has been spun. It is commonly employed for creating patterned fabrics using different colored yarns.

Lastly, piece dyeing occurs after the fabric is woven or knit. In this method, the entire fabric piece is submerged in a dye bath, allowing for the uniform application of color.

Each dyeing method offers distinct advantages in color control, efficiency, and flexibility, catering to various requirements in the textile industry!

Weaving and Knitting

Following the dye production stage for yarn, the process advances to transforming yarn into fabric, achieved through either weaving or knitting techniques.

Weaving is a method that entails interlacing yarns at right angles to form a fabric. Basic weave patterns such as plain, twill, and satin are commonly utilized. Each imparts distinct characteristics to the resulting fabric, including texture, durability, and appearance. The chosen weave directly influences the fabric’s properties, like its drape, strength, and surface finish.

Knitting involves interloping yarns to create fabric. Knitted fabrics, like jerseys and rib knits, are known for their elasticity and stretchability, which distinguishes them from woven fabrics. The knitting process offers versatility in fabric design and texture and variations in stitch patterns, allowing for the creation of diverse fabric structures and surface effects.

Each technique—weaving and knitting—contributes to the spectrum of fabrics available in the textile industry, catering to various applications and consumer preferences.

Finishing

After the fabrication process through weaving or knitting, the next stage is the finishing process, which enhances the fabric’s appearance, texture, and longevity.

Mechanical finishes use techniques like brushing, which raises the fabric’s surface fibers for a softer feel and enhanced texture. Calendaring involves the application of heat and pressure to smooth the fabric’s surface, creating a fantastic sheen and improving the feel when you pass your hand on the fabric. Embossing creates decorative patterns or textures on the fabric’s surface, adding an excellent aesthetic appeal.

We also have chemical finishes, including treatments to boost the fabric’s functionality. These treatments include applications for water repellency, ensuring the fabric repels water and remains dry in wet conditions. They also have wrinkle-resistance treatments that minimize creasing and maintain the fabric’s smooth appearance. Chemical finishes may also include flame inhibitor treatments to enhance the fabric’s resistance to ignition and combustion, making it safer for wear.

Together, these finishing processes are crucial in refining the fabric’s characteristics, making it more visually appealing, comfortable, and functional for its intended use!

Cutting and Sewing

Once the fabric is finished, it is prepared for the final production stage: pattern making and assembly into textile products. This phase begins with pattern making, creating templates for the desired item. These patterns serve as guides for accurately cutting the fabric into individual pieces. The fabric is then carefully selected to meet the project’s specific requirements. This involves considering factors such as fabric type, weight, color, and pattern.

Once the fabric is chosen, it is distributed to local quilt and sewing shops, where it becomes available for purchase by creators like you! These shops are hubs for enthusiasts and professionals, providing various fabrics, notions, and tools for sewing and quilting projects.

Understanding the fabric creation process allows you to choose the best materials for your sewing and quilting projects. Each step, from harvesting raw materials to sending the final product to your favorite dealers, plays a crucial role in the quality and characteristics of the final fabric. The next time you start a project, take a moment to appreciate the journey your fabric has taken to reach your hands. Check out your nearest JUKI dealer and see the fabrics available here! Happy sewing and quilting!

Personalize Your Spring Projects with JUKI

Discover the boundless possibilities of personalization with the RICOH Ri 100 direct-to-garment printer and the Tajima SAI embroidery machine! In this blog we’ll discuss how you can customize apparel and embellish accessories to show off your unique flair and individuality! With these powerful tools, get ready to elevate your sewing projects to new heights.

Designing with Tajima:

Imagine having access to a treasure trove of embroidery designs at your fingertips. Tajima’s software, Writer’s Plus, offers a diverse array of intricate patterns and motifs spanning various themes. The options are as vast as your imagination, from majestic animals to pretty flowers!

For animal lovers, the Tajima Program offers various designs featuring creatures big and small. You can find butterflies, dogs, and even wild animals like bears for your next project!

Space enthusiasts can explore the cosmos without leaving the comfort of their stitching corner. Galactic marvels like planets, stars, and more await, ready to adorn your creations with an otherworldly charm!

Rev up your sewing projects with designs inspired by the world of cars and racing. From fun family cars to exciting off-road vehicles, these designs add a dash of adrenaline to any fabric canvas.

The Tajima Software also offers a lineup of sports-themed patterns encompassing various athletic pursuits. Football, basketball, soccer, tennis – you name it. Elevate team jerseys, gym bags, or sports accessories with these spirited designs, just in time for Summer!

Step-by-Step Guide to Unleashing Tajima Magic

Now, let’s discuss the magic of the Tajima Software with a step-by-step guide on how to use these designs to create unique sewing projects.

Step 1: First, familiarize yourself with the Tajima embroidery software. Explore the design library, navigating through the various themes and motifs available. Please select your desired design and ensure it suits the dimensions of your project. You can find the size by checking the measurements of your Tajima Accessory, like your Magnetic Frame!

Step 2: Select a suitable fabric for your project, ensuring it complements the chosen design. Consider the thread colors that best enhance the design’s visual impact on the fabric. Before hooping your design, decide whether to fuse a lightweight tear-away. This can help with puckering on your designs!

Hat embroidered on TAJIMA Sai by JUKI Team

Step 3: Proper hooping is crucial for achieving neat embroidery. Secure your fabric in the embroidery hoop, ensuring it’s taut and evenly stretched to avoid puckering.

Step 4: Transfer the selected Tajima Design to your USB and then to your embroidery machine. Double-check the design’s alignment and positioning on the fabric before commencing stitching.

Step 5: Prepare your machine for embroidery, ensuring the correct thread colors are loaded and the settings match the design’s requirements. Follow the instructions on the Tajima Panel and press start. Watch as the magic unfolds with each placed stitch!

Step 6: After the embroidery, carefully remove the fabric from the hoop. You can also choose to restitch your design for a more filled-in finish. Trim any excess threads and admire your masterpiece.

You can learn more about how to set up and create projects on the Tajima Sai here.

RICOH Designs:

The standout feature of the RICOH Ri 100 is its ability to print directly onto the fabric, enabling users like you to produce unique textile designs tailored to your specific vision. Whether it’s a bold pattern, a subtle texture, or a full-color image, the DTG machine delivers stunning results in a wide range of colors!

The RICOH Ri 100 empowers you to add intricate designs to your sewing projects, whether intricate artwork, fun designs, or exciting typography. The RICOH ensures that every element is faithfully reproduced with precision and accuracy.

In addition to fabric designs, the RICOH Ri 100 can print vibrant photos directly onto garments, offering a unique way to personalize sewing projects. From family portraits to scenic landscapes, the DTG machine transforms ordinary fabrics into wearable works of art, adding a personal touch to every print!

Whether embellishing accessories, customizing home decor items, or adding branding to merchandise, the DTG machine offers limitless opportunities for personalization in sewing projects. The RICOH includes a variety of designs that are ready to go right when you set her up, and you can learn more about how to set up your designs here.

Step-by-Step Guide to Using Your RICOH

  1. Preparation:
    • Prepare your design file using the RICOH design software, and confirm the project specifications for size, resolution, and color mode.
  2. Fabric Preparation:
    • Choose the fabric or project you’ll be printing on and pre-press it! Ensure the fabric is clean, flat, and positioned securely on the RICOH’s tray.
  3. Loading the Design:
    • Connect your computer directly to the printer via a USB drive to load your design file onto the RICOH Ri 100. Then, use the software to adjust the design’s placement, size, and orientation as needed.
  4. Printing:
    • Once your design is loaded and properly positioned, use the start button to initiate the printing process. Printing takes approximately 2 minutes. Just load and unload your tray—it’s that easy!
  5. Finishing:
    • Once the printing is complete, remove the tray from the printer and transfer it to the RICOH finisher.
Quilt created by Kelly with RICOH Ri 100

Curing Temperature: The recommended curing temperature typically ranges from 320°F to 350°F (160°C to 177°C). This temperature range is just right for curing the ink and ensuring its adhesion to the fabric!

Curing Duration: As a general rule of thumb, curing durations typically range from 30 seconds to 3 minutes. However, keep in mind your project and design size.

After curing, allow the fabric to cool completely before handling.

Let Your Creativity Soar

The beauty of Tajima and RICOH lies not just in their capabilities but also in their ability to infuse your personality and charm into your sewing projects. Whether creating personalized gifts, embellishing garments, or adding flair to home decor, these designs serve as your creative accomplice!

So, embrace the Tajima and RICOH Ri 100, let your imagination run wild, and create your way to a world where fabric transforms into a canvas of boundless creativity. With every stitch or print, you’re not just crafting; you’re creating stories and memories and adding a touch of your unique essence into every project.

In the realm of projects, the only limit is your imagination, and with JUKI, TAJIMA Sai, and RICOH lighting the way, the possibilities are as vast as the cosmos itself. Let your projects tell a story that’s uniquely yours. Happy creating!