For this month’s JUKI tip, we go over how to use the automatic needle threader that can be found on select serger machines in our MO Series! Creating an easier sewing experience for you, this feature is perfect for getting your machine ready to create, without the hassle.
Follow along below as our National Account Trainer Alba showcases how to thread your automatic needle threader.
The needle threader on the Serger from JUKI is a mechanism that has a lever that goes right and left, whether you’re choosing to thread the right or left needle, before being pushed down to cover the needle in front of the eye.
As you watch the video, you’ll notice how our JUKI National Account Trinaer Alba moves the mechanism to the right-hand position, turning the hand wheel towards herself until the needles reach the highest possible position.
Ensuring the lever is set for the right-hand needle, we’re going to lower the self-threading lever, until it comes right around the needle. Here is where you’ll notice how the mechanism just hugs that needle, giving you the perfect spot to place your thread. Now, remember, for the best experience ensure your thread is not taut, and instead loose. This way the machine is able to thread your needle, without tugging.
Now, as you raise up the needle threader, as shown in the video, you’ll notice how it forms a loop that you can carefully pull through the eye of the needle, completing the threading of your needle. Pull the thread behind, and you’re all set on the right-hand needle!
For the left needle, we’ll position our needle threader for the left-hand position, before lowering the mechanism where it will hug your needle. Next, we recommend using two hands to place that thread in the groove of the needle threader; this will be right at the eye of the needle.
As you raise your needle threader mechanism, you’ll notice the loop form once again, before pulling the thread completely through and towards the back of the machine.
We hope this helps you the next time you want to use the automatic needle threader on your serger machine! What tip do you want to see next from JUKI? Let us know in the comments below!
Get ready for a new season with a new look using JUKI! Whether you’re creating a new jacket, a dress for a night out on the town, or a swimsuit for the sunny days approaching, our JUKI machines are ready to help bring your projects to life. Enjoy the Season, and give yourself a new look!
Check out our serger machines and contact your local JUKI dealer here to learn more about our machine features by contacting us here today!
If you’re new to using a serger, you might wonder what type of stitches you can create and what kind of fabrics and projects you can work on. Today, we will cover what a serger does, the kinds of stitches they can create, and how they can be used in your projects.
What is a Serger?
A serger is a specialty machine better known as an overlocker. We’ll jump into the stitches a serger can complete for you later in the blog, but an overlock stitch will only be found on sewing machines. An overlock machine will create a professional-grade binding on your fabric using three or more threads. For many, the professional finished look offered by using a serger is why they will invest, becoming owners of both a sewing machine and a serger.
Sergers can also speed up the creative process as a three-in-one machine. A serger will sew seams, trims off seam allowances, and finishes raw fabric edges in one process. The knife on the right side of your stitching space trims your work while you sew quickly, saving you the work. They also sew at high-speed levels, not found on sewing machines, and only sew on the left side of needles.
You can use your sewing machine to sew hems, gather fabric with differential feed, sewing knits, and other stretchy fabrics, and possibly create cover and chain stitches, depending on your chosen machine.
What Stitches does a Serger Create?
2 – Thread Overlock: This is the simplest overlock, and its primary use is preventing fraying in your project. While not strong enough to create a sturdy seam, it can help your projects have a more finished look and works best with lightweight fabrics.
The 2-thread overlock stitch is not commonly used since its main purpose is only to clean the raw edge of your fabrics, and in many cases, is not recommended for seams as it only uses two threads, creating a stitch that is not as sturdy as the following 3 and 4 thread options we’ll go over.
We recommend this one to finish the end of a dress created out of light material like chiffon, finish the edge of a ruffle on your home pillowcase, or finish the edge of a project made with silk.
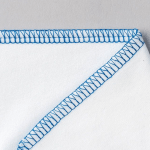
3 – Thread Overlock: Basic stitch of overlocking, which will prevent the fabric from fraying. We recommend this one when working with knit fabrics and occasional woven fabrics though stay away from areas that will be continually stressed, like sleeves of shirts.
You can also use this stitch while finishing or creating decorative stitches, patchwork piecing, blind stitching, piping, and attaching lace, trims, or beads to fabrics.
If you’re working with fabrics like canvas, corduroy, and denim, we don’t recommend this option, as heavy materials require strength that a second needle and thread can provide to build stability in the project.
4 – Thread Overlock: Now, this one uses two needles and four threads to securely sew together knitted and woven fabrics of most kinds. This option is also ideal for projects that involve heavier-based materials, as we mentioned before. This is because the 4-thread overlock offers a wider stitch due to the two-needle threads stitching, creating studier and bulkier seams.
You can use this overlock stitch to install elastic and insert zippers in garments, and it is a great choice when sewing stress areas in projects like the crotch of pants or sleeves of shirts. This overlock will enhance your stitches’ durability and allow your projects to withstand wear and tear.
However, while this stitch will create durable pieces of projects, we don’t recommend it when working with Chiffon and Georgette, as those fabric pieces might require more flexibility than the 4-thread overlock.
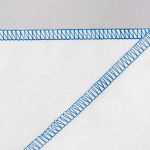
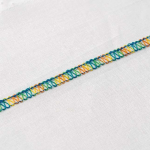
3 – Thread Flatlock: This stitch, as its name implies, results in a flat seam. This stitch is great because it will give you a professional finished look with little bulk, as the stitches are completely encased in the stitching and looper threads. You’ll find this stitch is best for hemming and can be commonly found on ready-to-wear garments.
Something to keep in mind when creating using the flatlock is the number of threads you’re using. Since you’re using three with the 3 – Thread flatlock, you’ll have a strong and sturdy stitch that can be used on garment pieces like activewear that will go through repetitive stretch and pull. You can also change the type of flatlock stitch from narrow to wide by deciding which needle to use when stitching.
Using the left needle creates wider stitches, and the right needle creates a more narrow stitch.
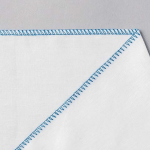
3 – Thread Narrow Overlock: This stitch will roll your fabric edge and then sew with a very narrow overlocking. We find this stitch is ideal for garment creators who are working on projects like activewear, swimwear, or underwear. Anything that is made from a stretchy material that you expect to be stressed and stretched often will be secured with this form of a stitch.
This thread will also allow the best stretch of the material, something we want in our activewear, so we can move and run with ease without the worry of our stitch unthreading.
3 – Thread Rolled Hem: The purpose of this stitch is to fold the raw edge of your fabric under thread wraps. Using the 3 – Thread rolled hem, the stitch will roll your fabric and then cover the rolled hem with threading as you stitch the fabric through.
You’ll find that medium and heavy-weight fabrics work well with this stitch since using the three threads will provide more tension for the fold and wrap on that bulk of the material. You’ll want to use this technique when working on a multitude of projects like dresses, pillows, quilts, and more to give your projects a professional-looking finish.
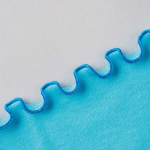
3 – Thread Rolled Hem with Differential Feed: When you use this 3-thread rolled hemming stitch on your projects with the differential feed on stretch fabrics, you’ll create richly designed pieces that have a beautiful hem design.
Depending on the design of your project, you can use the differential feed to add a touch of flair by simply adjusting the differential from 0 to 0.7. For example, if you’re creating with non-stretch woven fabric, start with the differential feed on neutral or zero. This way, both sets of feed dogs are moving at the same speed, giving you a flat rolled hem. If you want to add flair, raise the differential to 0.7 and watch as the rolled hem gets a ‘lettuce’ texture look that adds a beautiful touch to home pillows, dresses, and blouses.
We hope this helps you feel more comfortable with your serger and encourage you to try your hand at serging on your next project! Whether you’re working on a new quilt or planning your next prom dress, the benefits of having a serger in your studio are endless when it comes to achieving that quality finished look. If you’re interested in learning more about the serger stitches and how they look, follow us on YouTube today and watch our past videos here.
For this month’s JUKI Tip, we’re focusing on adjusting the bobbin tension on your longarm machine like our Miyabi J-350QVP! A common question we hear from sewists and quilters is, “how do I adjust the tension for my bobbin on my longarm?” We’re going to start off today’s JUKI Tip by covering what bobbin tension is, how to get true good tension for your next project, and a tool we think all quilters and sewists can benefit from having in their tool kit!
Follow along below as our JUKI National Account Trainer Alba demonstrates setting the bobbin tension for her Miyabi J-350QVP Longarm machine and how she finds the perfect tension for her project needs.
The first thing we cover is what our bobbin case and bobbin look like. For our JUKI longarm machines, you’ll need an M-Class bobbin and bobbin case. Inside the bobbin case, you’ll find its spring, which prevents backlash as your bobbin turns inside. Always check on your spring when changing bobbins, confirming its blue color to ensure it’s good to go! If you notice the blue haze diminishing, it’s time for your spring to be replaced.
Now it’s important to take care of your bobbin case! Handle with care to ensure that the metal doesn’t receive any bumps or bending from drops. This will affect your tension in the long run and how the bobbin pulls on your thread.
Starting off with a full bobbin, we’ll place the bobbin thread inside the bobbin, ensuring to pull the thread to the right side, before placing the bobbin in the bobbin case and stretching the thread to where the slit is so that it falls right into that tension area. That area is what holds the thread tension when you’re creating. Now the two screws you see on the side can be used to adjust the tension. By turning the screws in 15-minute increments, as opposed to twisting it fully, you’ll be able to adjust your tension slowly to your goal tension number. Remember, lefty loosey and righty tighty!
There are two ways to test your tension. One way to test your tension is by hand. You can do this by setting the bobbin on your palm, making sure to face the bobbin away from you as it normally would in the machine, and then pulling on the thread. You’ll want to make sure you can pull the thread up, slowly lifting it from your palm without the bobbin releasing from the bobbin case. The second way, a technique that offers more precise measurement, is using a tool like the TOWA Guage.
The TOWA Gauge is a tool quilters will love because of the assistance it can offer when you’re trying to get that perfect tension. The goal place our trainer recommends is between 180 and 200. However, her favorite is a little lower at 150. On a longarm, you want your tension to be able to handle multiple layers of batting and fabrics, so you’ll want your top thread and lower thread to meet right in the middle of your batting for good strong tension.
Following along on our youtube video, you’ll notice how inserting the bobbin into the TOWA Gauge is like inserting the bobbin into your longarm machine. Make sure to listen for a click as your setting your bobbin to ensure it’s placed in properly. Next, stretch the thread and run it along the bottom side of the first wheel and up and around to the top; here, you’ll begin to notice the gauge move. As your thread goes into the thread guide and out to the side, pull steadily and even to measure the tension. From here, you’ll be able to decide if you need to adjust the tension number to your preferred goal tension.
Once you’ve finalized your perfect bobbin tension, you can focus on your needle and thread combination. Having the right bobbin, needle, and thread is what will help your projects finish successfully and beautifully, but we’ll cover those combinations soon!
Thank you for joining us in this month’s JUKI Tip, where we focused on how to adjust the bobbin tension on your longarm machine. What JUKI Tip do you want to see next? Let us know in the comments below!
This National Quilting Month, we want you ready to start your next project! One of the first things you should take a chance to learn are the quilting terms used in the community. Knowing your quilting terms will help you follow along to live projects and understand the instructions on your patterns better. To get you started, we’re going to cover 10 quilting terms every quilter should know! The next time you create, you’ll sound like a pro.
Quilting Terms
Appliqué: Add motifs made of fabric by using your favorite machine! Add this to your base fabric by using a presser foot like our Applique Presser Foot or Open Toe Presser foot, which can help you accomplish this with ease.
Backstitch: In this process, you’ll stitch over one or two stitches and secure them. You can use reverse stitching on your sewing machine and create projects like handbags, garments, and more with quality strength!
Basting stitch: This step is done before your quilt layers are permanently joined! This stitch should look like a large, loose stitch that will hold together your layers of fabric and batting, allowing you to complete a clean-finished quilt.
Batting: This material can be found between the quilt top and the quilt backing. Available in a variety of fiber contents, the purpose of batting is to help your quilt lay flat and display well on a bed, living room, or hanging on a wall!
Binding: This step is the band of fabric that covers the raw outer edges of a quilt, creating a finished-looking project!
Couching: This quilting process involves stitching thick threads, ribbons, beads, and other items to a surface for decorative purposes. Our JUKI Couching Foot is available in two size options, allowing you to use decorative pieces like yarn, thread, and more!
Echo quilting: Create a fun look by stitching multiple lines that follow the outline of an appliqué or other design element, echoing its shape! We recommend using an Echo Quilting foot when you want to add this touch to your projects.
Fat eighth: Perfect for quilting, a 1⁄8-yard fabric cut is cut crosswise from a 1⁄4-yard piece of fabric for a finished size of approximately 9×22″. Perfect for keeping your project designs versatile without needing to buy many different fabrics.
Fat quarter: The 1⁄4-yard fabric cut is cut crosswise from a 1⁄2-yard piece of fabric for a finished size of approximately 18×22″. This set is also great for creating your quilt blocks and allows you to use a variety of fabric designs to create eccentric projects!
Framed block: Create a framed block with fabric strips around it to give it the appearance of being framed. Use this technique when you want to unify blocks or adjust block sizes on your quilt.
Free-motion quilting: This process of quilting is done with the feed dogs disengaged and using a free-motion presser foot so the quilt can be moved freely on the machine bed in any direction. There is a multitude of machines available that offer free-motion quilting, from semi-industrial to completely electronic, allowing you to find a machine model that works best for you! To see different machine options that offer free motion quilting, check out our site here.
Gathering stitch: This stitch is created with a long-running stitch that can be pulled to pucker up the fabric. Add this touch to your next quilt project by using a Gathering Foot, creating a fun and elegant look, perfect for a baby blanket project.
In-the-ditch quilting: Define your quilt blocks and shapes by stitching in the seams on the quilt surface. Also called stitch-in-the-ditch quilting, it maintains those straight lines, and prevents distortion.
Loft: This is the thickness of the batting, keep this in mind when you’re watching quilting live and they reference the project’s loft!
Machine piecing: Piece your quilts together with a ¼” seam allowance while making your quilt top. The best way to create that seam is using a ¼” Presser foot, helping you keep that consistent stitch.
Pivot: This process leaves the needle in your fabric when you raise the presser foot and allows you to turn the fabric when machine-piecing or machine-quilting. This process is useful when creating quilts, garments, handbags, and more!
Quilt sandwich: When you hear someone reference a quilt sandwich, they’re talking about the three parts of a quilt! Layered together you’ll find the quilt top, batting, and backing.
Raw edge: This is an unfinished fabric edge on your projects. Some creators will use this as a decorative element on quilt tops, and others will complete the edge for a more finished look.
Seam allowance: This is the distance between the fabric’s raw edge and the seam line. Typically the allowance is a ¼” space which can be done on your machine. You can keep that consistent stitch by using a ¼” Presser foot when you create.
Stabilizer: Make sure to use this product beneath an appliqué foundation! This will help you eliminate puckers and pulling on the fabric when stitching your project on your machine. There are different options for stabilizers, and can be found as a tear-away (simply stitch and then tear the pieces outside of your stitching) or water-soluble (removed in the washing machine, or hand wash process) option for easy removal after stitching is complete!
Now that you know more about the basics of quilting vocabulary, you can join a quilting live, attend a quilting class or try creating alone at home with a better understanding of what you’re learning! We hope these definitions help you feel more comfortable the next time you’re creating a quilt project.
What quilting term have you recently learned? Let us know down below!