
If you’re new to using a serger, you might wonder what type of stitches you can create and what kind of fabrics and projects you can work on. Today, we will cover what a serger does, the kinds of stitches they can create, and how they can be used in your projects.
What is a Serger?
A serger is a specialty machine better known as an overlocker. We’ll jump into the stitches a serger can complete for you later in the blog, but an overlock stitch will only be found on sewing machines. An overlock machine will create a professional-grade binding on your fabric using three or more threads. For many, the professional finished look offered by using a serger is why they will invest, becoming owners of both a sewing machine and a serger.
Sergers can also speed up the creative process as a three-in-one machine. A serger will sew seams, trims off seam allowances, and finishes raw fabric edges in one process. The knife on the right side of your stitching space trims your work while you sew quickly, saving you the work. They also sew at high-speed levels, not found on sewing machines, and only sew on the left side of needles.
You can use your sewing machine to sew hems, gather fabric with differential feed, sewing knits, and other stretchy fabrics, and possibly create cover and chain stitches, depending on your chosen machine.
What Stitches does a Serger Create?
2 – Thread Overlock: This is the simplest overlock, and its primary use is preventing fraying in your project. While not strong enough to create a sturdy seam, it can help your projects have a more finished look and works best with lightweight fabrics.
The 2-thread overlock stitch is not commonly used since its main purpose is only to clean the raw edge of your fabrics, and in many cases, is not recommended for seams as it only uses two threads, creating a stitch that is not as sturdy as the following 3 and 4 thread options we’ll go over.
We recommend this one to finish the end of a dress created out of light material like chiffon, finish the edge of a ruffle on your home pillowcase, or finish the edge of a project made with silk.
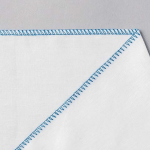
3 – Thread Overlock: Basic stitch of overlocking, which will prevent the fabric from fraying. We recommend this one when working with knit fabrics and occasional woven fabrics though stay away from areas that will be continually stressed, like sleeves of shirts.
You can also use this stitch while finishing or creating decorative stitches, patchwork piecing, blind stitching, piping, and attaching lace, trims, or beads to fabrics.
If you’re working with fabrics like canvas, corduroy, and denim, we don’t recommend this option, as heavy materials require strength that a second needle and thread can provide to build stability in the project.
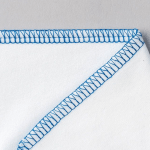
4 – Thread Overlock: Now, this one uses two needles and four threads to securely sew together knitted and woven fabrics of most kinds. This option is also ideal for projects that involve heavier-based materials, as we mentioned before. This is because the 4-thread overlock offers a wider stitch due to the two-needle threads stitching, creating studier and bulkier seams.
You can use this overlock stitch to install elastic and insert zippers in garments, and it is a great choice when sewing stress areas in projects like the crotch of pants or sleeves of shirts. This overlock will enhance your stitches’ durability and allow your projects to withstand wear and tear.
However, while this stitch will create durable pieces of projects, we don’t recommend it when working with Chiffon and Georgette, as those fabric pieces might require more flexibility than the 4-thread overlock.
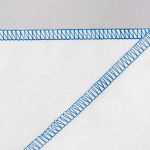
3 – Thread Flatlock: This stitch, as its name implies, results in a flat seam. This stitch is great because it will give you a professional finished look with little bulk, as the stitches are completely encased in the stitching and looper threads. You’ll find this stitch is best for hemming and can be commonly found on ready-to-wear garments.
Something to keep in mind when creating using the flatlock is the number of threads you’re using. Since you’re using three with the 3 – Thread flatlock, you’ll have a strong and sturdy stitch that can be used on garment pieces like activewear that will go through repetitive stretch and pull. You can also change the type of flatlock stitch from narrow to wide by deciding which needle to use when stitching.
Using the left needle creates wider stitches, and the right needle creates a more narrow stitch.

3 – Thread Narrow Overlock: This stitch will roll your fabric edge and then sew with a very narrow overlocking. We find this stitch is ideal for garment creators who are working on projects like activewear, swimwear, or underwear. Anything that is made from a stretchy material that you expect to be stressed and stretched often will be secured with this form of a stitch.
This thread will also allow the best stretch of the material, something we want in our activewear, so we can move and run with ease without the worry of our stitch unthreading.

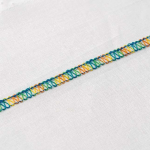
3 – Thread Rolled Hem: The purpose of this stitch is to fold the raw edge of your fabric under thread wraps. Using the 3 – Thread rolled hem, the stitch will roll your fabric and then cover the rolled hem with threading as you stitch the fabric through.
You’ll find that medium and heavy-weight fabrics work well with this stitch since using the three threads will provide more tension for the fold and wrap on that bulk of the material. You’ll want to use this technique when working on a multitude of projects like dresses, pillows, quilts, and more to give your projects a professional-looking finish.
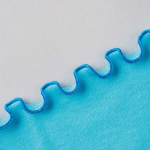
3 – Thread Rolled Hem with Differential Feed: When you use this 3-thread rolled hemming stitch on your projects with the differential feed on stretch fabrics, you’ll create richly designed pieces that have a beautiful hem design.
Depending on the design of your project, you can use the differential feed to add a touch of flair by simply adjusting the differential from 0 to 0.7. For example, if you’re creating with non-stretch woven fabric, start with the differential feed on neutral or zero. This way, both sets of feed dogs are moving at the same speed, giving you a flat rolled hem. If you want to add flair, raise the differential to 0.7 and watch as the rolled hem gets a ‘lettuce’ texture look that adds a beautiful touch to home pillows, dresses, and blouses.
We hope this helps you feel more comfortable with your serger and encourage you to try your hand at serging on your next project! Whether you’re working on a new quilt or planning your next prom dress, the benefits of having a serger in your studio are endless when it comes to achieving that quality finished look. If you’re interested in learning more about the serger stitches and how they look, follow us on YouTube today and watch our past videos here.

I enjoyed this monthly overview of the uses of the different stitches on my serger which I have not used to its fullest capacity.
LikeLike