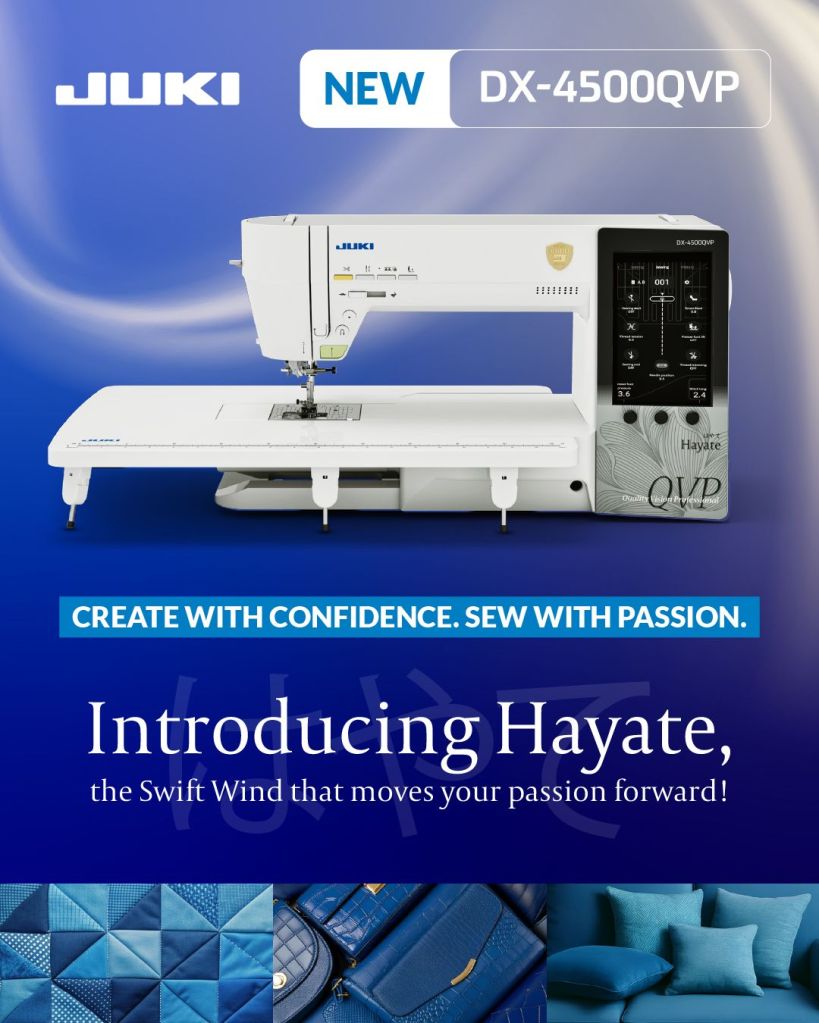
JUKI Tip: Adjusting The Bobbin Tension On Your Longarm

For this month’s JUKI Tip, we’re focusing on adjusting the bobbin tension on your longarm machine like our Miyabi J-350QVP! A common question we hear from sewists and quilters is, “how do I adjust the tension for my bobbin on my longarm?” We’re going to start off today’s JUKI Tip by covering what bobbin tension is, how to get true good tension for your next project, and a tool we think all quilters and sewists can benefit from having in their tool kit!

Follow along below as our JUKI National Account Trainer Alba demonstrates setting the bobbin tension for her Miyabi J-350QVP Longarm machine and how she finds the perfect tension for her project needs.

The first thing we cover is what our bobbin case and bobbin look like. For our JUKI longarm machines, you’ll need an M-Class bobbin and bobbin case. Inside the bobbin case, you’ll find its spring, which prevents backlash as your bobbin turns inside. Always check on your spring when changing bobbins, confirming its blue color to ensure it’s good to go! If you notice the blue haze diminishing, it’s time for your spring to be replaced.

Now it’s important to take care of your bobbin case! Handle with care to ensure that the metal doesn’t receive any bumps or bending from drops. This will affect your tension in the long run and how the bobbin pulls on your thread.

Starting off with a full bobbin, we’ll place the bobbin thread inside the bobbin, ensuring to pull the thread to the right side, before placing the bobbin in the bobbin case and stretching the thread to where the slit is so that it falls right into that tension area. That area is what holds the thread tension when you’re creating. Now the two screws you see on the side can be used to adjust the tension. By turning the screws in 15-minute increments, as opposed to twisting it fully, you’ll be able to adjust your tension slowly to your goal tension number. Remember, lefty loosey and righty tighty!

There are two ways to test your tension. One way to test your tension is by hand. You can do this by setting the bobbin on your palm, making sure to face the bobbin away from you as it normally would in the machine, and then pulling on the thread. You’ll want to make sure you can pull the thread up, slowly lifting it from your palm without the bobbin releasing from the bobbin case. The second way, a technique that offers more precise measurement, is using a tool like the TOWA Guage.

The TOWA Gauge is a tool quilters will love because of the assistance it can offer when you’re trying to get that perfect tension. The goal place our trainer recommends is between 180 and 200. However, her favorite is a little lower at 150. On a longarm, you want your tension to be able to handle multiple layers of batting and fabrics, so you’ll want your top thread and lower thread to meet right in the middle of your batting for good strong tension.

Following along on our youtube video, you’ll notice how inserting the bobbin into the TOWA Gauge is like inserting the bobbin into your longarm machine. Make sure to listen for a click as your setting your bobbin to ensure it’s placed in properly. Next, stretch the thread and run it along the bottom side of the first wheel and up and around to the top; here, you’ll begin to notice the gauge move. As your thread goes into the thread guide and out to the side, pull steadily and even to measure the tension. From here, you’ll be able to decide if you need to adjust the tension number to your preferred goal tension.

Once you’ve finalized your perfect bobbin tension, you can focus on your needle and thread combination. Having the right bobbin, needle, and thread is what will help your projects finish successfully and beautifully, but we’ll cover those combinations soon!

Thank you for joining us in this month’s JUKI Tip, where we focused on how to adjust the bobbin tension on your longarm machine. What JUKI Tip do you want to see next? Let us know in the comments below!

Know Your Quilt Terms!

This National Quilting Month, we want you ready to start your next project! One of the first things you should take a chance to learn are the quilting terms used in the community. Knowing your quilting terms will help you follow along to live projects and understand the instructions on your patterns better. To get you started, we’re going to cover 10 quilting terms every quilter should know! The next time you create, you’ll sound like a pro.

Quilting Terms

  1. Appliqué: Add motifs made of fabric by using your favorite machine! Add this to your base fabric by using a presser foot like our Applique Presser Foot or Open Toe Presser foot, which can help you accomplish this with ease.
  2. Backstitch: In this process, you’ll stitch over one or two stitches and secure them. You can use reverse stitching on your sewing machine and create projects like handbags, garments, and more with quality strength!
  3. Basting stitch: This step is done before your quilt layers are permanently joined! This stitch should look like a large, loose stitch that will hold together your layers of fabric and batting, allowing you to complete a clean-finished quilt.
  4. Batting: This material can be found between the quilt top and the quilt backing. Available in a variety of fiber contents, the purpose of batting is to help your quilt lay flat and display well on a bed, living room, or hanging on a wall!
  5. Binding: This step is the band of fabric that covers the raw outer edges of a quilt, creating a finished-looking project!
  6. Couching: This quilting process involves stitching thick threads, ribbons, beads, and other items to a surface for decorative purposes. Our JUKI Couching Foot is available in two size options, allowing you to use decorative pieces like yarn, thread, and more!
  7. Echo quilting: Create a fun look by stitching multiple lines that follow the outline of an appliqué or other design element, echoing its shape! We recommend using an Echo Quilting foot when you want to add this touch to your projects.
  8. Fat eighth: Perfect for quilting, a 1⁄8-yard fabric cut is cut crosswise from a 1⁄4-yard piece of fabric for a finished size of approximately 9×22″. Perfect for keeping your project designs versatile without needing to buy many different fabrics.
  9. Fat quarter: The 1⁄4-yard fabric cut is cut crosswise from a 1⁄2-yard piece of fabric for a finished size of approximately 18×22″. This set is also great for creating your quilt blocks and allows you to use a variety of fabric designs to create eccentric projects!
  10. Framed block: Create a framed block with fabric strips around it to give it the appearance of being framed. Use this technique when you want to unify blocks or adjust block sizes on your quilt.
  11. Free-motion quilting: This process of quilting is done with the feed dogs disengaged and using a free-motion presser foot so the quilt can be moved freely on the machine bed in any direction. There is a multitude of machines available that offer free-motion quilting, from semi-industrial to completely electronic, allowing you to find a machine model that works best for you! To see different machine options that offer free motion quilting, check out our site here.
  12. Gathering stitch: This stitch is created with a long-running stitch that can be pulled to pucker up the fabric. Add this touch to your next quilt project by using a Gathering Foot, creating a fun and elegant look, perfect for a baby blanket project.
  13. In-the-ditch quilting: Define your quilt blocks and shapes by stitching in the seams on the quilt surface. Also called stitch-in-the-ditch quilting, it maintains those straight lines, and prevents distortion.
  14. Loft: This is the thickness of the batting, keep this in mind when you’re watching quilting live and they reference the project’s loft!
  15. Machine piecing: Piece your quilts together with a ¼” seam allowance while making your quilt top. The best way to create that seam is using a ¼” Presser foot, helping you keep that consistent stitch.
  16. Pivot: This process leaves the needle in your fabric when you raise the presser foot and allows you to turn the fabric when machine-piecing or machine-quilting. This process is useful when creating quilts, garments, handbags, and more!
  17. Quilt sandwich: When you hear someone reference a quilt sandwich, they’re talking about the three parts of a quilt! Layered together you’ll find the quilt top, batting, and backing. 
  18. Raw edge: This is an unfinished fabric edge on your projects. Some creators will use this as a decorative element on quilt tops, and others will complete the edge for a more finished look.
  19. Seam allowance: This is the distance between the fabric’s raw edge and the seam line. Typically the allowance is a ¼” space which can be done on your machine. You can keep that consistent stitch by using a ¼” Presser foot when you create.
  20. Stabilizer: Make sure to use this product beneath an appliqué foundation! This will help you eliminate puckers and pulling on the fabric when stitching your project on your machine. There are different options for stabilizers, and can be found as a tear-away (simply stitch and then tear the pieces outside of your stitching) or water-soluble (removed in the washing machine, or hand wash process) option for easy removal after stitching is complete!

Now that you know more about the basics of quilting vocabulary, you can join a quilting live, attend a quilting class or try creating alone at home with a better understanding of what you’re learning! We hope these definitions help you feel more comfortable the next time you’re creating a quilt project.

What quilting term have you recently learned? Let us know down below!

Happy National Quilting Month!

Join us this month as we celebrate National Quilting month with some of our favorite JUKI quilting machines. Whether you’re working in a studio, or on your kitchen table, we make sure to have what you need to start creating.

Check out this month’s top quilting machines and contact your local JUKI dealer here to learn more about our machine features and projects you can start creating today!

5 Ways to Personalize Your Projects

As creators, we love being inspired by other sewist and quilters, but how do we take their inspiration and personalize it? Today we will discuss five ways to personalize your sewing and quilting projects. From adding lettering to printing on designs, there are so many ways we can find a project and turn it into our style. So follow along and check out what machines and accessories we recommend for your personalization touches.

Adding Lettering

Whether you’re inspired to create a tote bag, or a sweater, adding lettering to your projects can be just the touch of personalization you need! Add your initials with your partners on a sleeve to create the perfect valentines gift, place your child’s name on their new school bag, or gift a quilt with a quote to your loved one using the lettering feature on your creations.

To add this personalization technique, you can use an electric computerized sewing machine that offers lettering, like the Kokochi DX-4000QVP! An electronic computerized sewing machine like the DX-4000QVP offers lettering stitch choices, ranging in different fonts, that will allow you to quickly and easily stitch in your child’s name, favorite quote, or number one sports team name!

Adding lettering is an easy way to personalize your next project and can be done with just a tap of your finger and a stitch!

Adding Embroidery Designs

Using a specialized embroidery machine, you can start adding your designs and bring texture to your projects by adding a touch of your personality! For example, add a cool design to sneakers, pet collars, or even a child’s teddy bear to create a project representing you or the gift receiver.

A machine like the JUKI/Tajima Sai 8 Needle Embroidery Machine is an example of a machine that can offer this feature! With 8 different color options, you can create beautiful flowers, animals, and a scenic view from your last hike. Art is limitless with what you can create on an embroidery machine. Adding embroidery can be an exciting art form when creating personalized projects!

Want to try your hand at embroidering and creating a makeup bag? Learn how to create this makeup bag with our JUKI Ambassador Nicole Moore here!

Designing Your Fabric

Have you found yourself wanting a specific fabric design? Been drawing some designs of your own? Then take the leap and design your own fabric! With a machine like a Direct-To-Garment printer, the options in patterns and designs for your projects are now endless, thanks to the ability to design your own fabrics right from your studio.

The RICOH Ri 100 can help you print your art designs and patterns onto fabric easily and quickly. From canvas fabrics for your tote bags to cotton for your memory quilts, enjoy the freedom of designing and creating anything for your imagination, and enjoy a material that no one else would have!

Try your hand at printing your own fabric with this east mini quilt project! Learn how to create your own with our JUKI Ambassador Nicole Moore here!

Adding in Photos

Whether it’s a family photo or a memory from your favorite trip with friends, adding a memory photo to a project like a t-shirt or a quilt is a great way to personalize your projects! Whether you’re embroidering designs with free motion quilting, using a Direct-To-Garment printer, or using an embroidery machine, there are limitless ways you can get to designing and including your photos in your projects.

Our favorite projects are memory quilts users create with photos! From sweet newborn gifts to anniversaries and holidays, a quilt created with personalized love is an excellent idea for your next gift project! Using a machine like our Direct-To-Garment printer, the RICOH Ri 100 can easily print and place your photos directly onto the fabric you’re creating, letting you put your focus on your quilt block designs.

Want to create your own memory quilt like the one shown for your loved one? Follow along here to learn more here!

Creating a Set

One of the best things about personalization is the freedom to be creative in what we embroider and print on. Personalize your next gift by creating a matching set! Whether it’s a set of make-up bags for traveling, or a matching set of t-shirts for the father and daughter duo, sets can be a fun gift that allows you to try different project ideas.

One of the best ways to create sets is to intermix your work! Print on your fabric, embroider your design and sew it all together to create something unique and different. Whether your project is small, like a glasses case, or large, like a king quilt, adding these touches of personalization will bring the whole idea together!

So the next time you create a project, add your name, embroider a design, or print on a pattern and show your personality when showing off your project!

Want to try your hand at creating a matching set? Check out our Daddy and Daughter duo set project here!

Want to personalize your next project? Then, visit us here today to find your nearest JUKI dealer!

JUKI Tip: Using The Micro-Lift on the TL Series

For this month’s JUKI Tip, we’re focusing on the micro-lifter feature that can be found on your TL series machines! Now, a common question we get is, “what is different about the Micro-lift feature from the presser foot pressure?” To show the difference, we’re going to use the TL-18QVP because it has two different locations for each feature.

Now the presser foot pressure, as it sounds, is the amount of pressure the foot puts on the fabric you’re sewing. For example, if you’re moving your project, the presser foot pressure is what will help you keep that nice straight seam. With the Micro-lift feature, your presser foot pressure will stay the same, but the height of the foot will change. Raised above the feed dogs, your foot will now have space to create using multiple layers of fabric, thick fabrics, complete binding easier, work on handbags, and so much more.

Our favorite part is not needing to adjust the presser foot pressure as often when using the Micro-lift feature, helping your project process become more simple.

As you watch the video, you’ll be able to follow along as our National Account Trainer Alba demonstrates how the Micro-lift feature looks when in use, and how easily the fabric you’re working on will go through. From 8 layers of denim to 15 layers of denim, you’re able to see how the fabric smoothly glides through; the needle easily sewing through the material.

We hope this video encourages you to try your hand at the Micro-lift feature on your machine and that it helps you create beautiful projects with quality style! What JUKI Tip are you hoping to see next? Let us know in the comments below!