
If you’ve ever pulled a stretch seam off your serger only to find it puckered, wavy, or stretched out of shape, differential feed is your solution. It’s one of the most powerful and most misunderstood features on a serger, and yet it’s available on JUKI machines right out of the box.
Once you know what it does and how to use it, you’ll wonder how you ever serged without it. Consider this your beginner’s guide to one small dial that makes a very big difference. Let’s break it down.
What Is It?
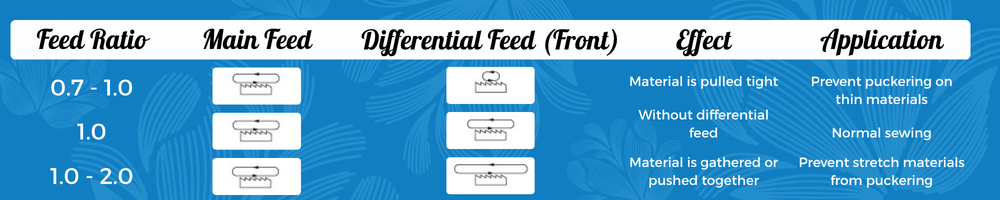
Your serger has two sets of feed dogs, which are the small metal teeth that grip and move your fabric under the presser foot. One set sits in front of the needle, and one set sits behind it. The differential feed is what lets you control the speed ratio between these two sets, essentially telling the front and rear feed dogs to move at different rates so your fabric passes through the machine with ease. On JUKI sergers, you’ll find that the differential feed ratio ranges from 0.7 to 2.0.
How Does It Work?
The differential feed setting on your JUKI serger is expressed as a ratio. Think of it this way: the ratio tells your machine how the front feed dogs should move compared to the rear ones. A ratio of 1.0 means both sets are moving at exactly the same speed. Go below 1.0, and the front slows down. Go above 1.0, and the front speeds up. That simple adjustment is what gives you control over how your fabric behaves as it feeds through the machine. Below is a breakdown of how they would be used:
Ratio below 1.0 (0.7) aka Stretch Mode: The front feed dogs move more slowly than the rear, gently stretching the fabric as it feeds through. This is useful for creating a lettuce edge on stretch fabric or preventing wavy seams on very stable, tightly woven fabrics.
Ratio of 1.0 (Neutral): Both sets of feed dogs move at the same speed. This is your baseline setting for stable woven fabrics.
Ratio above 1.0 (up to 2.0) aka Ease Mode: The front feed dogs move faster than the rear, easing or gathering the fabric slightly as it feeds. This is the most commonly used setting; it prevents stretch fabrics from stretching out under the presser foot, giving you a flat, professional seam.
When Should You Use Differential Feed?
Now that you understand how we’ve covered how differential feed works, the next question is knowing when to actually reach for that dial. The answer depends entirely on your fabric. Different materials behave very differently as they feed through a serger, and differential feed is your way of adapting to those differences rather than fighting them. Here’s a quick guide to the most common situations you’ll run into:
- Knit and stretch fabrics (jersey, rib knit, spandex): Increase toward 2.0 to prevent wavy, stretched-out seams.
- Chiffon and lightweight wovens: A slight increase (1.2–1.5) can prevent puckering on delicate seams.
- Lettuce edges: Decrease toward 0.7 while gently pulling the fabric taut for a ruffled effect.
- Stable wovens (quilting cotton, denim): Stay at or near 1.0 — these fabrics typically don’t need adjustment.
- Easing sleeve caps: A higher setting can ease in a little extra fabric for a smooth curve.
Common Mistakes First-Timers Make
Every creator works through a learning curve with differential feed, and that’s completely normal. But, just in case, here are four of the most common mistakes beginners make and how to avoid them:
- Forgetting to reset after switching fabrics: Easy to adjust, easy to forget. Always check your differential feed setting when changing fabric types or you may end up with unexpected gathering on your next seam.
- Making large adjustments instead of small ones: The dial is more sensitive than it looks. Test in small increments, try 1.2, then 1.5, and work your way up rather than jumping straight to 2.0.
- Not testing on a scrap first: Always run a test strip on the same fabric before touching your actual project. Same grain line, same stretch direction. Every time.
- Using differential feed as a substitute for proper tension: Differential feed controls fabric movement, not stitch formation. If your stitches look uneven, address your tension first and then fine-tune from there.
Once you get comfortable with differential feed, you’ll find it becomes second nature; one quick dial adjustment before you serge, and your seams come out smooth every single time.
Want to see how differential feed looks in action on JUKI machines? Visit our YouTube channel for demonstrations, or stop by your local JUKI dealer to try it yourself on one of our MO or MCS Serger machines!

One thought on “What is Differential Feed?”