JUKI Tip: Double Fold Bias – Sewing Corners

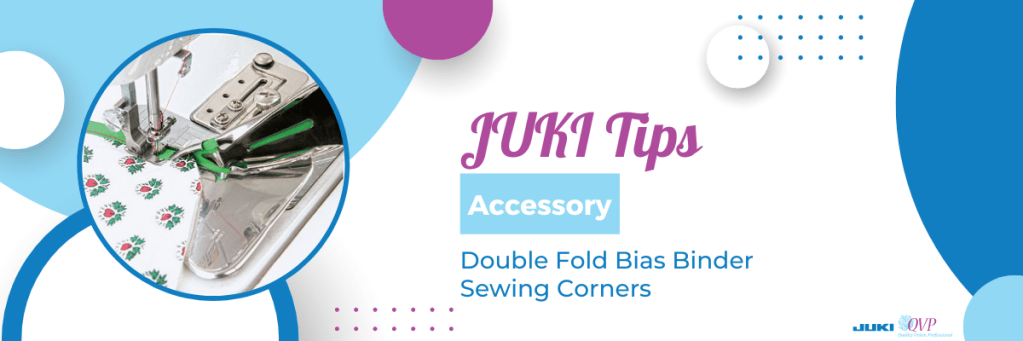
On this JUKI tip, we use the Double Fold Bias Binder and show you how to sew corners with this accessory and create a fun sewing experience!

Follow along below for a rundown of what Alba covers on today’s JUKI Tip!

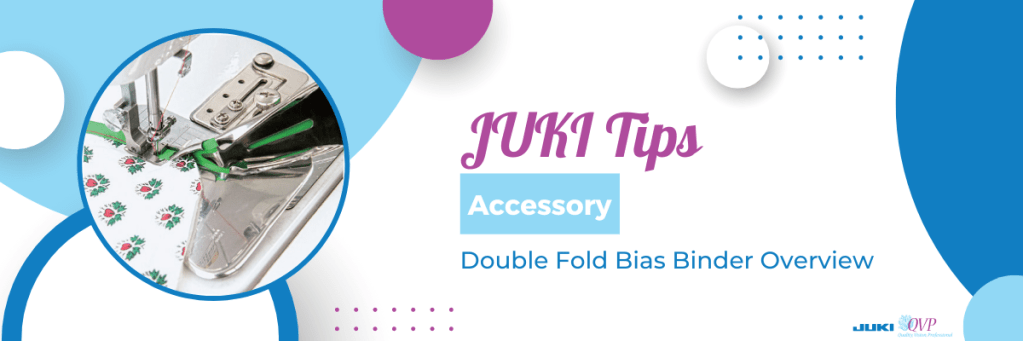
Hello all my JUKI friends, my name is Alba and welcome to another tips and tricks with JUKI! Today I am talking about the double-fold bias binder and I have one in front of me, and I wanted to show you the components of this. I did another video previously on how to load the fabric and just tips with getting it to run smoothly, but today I’m going to be showing you how to use it with quilts and doing those mitered corners.

I wanted to show you the binder itself so that you could get a little bit familiar with this tool. First, it comes with the foot that’s very short allowing you to really get a nice top stitch onto that, and also two thumb screws. Now this pivots and opens up and this section here with that wide opening is where you would put your thumb screws, to screw it right into the bed of the machine.

Now there’s also a set of screws right by where you feed your bias, and this allows you to move closer and further away from your foot, depending on the machine, depending on the material that you’re using, and likewise, that big screw allows you to move left and right to get this positioned perfectly.

Now with this I feed my bias in, and I just pushed that fabric that I got it all the way into there, and I have it being held by my needle right now. So as I am sewing this I want to make sure that I’m holding my quilt right into that corner and as I’m coming to a stop I want my needle to be right at the edge of the fabric. You will see where my needle is, and where my fabric is, I went right to the edge; and I am touching my scissor button and what I will be doing is releasing enough of that bias and I want to give that a little finger press. I am going to move this fabric closer to me and you want to make sure that you have enough to be able to work with. What I am going to be doing, again with that finger press, I am going to open this up and kind of force that bias.

This will allow me to pull that tape back through, and a long silk pin would come in really handy for just holding that in place. In fact, I am going to put a pin into that corner to hold it; I have that nice miter, and I’m going to put my pin right in there and I am going to bring that fabric all the way towards me.

I am going to position this right underneath the foot so that my needle catches that very corner. Now with my stiletto, I’m using tweezers here, I’m making sure that my fabric is tucked all the way in, and I am going to sew. You would do this on all four of your Corners.

Now you can see that beautiful corner that I’ve just completed, and I want you to see how beautifully that is top stitched right at the edge and it catches the front and the back beautifully, and I’m just gonna allow you to get a really close look at that.

Now at that corner, I did add a PIN to secure, you could also add some fusible web tape, that quarter-inch fusible web tape, and press that first inch and force that miter in place. But, with the bias binder, that double-fold bias binder, gives you the ability not only to do curves but to do those beautifully mitered corners.

How beautiful is that for your quilts, your crafting projects, everything that you could imagine. I really like to do this when I’m sewing garments and I am not lining like a jacket. I would do this on my inside seams and those are called Hong Kong scenes and it just gives a beautiful professional look to that garment.

Thank you for coming and sharing your time with me, what do you want to see next on JUKI tips? Lets us know down below!

JUKI Tip: Double Fold Bias Binder Overview

On this JUKI tip, we use the Double Fold Bias Binder and show you how to feed the fabric into the machine with this accessory and create a smooth sewing experience!

Follow along below for a rundown of what Alba covers on today’s JUKI Tip!

Hi, friends my name is Alba and I would like to welcome you to another tips and tricks with JUKI! Today I am talking about the double-fold bias binder and I have two sets in this video; one is a 38-millimeter and one is a 32-millimeter. The one I have on my machine is the wider of the two and I want to show you what exactly is in the package when you open this up.

I am going to open it right in front of you and I am going to pull out the binder itself and it comes with fabric and binding on it. It also comes with a little package with a thumb screw and a foot, and it comes with an instruction sheet. So what I wanted to show you is a little bit of detail, of what is in this, and as I said the one that’s on the machine is a 38-millimeter one, and what that means is how wide the fabric is that is put into the binder and how wide the finished product will come out.

For the 38-millimeter one, I used a one and a half inch strip of fabric, folded it and the completed bias is about 3/8 of an inch. Now what I like about this is you’re going to notice how short that foot is and this is really helpful as you’re sewing because that binder can get really close to the foot and allows for very little movement and of course we have our thumb screws to be able to put this onto the machine. Now what most people get confused with is they’re expecting this portion here to lay flat on the machine but as you can see in the video this accessory rests off of the machine. The thumb screw goes into the screw hole that’s on the bed of the machine, so these are intended for the industrial machines and the machines with solid metal beds, so that they could get screwed directly into the machine and a lot of people do not realize that pivot action that this attachment has.

Now I have two pieces of fabric and both of them have been cut to one and a half inches, and I’m going to show you the struggle that most people have and my tip for feeding the fabric into the machine and getting this to run smoothly. Now most people try to feed the fabric with it in the position right in front of the foot, but if you pivot this, it allows you to better see, getting that fabric in there and just puts you in a much better angle. Now as you’re noticing, I have the wrong side of the fabric facing me. Where most people have an issue is right there and I’m gonna get recommend a stylus, and with that tip, the fabric needs to go underneath its section in the video. Now this is where a lot of people have trouble trying to do that and I’m going to give you my tip for getting that done.

Now let me pull my trusty scissor out and I am going to cut a point into my fabric. By putting a point into that fabric, and you definitely want to use a stiletto, look at how easily that goes right into that fold. And as I pull this out I want to make sure that my fabric is folded, and what I do is I give this a little bit of a finger press. Now when I lift my foot and lift my needle I can move that fabric right underneath the foot and that large thumb screw will allow you to move this right and left so that when you lower your foot. Your needle is just slightly off of that edge to top stitch that edge. Now as I cut this, it was the width of fabric, and I am going to just sew away. Now watch in the video how even at that full speed, how brilliantly and effortlessly that works because this attachment is right up to the foot.

Now I am showing you sewing these pieces shut. I’m going to do a video really soon on putting um this into a quilt sandwich, and doing that mitered corner, but I wanted to show you this finished product and also some of the crafty things that you can do with these strips. You might have noticed my lanyard and I really like fun bright colors so I made my lanyard with the strip, and I happen to have made it so that it can hold my little scissors but also weaving fabric and doing that repeatedly so that you can create your own fabric and your own patterns, how cute would that be as an inset for a waistline? Or for a garment, for a tote bag. I want you to Google and search YouTube videos for fabric weaving to see all of the different things that you could do with that. I want you to stay tuned for another video that I will be doing on mitering corners and using this on quilt fabric.

Thank you for coming and sharing your time with me, what do you want to see next on JUKI tips? Lets us know down below!

JUKI Tip: Changing Your Foot Control Function Settings

Have you learned all the different ways you can use your foot controller on your computerized sewing machine? Check out our tips today to learn all 7 ways you can enjoy sewing with just the tap of your foot!

Follow along below for a rundown of what Alba covers on today’s JUKI Tip!

Today we’re going over the foot pedal and the foot switch function on the foot pedal for your machine. It has two sections to step on, the blue section for sewing, and the heel section or the white section, which on many of our machines can be programmed to do different functions.

The DX-2000 offers options to change the settings on your foot control functions for example as you’ll see demonstrated in this video. This function is normally found on our full-size machines!

To best follow along with today’s video, please refer to the section of the manual where all of this is laid out and that is on page 93! Now, the heel function of the foot pedal has six different parts we’re going to show you, and we’re going to cover what those functions are and how to get them going.

First, tap on the icon that looks like a wrench and a screwdriver; this is where we go into settings to change features on our machine. When you press that your screen comes up with different functions and we are going to tap the arrow until you reach the heel function icon. Next, press OK, and let’s start choosing our functions.

The first function is a feature already placed as a button on your machine, it is the same icon on the machine for reverse; if you select this, it will do reverse stitch. Now, when you press forward on this foot it will always sew as normal, as you tap and press on the back of the foot pedal, you’ll see your reverse stitch begin.

The second function option is a lock stitch. A lock stitch is completed when that needle goes up and down in place locking your stitch so that it doesn’t unravel. This is useful for locking in your projects and securing a quality finish.

The third function is a half stitch. The icon for this function shows as a needle with arrows up and down, and what this will do is it will take a half stitch as you come to the end of your thread. This feature is useful to secure your seam but not lock it if you do not want any build-up of threads you’re going to sew.

The fourth function will have the presser foot lifting and lowering. As you start sewing and touch that heel portion of your foot control it will leave you with the foot up and the needle down and this is really helpful if you were going to do continuous sewing or chain piecing!

The fifth function is the cutting function. The cutting function can be very helpful! When your stitch is done this function will trim your top thread and bottom thread at the same time, saving you the trouble of finding your thread scissors.

The last function is the ability to turn off all extra functions when tapping the back of your foot controller. You can turn them on and off as needed helping you create your projects with ease. Remember, the details of this are on page 93 of the instruction book for the DX series, and offer images you can follow to learn more!

Thank you for joining today’s tip, we hope this helps you create easier the next time you’re working on your machine!

Get Ready for Halloween with JUKI!

Halloween season is upon us, JUKI lovers, and we’re so excited to let the creativity flow! Join us today, as we talk about ideas for your spooky costumes and what machines and accessories will help you get there.

One of the crucial things to keep in mind when planning your costume is not everything has to be from scratch. Costumes are created from pieces put together, which means parts of them can be homemade, and other parts can be store-bought or even found in your home!

Before You Start:

The best way to start is to pick a theme! Build an inspiration board with color schemes, materials, and other costumes people have done. Consider your budget as you go through ideas on how you want your finished project to look. Add your special flair and creative touches to make your costume unique to you!

Helpful Tools to Creating Your Project:

We recommend having two sewing machines on hand when creating your costume, a computerized sewing machine and a serger. Our Kokochi DX-4000QVP is an essential tool when creating Halloween costumes or even cosplay. This computerized sewing has a large sewing area for your capes or larger pieces, includes 368 sewing patterns to personify your garments and 20 professional buttonhole options. No matter what you’re creating, this machine creates beautiful pieces that you envision!

If you’re creating pieces that involve fabric that may fray or need gathering, like fairy costumes or princess gowns, it is a great idea to keep an overlock on hand like the MO-654DE. This popular serger has a built-in rolling hem that covers the fabric and prevents it from fraying as well as all the popular overlock and flatlock variations. It is perfect for adding those touches like a bunched-up sleeve, neckline, or skirt.

Here are some key things to think of when planning your costume:

Focus on what fabrics you’re going to need. Keep in mind what colors you’ll need, what kind of character you’re going to be, and what you need the costume to do for you! Cotton is a common one for costumes, but keep in mind location and weather. Tulle is perfect for petticoats, bows, and tutus. Felt is helpful for decorations, or if you need accessories like a hat. Some costumes will require stretch, so keep that in mind when shopping for a costume like superheroes made from latex and lycra. Satin can be used for costumes like princesses or creating a decade pieces from the ’20s.

Are you adding embellishments to your costume? Add a touch of glam and glitz like buttons on a clown costume, or gemstone, and flashy sequins on a decade’s piece for the ’70s! We recommend making sure; you have the right foot on hand for your sewing machine as well. Our Creative Set, for example, will have all our popular design attachment pieces like our applique presser foot, cording and embroidery presser foot, pearl attaching presser foot, and more!

As Halloween dawns upon us be ready to celebrate! Did you create a Halloween costume with your JUKI? Be sure to tag us!

Let’s Talk Fabric

As a sewist, you know the importance of choosing suitable fabric for your project and how it can significantly affect your finished product! Today JUKI Lovers, we’re going to go over different fabric types and how to choose the right one for your project.

Quilting Cotton
The most common fabric you’re going to find in big stores is quilting cotton. A light to medium fabric, this material is made of cotton and woven, making it a popular choice for quilting projects. Keep in mind, this material is not the best for clothing construction on most projects. While it can create structured shirts well like a button-down, if you’re looking for a look that has more stretch, flow, or drapes, this fabric wouldn’t work best.

Linen
Linen fabric is a slightly different fabric from cotton. While similar as both are plant-based, the linen fabrics tend to be very soft and very breathable. Linen is best for warmer temperatures and is done in a plain weave. Some linen fabrics will have a noticeable color variation due to the threads that created the material. It’s well known to drape nicely, and it softens after washes creating the perfect comfort material for the winter times. Still, it’s best to keep in mind linen proneness to shrinking.

Silky Solids and Prints
When you’re looking for something bright or eye-catching, silky solids and prints are a bold choice. This material drapes well and has two options for construction. One silk material is made of polyester, a high-quality dupe of the original silk created from cocoons. When creating blouses or dresses, the structure of the material gives the proper flow and accentuates nicely. Choose this material when wanting to create light, loose clothing.

Canvas
Canvas fabrics come in different styles, but it’s primarily a solid material best used for home décor projects, theatre set designing, and bags. Canvas can also be best used for home furniture projects because of the soft material and works well on footrests and ottomans. Of course, this material can also be used for painting and other art projects. Keep canvas in your fabric drawer as it is an incredibly versatile fabric for many hobbies!

Chiffon
When creating beautiful and frilly pieces, chiffon is a charming choice! Woven sheer fabric is perfect for creating skirts with a flow and can also be used for home décor such as curtains. Always keep in mind when using chiffon for clothing that the material can be complex for new sewers to work with due to its proneness to frame and be shifty. We recommend testing with a small piece of fabric and adjusting your settings as you go.

Twill
Making curtains? Twill is the perfect fabric for that project! Twill is a fabric created out of cotton or cotton spandex and is best used for dress pants, home décor, and bags. Twill is created using a twill weave and is generally woven with threads of only one color. Perfect for curtains, the material is thick and drapes well with low wrinkles creating a cleaner look in your space.

Flannel
Flannel garments rise from their slumber during the colder seasons due to their comfort and warmth. Woven cotton is brushed on or both sides creating this fuzzy and soft texture that allows warmth to be kept. This material is excellent when designing winter pajamas or cozy outfits for the fall. Using this soft material, you can also create warm blankets and quilts for the family.

With so many materials and fabrics available for sewers out there, we want to make sure you’re choosing the right one! What are some fabrics you’ve worked with that you love using?