Adventures in JUKI Decorative Stitches

When it comes to sewing, the magic is in the details, and nothing adds a touch of flair quite like the right decorative stitch! Whether you’re embellishing a cape or creating a statement dress, JUKI’s decorative stitches open up a world of creative possibilities. In this adventure, we’ll dive into our favorite stitches and share tips on when and where to use them to make your costume stand out!

Machine Options

Before we dive into specifics, let’s take a moment to talk about the JUKI sewing machines that offer decorative stitches. Known for their precision and durability, JUKI machines come equipped with a wide variety of stitches that cater to every sewing need, from basic to intricate projects.

  • JUKI HZL-F Series: The HZL-F Series are powerhouse options that can reach over 250 built-in stitches, including decorative. You’ll find everything from floral patterns to geometric designs, perfect for adding unique touches to your projects. This model also includes alphanumeric stitches, so you can personalize your creations with names or messages!
  • JUKI DX QVP Series: The DX QVP Series offers up to 287 stitch patterns, including several exclusive decorative stitches designed for quilters and fashion creators alike. This machine is perfect for costume accessories that require precise stitching and detailed embellishments! The machine’s advanced features, like the floating presser foot, make it easy to work with thick fabrics or multiple layers.
  • JUKI HZL-DX Series: Reaching up to 287 stitches, including 16 different buttonhole styles and various decorative stitches, the HZL-DX Series is ideal for those who want to experiment with various designs in one project. The machine’s intuitive controls make it easy to switch between stitches, allowing you to quickly add intricate details to your projects.

Decorative Stitches On JUKI

Now, let’s talk about some decorative stitches in your machines. These stitches are more than just pretty patterns—they’re functional add-ons that can elevate your sewing projects. Here are a few recommendations on how to make the most of these stitches in your next creation:

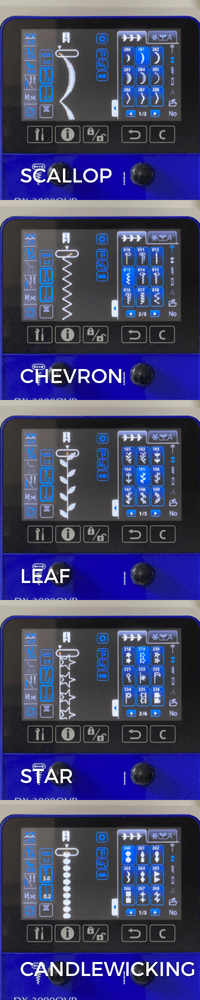
  1. Scallop Stitch: The scallop stitch adds a delicate, feminine touch to the edges of the fabric. It’s perfect for finishing off a scarf with a soft, wavy edge or adding a whimsical border to a cape. Pair it with a contrasting thread for extra pop. It is perfect for the edges of scarves, capes, and hems.
  2. Chevron Stitch: The Chevron stitch brings your projects a bold, geometric flair. This is a fantastic choice for accenting belts or bag straps, offering durability and a stylish design. It also works wonderfully around the brim of a hat, adding texture and visual interest. Perfect for belts, bags, and much more!
  3.  Leaf Stitch: The leaf stitch is ideal for nature-inspired designs. Imagine a flowing cape with a vine of leaves winding around the edges or a bag with leafy embellishments. This stitch adds an organic feel to your projects, making it perfect for costumes with a natural or fantasy theme. Perfect for capes, bags, and collars.
  4. Star Stitch: The star stitch is playful and eye-catching, perfect for superhero-themed costumes. It can be used to create star-studded borders on capes, add a touch of sparkle to hats, or embellish belts and bags. This stitch is a must for any costume that needs a bit of magic. Perfect for capes, hats, and superhero or space-themed accessories.
  5. Candlewicking Stitch: The candlewicking stitch creates a textured, almost bead-like effect on the fabric. Use it to create intricate designs on scarves or add texture to belts. It’s a great way to introduce a three-dimensional element to your accessories. It is perfect for scarves, belts, and detailed embellishments.

Bringing It All Together: Creating the Perfect Costume Accessories

Now that we’ve covered some of our favorite decorative stitches let’s talk about how to bring them together in your projects. When designing costume accessories, consider the overall theme and how the stitches can enhance it. Here are a few ideas:

  • Hats: Add a chevron or star stitch around the brim to create a statement piece that ties in with your costume’s theme.
  • Capes: Use a combination of leaf and scallop stitches to add movement and elegance to the edges.
  • Belts: A bold chevron or candlewicking stitch can transform a simple belt into a standout accessory.
  • Bags: Incorporate a variety of stitches like the leaf and star to add personality and texture.

Remember, the key to successful decorative stitching is practice and experimentation. Try different thread colors, stitch lengths, and placements to see what works best for your project.

Whether creating a full costume or adding a special touch to an accessory, JUKI’s decorative stitches offer endless possibilities. We hope this guide inspires you to experiment and have fun with your sewing projects. Don’t forget to share your creations with us—happy stitching!

JUKI Tip: Adjusting Your Ruler Foot

Welcome to another tip with JUKI! Presented by our National Account Trainer Alba, we’re going to talk about quilting and our JUKI Ruler Foot for the TL Series.

In this video, we’re working on the JUKI TL-18QVP Semi-Industrial Sewing Machine and using our optional accessory the Ruler Foot. In this tip, we’re going to show you how to adjust that ruler foot for perfect stitching. You may notice that when you put your ruler foot on your machine it’s really high above your fabric and you never want to do that.

You really want the height of a credit card, a hotel key, or a thin plastic sheet and as you watch the video, you’ll see there’s a lot of height to start us off with, but the ruler foot has a screw on the side that you can turn and that will raise and lower your presser foot. Using your hotel card, or thin plastic sheet, will help you get that height you need and you’ll want to be where that credit card barely skims the bottom of that foot.

What this does is, as the needle goes up and down it prevents the fabric from bouncing and gives you those perfect stitches you want on your free motion quilt projects.

What tip do you want to see next? Let us know in the comment below!

JUKI Tip: Trimming Your Tajima SAI Thread

Don’t you hate when you’re about to start an embroidery and you have that thread tail hanging out? On this JUKI Tip video today we’re going to show you how quick and easy it is to trim that right up on the machine.

In the video above, you’ll see on the screen I am going to go to the icon that looks like four needles with arrows on either side. When you tap on this icon you can move to whichever needle you need to trim with ease, without disrupting your current project.

In our video you’ll see it’s set up on needle number one and needle number one is the one with the thread that we direct you to. You’ll see me press and hold the scissor icon, and it will cut and remove that thread from your needle.

We hope this quick and easy tip helps you the next time you’re creating on the TAJIMA Sai Embroidery machine! What tip do you want to see next? Let us know down below!

Crafting Your JUKI Sewing Ritual

Whether you’re an amateur enthusiast or a seasoned seamstress, this new year, JUKI will help you establish a ritual you can follow before diving into your sewing endeavors. These steps can significantly elevate your crafting experience! Crafting a dedicated routine for your JUKI sewing machine ensures a smooth and gratifying sewing journey.

Embrace the Ritual
Before the machine’s hum fills the air with creative promise, embark on a ritual that sets the stage for a seamless sewing session. Here’s a guide to crafting a pre-sewing routine specifically tailored for your JUKI machine:

  1. Needle Check:
    Every project starts with the first stitch. Before commencing your project, inspect the needle for any signs of wear, such as dullness or bends. Ensure it’s securely fastened and aligned correctly. Replace the needle if it shows any signs of damage or has been used for an extended period.

A damaged needle can cause many issues in your project process and creation. Your stitch quality can go down with a broken needle, as this can lead to skipped or uneven stitching. The fabric you’re working on can be damaged and lost due to nonrepairable holes. The needle can break if already chipped and damage your machine or yourself, and lastly, you won’t get the results you’re looking for.

The needles are an important first step to ensuring your machine is ready to create.

  1. Bobbin Space Cleaning:
    A clutter-free bobbin area is vital for smooth stitching. Remove the bobbin case and clean out any lint, dust, or stray threads that might have accumulated. Use a small brush or the machine’s cleaning tools to ensure the area is pristine.

Cleaning your bobbin space will help you prevent any malfunctions while creating like uneven stitches, thread breakage, or skipped stitches. We’re also aiming to avoid those thread jams, maintain consistent tension, and extend the lifespan of your machine.

Lastly, debris in the bobbin area can transfer onto the fabric, causing stains or marks, so keep your projects clean and smooth with a quick sweep of your bobbin area.

  1. Thread Space Maintenance:
    Keeping the upper thread path clean ensures consistent tension and prevents thread snags. Use a lint brush or compressed air to remove debris from the tension discs, thread guides, and around the needle. A clean thread path is crucial for optimal stitching quality.

When you don’t clean your thread space, you might notice inconsistent tension due to dust or lint accumulating, which can interfere with the tension discs or thread guides. You’ll also be able to extend the lifespan of your thread and needle with clean thread space and preserve your fabric from dealing with stains or marks from the debris.

Keeping this area clean is optimal for getting that excellent quality finish you want on your projects!

  1. Stitch Plate Selection:
    Ensure the appropriate stitch plate is installed depending on your project and the type of stitch you’ll be using. Swap to a straight stitch plate for delicate fabrics or a zigzag stitch plate for decorative or stretch stitches.

The right plate will help you achieve quality stitch accuracy, protect your needle from breaking or damage, and reduce puckering in your projects. JUKI also has different options for plate selection on light or heavy-weight fabrics.

  1. Bobbin Thread Compatibility:
    Confirm that the bobbin thread matches the upper thread in weight and type. Consistency in thread choices ensures uniform and balanced stitching.

Having the correct bobbin will also help you with tension control, as mismatched bobbin thread could lead to difficulties in achieving balanced tension. Having the correct tension will also ensure that your fabric doesn’t receive any damage.

And remember, specific sewing projects, such as quilting, may require specific types or weights of bobbin thread for optimal results.

  1. Foot Selection and Attachment:
    Choose the appropriate presser foot for your project. Attach it securely to the machine to guarantee smooth fabric feeding and precise stitching. Different feet cater to various sewing techniques; ensure you have the correct one for your intended stitches.

Having the right foot is an important step to a smooth sailing project. The right presser foot will allow you to maintain excellent stitch quality, and certain feet have markings or guides that assist in maintaining precise seam allowances or stitching lines.

For example, some sewing projects require specialized techniques that can only be achieved with specific presser feet. An edge-stitching foot helps create precise edge stitches. Check out your JUKI options by visiting here!

  1. Test Stitching:
    Before beginning your project, perform a test stitch on a scrap fabric. This allows you to verify the thread tension, stitch length, and stitch quality before starting on your main project.

Testing stitches will help ensure your machine is calibrated correctly, that your tension settings are in order, and that your stitches will finish clean. Taking the time to perform test stitching or practice stitches before beginning your main project is a valuable step.

Crafting a pre-sewing ritual for your JUKI sewing machine establishes a foundation of consistency and attention to detail. By diligently checking the essentials – from needles to thread paths and stitch plates – you pave the way for a hassle-free and enjoyable sewing experience!

Embrace this ritual as a series of steps and a meaningful ceremony that honors your craft. Let your JUKI machine reflect your dedication to precision and commitment to turning every sewing project into a masterpiece. Start your sewing journey on the right foot by embracing the art of preparation with your trusted JUKI machine!

JUKI Tip: How to Get Started with Ruler Work

In this month’s tip, JUKI National Account Trainer Alba teaches us a fun and easy way to use our new JUKI ruler set in the Hearts and Wings collection! Showcased by Alba, check out examples of patterns you can create and an easy trick on how to plan out your designs the next time you’re creating.

Follow along below for a rundown of what Alba covers on today’s JUKI Tip!

Hello, all my JUKI friends my name is Alba and I am the national accounts trainer for JUKI Home Sewing! I’d like to welcome you to my home and today I’m really excited because this is almost like a double video for you. I am not only introducing a new product but I’m going to give you a tip on getting started with that new product. So let’s get right to it and let me show you the new product!

What I’m referring to is the hearts and wings ruler set. This is absolutely beautiful, you’re getting five different rulers that I have spread out on the video and they are clear rulers so I do have them down on white paper to try and make it easy for you to see them. As you could see, they give you five different shapes and really endless possibilities and a lot of people when they get started with rulers and quilting one of the first questions they ask is “so how do I get started?” And that’s exactly my tip for you today!

Now you notice I have no machine set up because really getting started with rulers or any free motion for that fact is on paper or a dry-erase material. So you can work on paper with pen, and I do recommend getting a pen that does not have a click on/off, because that pen will close on you as you are tracing those rulers or templates. You may hear this term, ruler or a template, and they refer to the same thing.

What I am going to do, is at my local Dollar General they have a dry-erase wallpaper and for me, I put this on the back of my cutting mat and it makes it really easy for me to audition and practice with my rulers. So the first thing I am going to do is I will be doing a border with this ruler here, and what I like about the JUKI ruler is, it doesn’t show well on camera, but there are a little dots of grips fabric grips on these rulers so it makes it really easy to start using them.

To start in the video I’ll draw a center line, and what I like about the dry erase is I can just erase if I’ve make a mistake and it makes it really practical on this dry erase material but remember to use a dry erase marker that’s especially made for this. Now with free motion it really doesn’t matter where you start at the beginning or at the end because you have full 360 movements; but for me when I start I like to start at the top of my fabric with the bulk towards me so as I move I’m moving into the machine and that’s exactly what I will be doing here.

I am going to place my ruler down and you will notice on the video all the cross markings, and these are indicator markings to keep you straight, plum and even. So I am going to line up, and when using rulers you want to put some of your fingers on the ruler and some of them off the ruler guiding it and having you keep it from moving or shifting. Now if this were my machine I would be following the edge and at any point stop because that is what will give you a nice beautiful point. Now I am going to move my ruler and line up and make sure that I am staying on those lines.

Now I’m going to turn my ruler around and go to the other side. I could either start from the top or the bottom and always when you’re doing this, pause at that corner. Im going to make sure I am lined up beautifully, and look at what a beautiful design this makes for a border!

As you play with this you could put a medium size one in between and audition but this is what I like about working with a dry erase area paper pen, you’re getting to play with it and really experimenting with the movement and the shape that you will create. Now by using the dry erase, it will be slightly larger because my foot does grip about A4 of an inch from that ruler base but this is a good way to get that general idea of how that ruler will take shape and also to play with it and trying create new and exciting shapes of your own.

I want to thank you for sharing this time with me! If you enjoyed this video and others that you’ve seen make sure to hit subscribe and make sure to leave comments as well on what you’d like to see. Please come back and show me your progress that you’re making with your rulers and again this is the new hearts and wings ruler set that I am playing with a five-piece ruler set so please reach out to your local dealer and get a really nice look at this set!