Top 5 Sewing Techniques Every Sewist Loves

Sewing is a versatile craft that allows you to bring your creative vision to life. From garments to home decor and accessories, understanding and utilizing various sewing techniques can take your creations to the next level. This blog post will explore some beloved sewing techniques every sewist loves to use. These techniques not only enhance the quality and durability of your projects but also add a touch of professionalism and finesse to your craftsmanship! Get ready to elevate your sewing skills and create masterpieces you’ll be proud of.

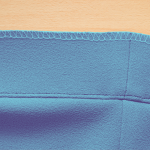
The French seam is a clean and elegant finishing technique that encloses raw fabric edges within the seam. It is commonly used in lightweight fabrics, delicate garments, or sheer materials. To create a French seam, first, sew the wrong sides of the fabric together with a narrow seam allowance. Then, trim the seam allowance, press it to one side, and fold the fabric, enclosing the raw edges. Finally, sew a second seam, enclosing the trimmed edges. French seams provide a neat and professional finish while preventing fraying.

Consider making a French seam pillowcase with enclosed seams for a clean look and added durability. For garment projects, try sewing a French seam blouse or dress, providing a polished appearance both inside and out. Another idea is to craft a French seam tote bag, ensuring the seams are strong enough to withstand the weight of your belongings while maintaining an elegant look.

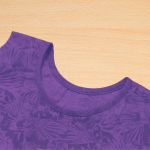
Understitching is a technique used to keep facings or linings from rolling to the front of a garment or project. It involves sewing the facing or lining to the seam allowance close to the stitching line, usually on the wrong side of the fabric. Understitching helps maintain a clean and polished appearance, ensuring the inner layers stay in place.

Consider making a tailored blazer or jacket and understitching the facing to ensure it stays in place and lays flat. You can use understitching along the neckline or armholes for garments like dresses or skirts to keep the facings or linings from peeking out. Additionally, understitching the lining can prevent it from sagging or shifting when working on projects like bags or pouches.

Topstitching is a functional and decorative technique that adds strength, stability, and visual interest to your sewing projects. It involves stitching on the right side of the fabric, usually a short distance away from a seam or edge. Topstitching can secure seam allowances, attach pockets, or emphasize design details. It is commonly seen on jeans, collars, cuffs, and hems. Use a longer stitch length and a coordinating or contrasting thread color to make your topstitching stand out.

Consider making a denim jacket or jeans and using topstitching to highlight the pockets, seams, and hems, adding a trendy and professional touch. Try topstitching along the edges and straps for bags and accessories to provide extra strength and a polished finish. When working on garments, you can incorporate topstitching to outline collars, cuffs, or waistbands, creating visual interest and structural reinforcement. Additionally, topstitching is a great way to add detail to home decor items such as curtains, cushions, or tablecloths, bringing a tailored and finished look to your space.

Bias binding is a versatile technique to finish raw edges, add decorative accents, or create straps and ties. Bias binding is made from strips of fabric cut on the bias, resulting in a flexible and stretchy trim. It can be purchased ready-made or created by cutting fabric strips at a 45-degree angle. Bias binding is used to neatly encase raw edges by folding them over and stitching them. It adds durability, structure, and a professional finish to your sewing projects.

Consider making a quilt and using bias binding to neatly enclose the edges, providing durability and a decorative edge. For garments like dresses or blouses, bias binding can be used to finish necklines and armholes or even create adjustable straps. Additionally, you can use bias binding to add a pop of color or pattern to home decor items such as placemats, table runners, or curtains.

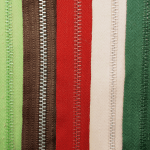
Mastering zipper installation is a valuable skill that opens up design possibilities. Whether it’s a centered, invisible, or exposed zipper, proper installation ensures secure closure and a polished look. Take the time to learn different zipper insertion techniques and practice them on scrap fabric before applying them to your projects.

Consider making a zipper pouch or cosmetic bag to showcase your zipper installation skills while providing a functional and stylish storage solution. You can incorporate zippers into skirts, dresses, or pants for garments to ensure a smooth and secure fit. Adding zippers to jackets or coats allows easy on-and-off access while maintaining a polished look. Additionally, you can create accessories like wallets, laptop sleeves, or even pillow covers with zipper closures.

Sewing techniques are vital in transforming your projects from ordinary to extraordinary. You can create beautiful, professional-quality garments, accessories, and home decor items by incorporating French seams, understitching, topstitching, bias binding, and mastering zipper installation. These techniques enhance the durability and functionality of your creations and showcase your attention to detail and craftsmanship. So, embrace these beloved sewing techniques, practice them with patience and precision, and watch your sewing skills flourish. Happy sewing, and may your creations continue to inspire and impress!

Magical Sewing Techniques for Halloween Costumes

Decorative stitching is a wonderful way to add flair and personality to your Halloween creations this month. You can transform your creations into unique and eye-catching pieces with the right sewing machine and techniques! In this blog post, we will explore five different types of decorative stitching and how you can incorporate them into your costume creations. Let’s delve into decorative stitching and discover how these techniques can elevate your sewing projects.

Satin Stitch:

The satin stitch is a dense and smooth decorative stitch perfect for creating bold outlines, filling shapes, or adding intricate details. It is commonly used for appliqués, monograms, and decorative borders. To create a satin stitch, set your sewing machine to a wide zigzag stitch and shorten the stitch length. Use a satin stitch foot or a stabilizer underneath the fabric to ensure smooth stitching. Experiment with different thread colors and widths to achieve the desired effect and make your designs pop.

Craft a fairy or mermaid costume and use satin stitch to embellish the wings or scales, adding a touch of enchantment. For spooky creatures like witches or vampires, the satin stitch can create intricate appliques on capes or hats, bringing them to life. Additionally, you can use satin stitch to embroider haunting motifs like spiders, skulls, or bats onto costume pieces such as vests, gloves, or masks.

Decorative Embroidery Stitches:

Embroidery stitches offer a world of possibilities when it comes to decorative stitching on garments. From delicate flowers to intricate motifs, countless embroidery stitches exist to explore. These stitches can embellish collars, cuffs, and pockets or create beautiful focal points on your garments. Transfer your design onto the fabric, and use embroidery floss or decorative threads to bring your vision to life.

Use this technique when creating a whimsical fairy costume and using decorative embroidery stitches to add intricate floral patterns or delicate butterfly motifs to the wings and dress. For a frightful twist, bring your vampire or witch costume to life by embroidering intricate cobweb designs or eerie symbols onto capes and hats. Additionally, you can use decorative embroidery stitches to add a touch of mystique to costumes such as fortune tellers, pirates, or mythical creatures. With various stitches like chain stitch, feather stitch, or French knots at your disposal, you can create captivating textures and embellishments that will make your Halloween costume truly unforgettable.

Decorative Hemstitching:

Hemstitching is a classic decorative technique that adds elegance and refinement to garments. It is often seen on hems, cuffs, and necklines. Hemstitching involves creating a row of evenly spaced and neatly aligned holes along the edge of the fabric, followed by stitching that secures the fabric and creates a decorative effect. You can achieve hemstitching with a wing or twin needle on your sewing machine. Experiment with different stitch widths and thread colors to create unique and personalized hemstitched details.

Imagine sewing a vampire or witch costume and using decorative hemstitching along the edges of the cloak or cape, adding a subtle yet mesmerizing touch! For ethereal creatures like fairies or mythical beings, you can incorporate decorative hemstitching to create intricate patterns on the hems of flowing skirts or sleeves, evoking a sense of enchantment. Additionally, consider using this technique to add texture and interest to costumes like ghosts or ghouls, where delicate and uneven hemstitching can mimic the appearance of the tattered fabric.

Scallop or Shell Stitch:

Scallop or shell stitching is a beautiful decorative stitch that adds a feminine and playful touch to garments. It is commonly used on necklines, hems, or as an accent trim. The scallop stitch creates a series of rounded or pointed arches resembling scallop shells. You can achieve this stitch using a decorative stitch setting on your sewing machine or with a scallop-shaped embroidery foot. Experiment with different stitch lengths and thread colors to create varied and delightful scallop designs.

Consider crafting a mermaid or ocean-themed costume and using the scallop or shell stitch to create a stunning scale-like effect on the tail or bodice. For angel or mystical creature costumes, incorporate this technique to embellish the edges of wings or capes, evoking a sense of enchantment. The scallop or shell stitch can also create spooky accents on costumes like witches or sorcerers, where a scalloped hem or trim adds a touch of eerie elegance.

Pintucks:

Pintucks are tiny, parallel folds of fabric that add texture and dimension to garments. They are commonly used on bodices, collars, or as decorative accents on sleeves. Pintucks can be created with a pintuck foot on your sewing machine, which helps guide the fabric and maintain even spacing between the folds. Experiment with different pintuck widths and spacing to achieve the desired effect. Pintucks can be further enhanced using contrasting thread colors or adding decorative stitching along the folds.

Imagine crafting a Victorian-inspired vampire or steampunk outfit and using pintucks to create intricate details on the bodice or sleeves, giving it an air of timeless elegance. For magical creatures like fairies or enchanted beings, pintucks can create delicate pleating on flowing skirts or delicate wings, adding a touch of enchantment to the costume. Additionally, pintucks can be utilized to create structured elements on costumes like knights or superheroes, providing a bold and heroic aesthetic.

Decorative stitching opens up a world of creative possibilities in garment creation. By incorporating techniques such as satin stitching, decorative embroidery stitches, hemstitching, scallop or shell stitching, and pintucks, you can add depth, personality, and uniqueness to your garments. These techniques allow you to experiment with different thread colors, stitch widths, and designs, giving your creations a personalized touch. So, unleash your creativity, explore these decorative stitching techniques, and let your garments become works of art. Happy sewing, and may your decorative stitches bring joy and beauty to your sewing projects!