
JUKI sergers are renowned for their versatility and precision, making them a go-to choice for beginner and advanced sewists! These machines are designed to handle a wide range of projects and sewing plans and help you create professional-looking seams to add decorative finishes. Today, we will discuss the accessories you can find for our JUKI sergers that will help these projects come to life!
Accessorizing your serger not only enhances its functionality but also allows you to tackle more complex projects with ease. Whether you’re adding elastic, creating perfect hems, or embellishing with beads and piping, the right accessories can significantly improve the precision and efficiency of your work.
Let’s Talk Presser Feet
Presser feet are the unsung heroes of any serger, transforming a simple stitch into a professional finish. Each presser foot is designed with a specific function in mind, making it easier to achieve various sewing techniques with precision and efficiency. Here’s a closer look at some of the most essential presser feet for your JUKI serger:
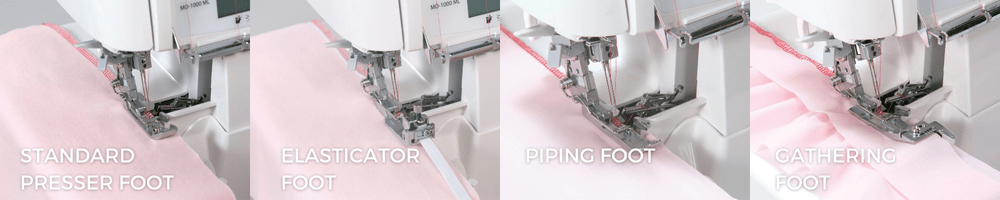
1. Standard Presser Foot: This foot is the workhorse of your serger. It comes pre-installed on most JUKI sergers and is perfect for basic serging tasks like finishing raw edges, sewing seams, and creating overlock stitches. Whether you’re working on lightweight fabrics or heavier materials, this versatile presser foot ensures even feeding and consistent stitch quality. It’s ideal for general-purpose sewing and is often the go-to choice for many projects.
You can learn more by watching here: JUKI Standard Presser Foot Tutorial
2. Elasticator Foot: Adding elastic to fabric can be tricky, but the Elasticator Foot simplifies the process by evenly stretching and stitching the elastic in place. This foot is perfect for creating garments that require stretch, like your swimwear, lingerie, or activewear. The Elasticator Foot also ensures the elastic is attached securely and evenly without the risk of overstretching or puckering the fabric. It’s a game-changer for anyone sewing with stretchy materials!
You can learn more by watching here: How to Use the Elasticator Foot
3. Piping Foot: The Piping Foot is designed to help you easily insert piping into seams. This adds a decorative touch to your projects! You can use piping in home décor items like cushions, pillows, upholstery, and garments to add decorative elements. This foot has a groove that holds the piping in place as you stitch, ensuring that it’s evenly attached with no shifting. The result is a crisp, professional finish that elevates the look of your handmade items.
You can learn more by watching here: Inserting Piping with a JUKI Piping Foot
4. Gathering Foot: Creating ruffles and gathers can be time-consuming, but the Gathering Foot makes it easy! This foot gently gathers the fabric as you sew, allowing you to create even, beautiful ruffles in no time. It’s perfect for adding volume to skirts, sleeves, and home décor projects like bed skirts and curtains. The Gathering Foot also works excellent with lightweight to medium-weight fabrics, giving you consistent gathers without the hassle of manual gathering!
You can learn more by watching here: How to Create Ruffles with the Gathering Foot.
Specialty Plates and Accessories
In addition to presser feet, JUKI sergers offer a range of specialty plates and accessories that can elevate your sewing projects to the next level. These tools are designed to add intricate details and professional finishes to your work, allowing you to explore more creative possibilities with your serger. Here’s a breakdown of some essential specialty accessories that can enhance your sewing experience:
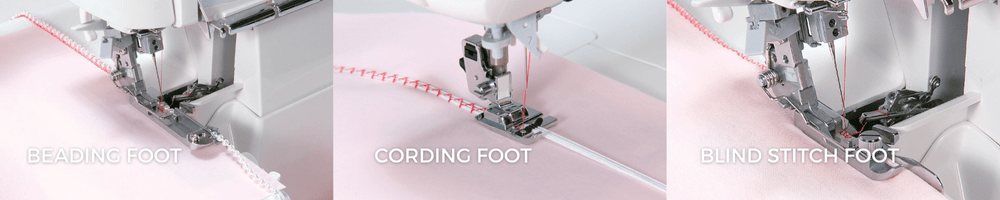
1. Beading Foot: The Beading Foot is a beautiful accessory for anyone looking to add a touch of sparkle to their projects. This foot is designed to sew beads, pearls, or sequins onto fabric precisely and easily. The groove on the presser foot guides the beads while the serger stitches them securely. This accessory is especially popular for bridal wear, evening gowns, and other special occasion garments where delicate embellishments are desired. Whether you’re adding a subtle trim or creating a bold, beaded design, the Beading Foot makes the process smooth and professional!
You can learn more by watching here: Beading Foot Demonstration
2. Cording Foot: The Cording Foot is an excellent tool for adding decorative cords such as yarn and strands of pearls to your sewing projects. This foot is designed to hold the cord in place while the serger stitches it securely onto the fabric. It’s perfect for enhancing the seams of garments, bags, and home décor items, adding a stylish and professional touch. The Cording Foot can accommodate various cord sizes, making it versatile for different projects. You can outline a neckline, add texture to a pillow, or create intricate trims!
You can learn more by watching here: Attaching Decorative Cords with the Cording Foot
3. Blind Stitch Foot: If you want to create invisible hems, the Blind Stitch Foot is a must-have accessory! With this foot, you can sew a barely visible hem from the outside of the fabric, making it perfect for hemming pants, skirts, and dresses. The foot also offers an adjustable guide that helps you position the fabric correctly, ensuring that the stitches are hidden within the hem. The Blind Stitch Foot is beneficial for formal wear, business attire, and any garment where a discreet hem is needed.
You can learn more by watching here: Blind Stitch Foot in Action
Finding the right accessories for your JUKI serger unlocks a new level of creativity in your sewing projects! With the right accessories, you can transform your serger from a simple overlocking machine into a versatile tool capable of handling a wide range of tasks—intricate beading, professional hems, decorative finishes, and more.
Experimenting with different accessories is key to expanding your sewing capabilities! Whether you’re a beginner looking to learn new techniques or an experienced sewist aiming to refine your skills, these tools provide endless possibilities for customization and innovation in your projects. Don’t hesitate to explore and try various presser feet and other serger accessories to see how they can enhance your creative process.
To get a comprehensive overview of the available accessories and how they can benefit your sewing, check out your nearest JUKI dealer here!
