In a world increasingly dominated by technology and fast-paced living, finding a fulfilling and engaging hobby has become essential for maintaining a sense of balance and well-being. Sewing, an age-old craft, has experienced a renaissance in recent years, captivating both seasoned crafters and newcomers alike. As we step into the new year, there has never been a better time to embrace the sewing revolution and connect with other sewists through various online sewing groups, workshops, and sewing retreats! Let’s delve into the significance of sewing communities and events and discover the multitude of benefits they offer in 2023.
1. Support and Inspiration:

Sewing can occasionally present challenges, and having a support network can make all the difference. Engaging with fellow sewists through online groups or workshops allows for the exchange of ideas, troubleshooting of issues, and sharing of accomplishments. The encouragement received from others can ignite the spark of inspiration and creativity, propelling one’s sewing journey to new heights. Additionally, witnessing the remarkable projects undertaken by community members serves as a wellspring of motivation to take on new challenges.
You can also connect with our National Account dealers here who throughout the year, have JUKI trainers visit to keep their staff up to date on the newest JUKI home products so they can help provide you with reliable support during and after your purchase.
2. Learning and Skill Development:

The world of sewing is vast and ever-evolving, with a plethora of techniques, styles, and materials to explore. Sewing communities often host workshops and classes, both online and in-person, led by skilled instructors and industry experts. These workshops not only introduce new skills but also offer a platform for improving existing ones. The chance to learn from experienced artisans can boost confidence and competence, enabling sewists to tackle more intricate and ambitious projects.
Connect with your local JUKI dealers here to learn more about what class options they have available to the sewing community! From weekly clubs to monthly events or special class dates, our JUKI dealers are ready to help you start creating.
3. Fostering Creativity:
Creativity thrives in environments where ideas are freely shared and celebrated. Sewing communities provide a safe space for individuals to express their creativity without judgment. Through collaborative challenges and sharing sessions, members can explore different perspectives and experiment with their creativity, leading to innovative and imaginative sewing creations.
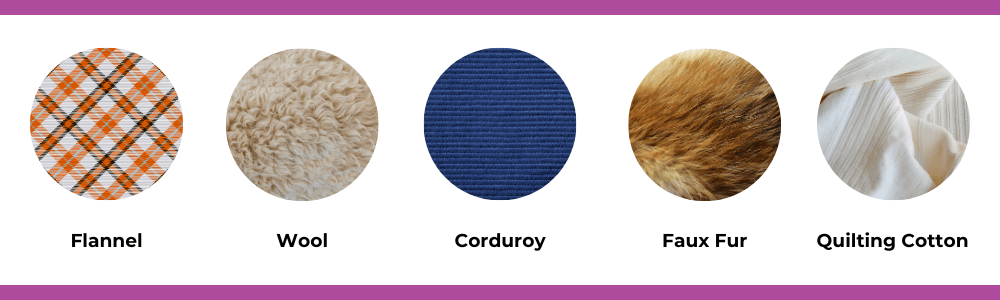
Fostering creativity in sewing and quilting is essential to unlocking the full potential of these crafts and producing truly unique and captivating creations. Try stepping out of your comfort zone by experimenting with different fabrics, colors, and patterns. Embrace mistakes as opportunities to learn and grow, allowing them to inspire new design directions. Draw inspiration from various sources, such as nature, art, and everyday life. By giving yourself the freedom to think outside the box and incorporating diverse influences, your sewing and quilting projects will undoubtedly flourish with newfound creativity and originality.
4. Sewing Retreats: A Time for Renewal:
For many, the hustle and bustle of daily life can impede the full enjoyment of their hobbies. Sewing retreats present an opportunity to escape distractions and immerse oneself fully in the craft. These retreats, often set in picturesque locations, offer dedicated time for sewing, learning, and connecting with fellow participants. The serene ambiance, away from the pressures of everyday life, encourages a profound sense of relaxation and rejuvenation.
You can also attend sewing and quilting exhibitions that host a variety of sewing classes ranging from serging to sewing and quilting. These expos also offer the chance to purchase new JUKI machines at show deal prices and the opportunity to find new notions and fun fabrics! Learn more about the events JUKI attends by staying up to date on our socials here or visiting our events page here.
5. Adapting to the Digital Age:
The internet has revolutionized the way we connect and share information. Online sewing groups have thrived, attracting sewists from across the globe. These virtual communities transcend geographical boundaries, bringing together people who would have never met otherwise. Through online platforms, members can share their work, participate in discussions, seek advice, and make friends, all within the comfort of their homes.
Check out JUKI’s YouTube page from the comfort of your home and learn how to create fun and easy projects by following our step-by-step videos! Thanks to the digital age, we can share our favorite projects that we love creating, and display tips and tricks you can start using on your sewing journey.
As we enter 2023, the sewing community stands stronger than ever, enriched by the passion and dedication of its members. Joining sewing communities and participating in sewing events opens doors to a world of creativity, camaraderie, and personal growth. The support, inspiration, and friendships cultivated through these interactions make the sewing journey not only enjoyable but also deeply rewarding. Good luck on a new year of creating and Happy sewing!