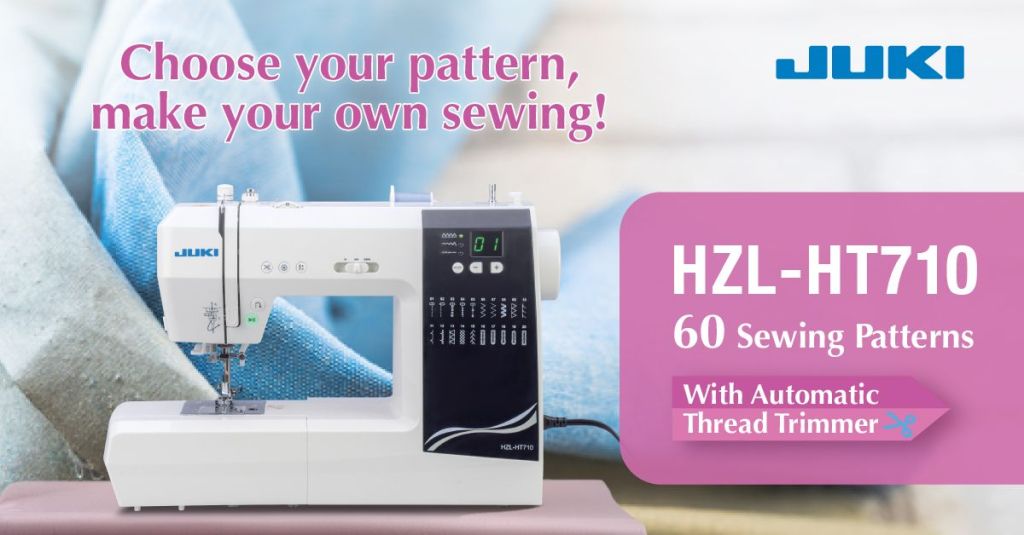
Introducing the HZL-HT710 computerized sewing machine, an innovation that revolutionizes your sewing journey. Seamlessly merging cutting-edge technology with a host of user-friendly functions, this exceptional machine streamlines your sewing tasks and ensures impeccable results. The machine’s standout feature lies in its automatic thread-trimming capability. A single button press elegantly tidies both upper and lower threads, allowing you to save time and concentrate on your craft. Enrich your artistic ventures with an extensive collection of 60 stitch patterns, covering everything from foundational stitches to elaborate motifs.
Bid farewell to the frustrations of threading the needle, thanks to the in-built auto needle threader. The age-old struggle is replaced with a straightforward procedure—follow the guide, and watch the HZL-HT710 elegantly thread the needle on your behalf. Embrace the myriad possibilities that come with the HZL-HT710 computerized sewing machine. Its progressive features and intuitive design empower your creative pursuit and guarantee remarkable sewing achievements. As you invest in the HZL-HT710 today, you unlock a realm of effortless sewing, taking your projects to unprecedented heights of excellence. The journey to seamless stitching and crafting joy awaits.
Features
Automatic Thread Trimmers
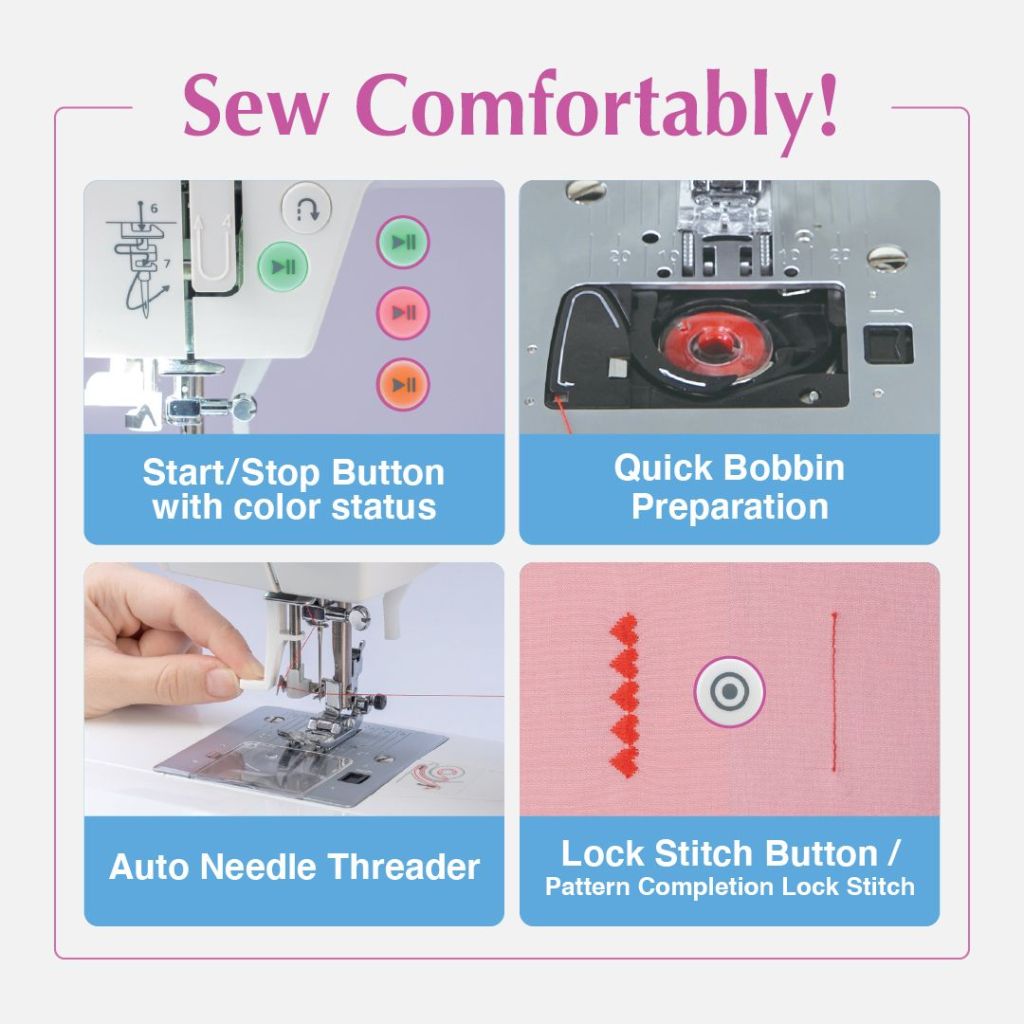
Start/Stop Button
Quick Bobbin Preparation
Auto Needle Threader
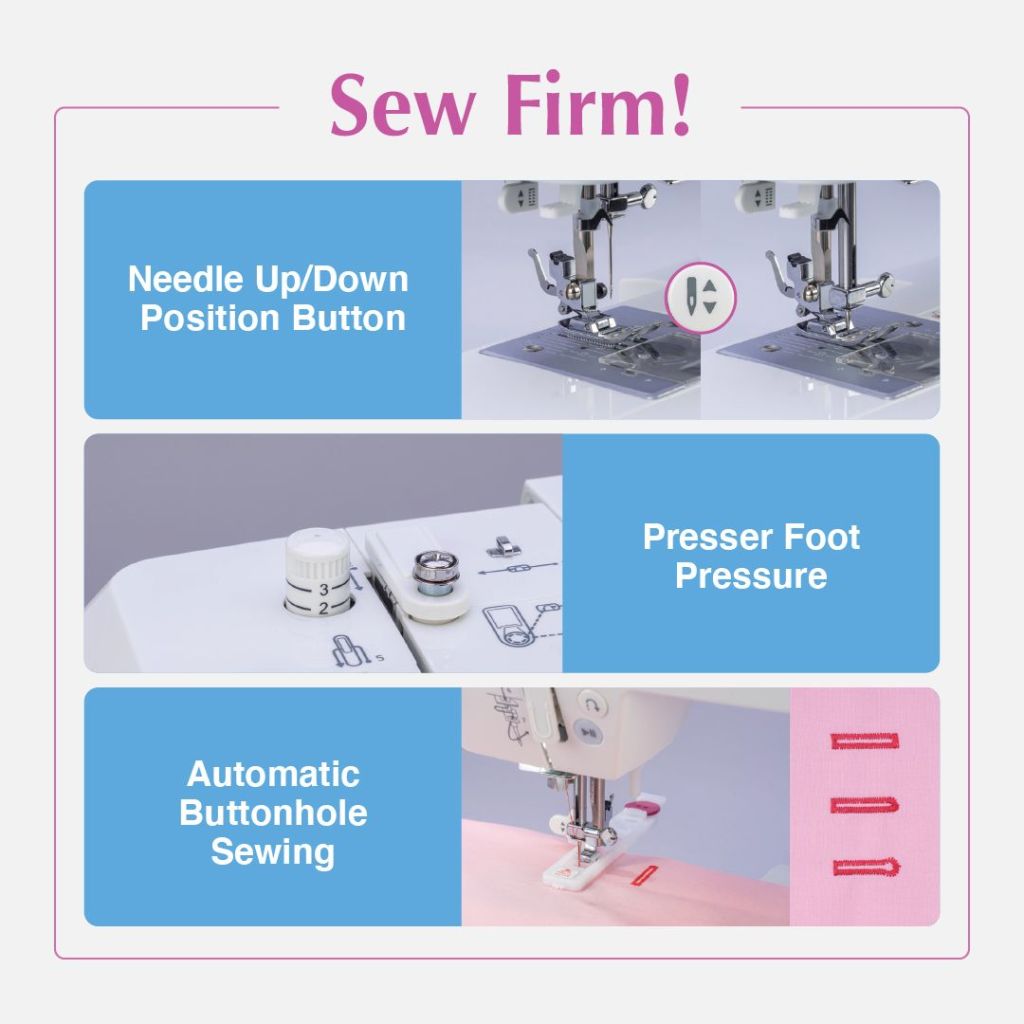
Lockstitch
Needle Up/Down Button
Adjustable Presser Foot Pressure
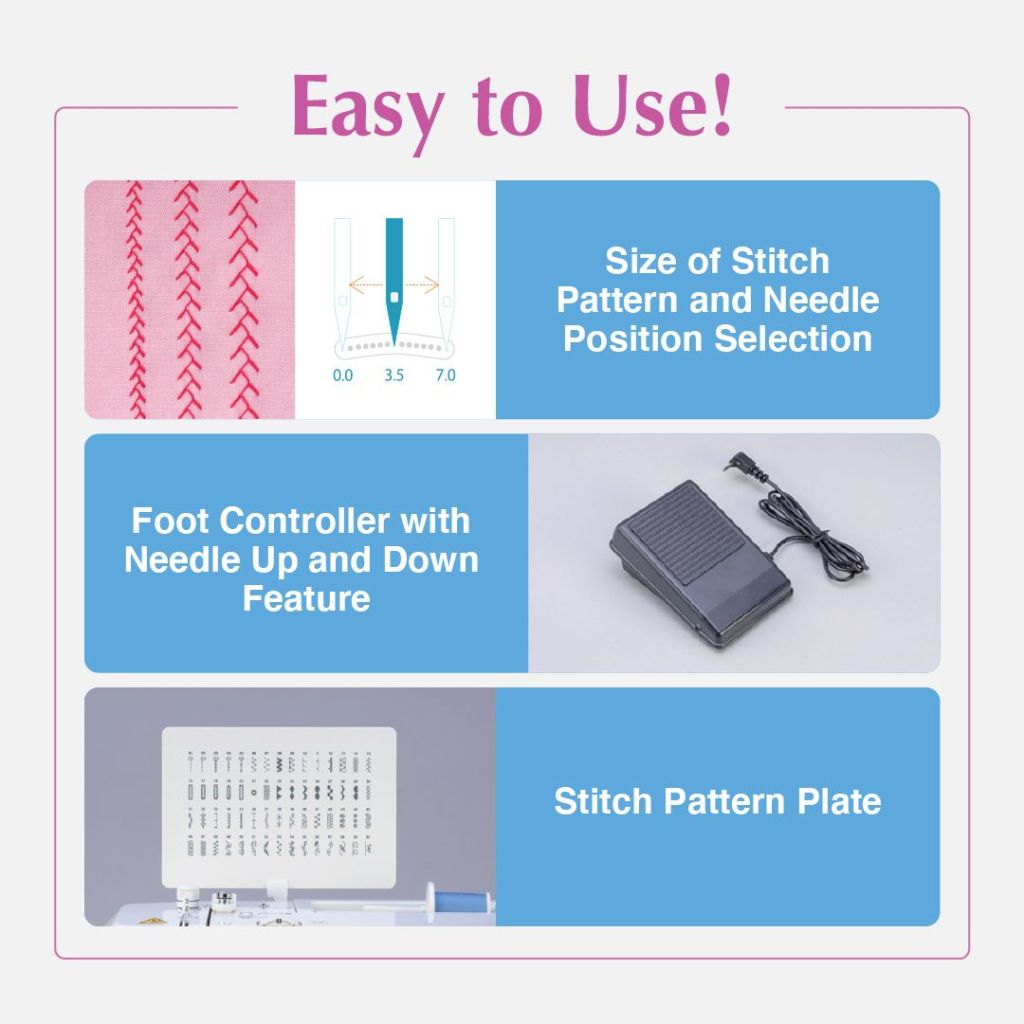
Size of Stitch Patterns and Needle Position
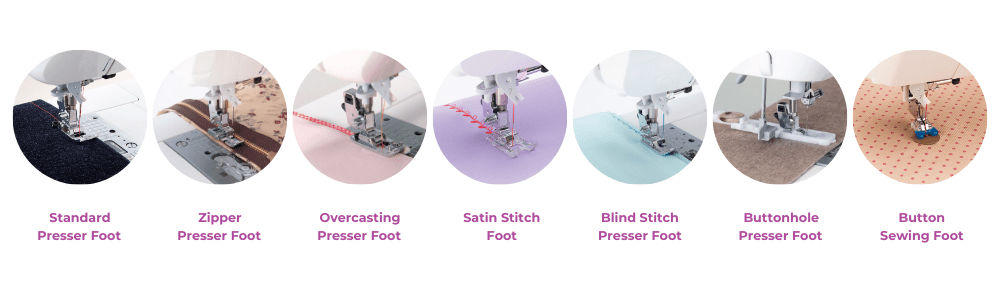
Included Accessories
Standard Presser Foot
Zipper Presser Foot
Overcasting Presser Foot
Satin Stitch Foot
Blind Stitch Presser Foot
Buttonhole Presser Foot
Button Sewing Foot
Learn more about the NEW HZL-HT710 at your nearest JUKI Dealer. To find your local JUKI Dealer, click here today!
Embarking on your first clothing sewing project can be an exciting and fulfilling experience. However, it’s essential to know a few things before diving into the world of garment construction. As a beginner sewist, knowing these key concepts and techniques will set you up for success and promise a smooth sewing journey. In this blog post, we’ll explore five things every beginner should know before creating their first clothing project. Let’s begin your path to becoming a confident and skilled sewist!
Step 1: Start with Simple Patterns
As a beginner, choosing sewing patterns matching your skill level is important. Begin with simple designs that have minimal pattern pieces and straightforward construction techniques. Look for patterns labeled as “beginner” or “easy.”
These patterns often include clear instructions and diagrams to guide you through each step. Starting with simpler projects will build your confidence and help you understand the basics of garment construction before moving on to more complex designs. Some options for patterns we recommend for beginner sewists are skirts, shorts, dresses, or even bucket hats!
Beginning with projects that are easier to create will set you up for success! Remember, it’s okay to start small. You don’t have to make a whole outfit for your first project! Check our simple and fun pattern options you can try on our project page here.
Step 2: Take Accurate Body Measurements
Before starting any clothing project, taking accurate body measurements is crucial. Measurements serve as the foundation for choosing the correct pattern size and ensuring a proper fit. Use a flexible measuring tape to measure your bust, waist, hips, and other relevant areas, following the pattern’s measurement guide.
If you’ve never measured yourself before for clothing, refer to online tutorials or sewing books for guidance on how to take accurate measurements. Remember, a well-fitting garment begins with precise measurements! Make sure to have a measuring tape and some fabric chalk to mark your spots when you’re ready.
Another great way to get measurements is by using pieces in your wardrobe that you already love and following their style and sizing.
Step 3: Understand Fabric Selection
Choosing the suitable fabric is vital to the success of your clothing project! As a beginner, it’s best to start with fabrics that are easy to handle, like using cotton or linen. These fabrics are stable, have minimal stretch, and are forgiving when it comes to sewing mistakes. Consider the fabric’s weight, drape, and care instructions before creating your project.
Make sure to note down any recommended fabric types mentioned in the pattern instructions. The recommended fabric is because the project’s final look might be for outdoor weather needs, additional stretch, or even more flow! Remember how you want the final outcome to look will influence what fabric you’ll create with.
Additionally, prewash and press your fabric before cutting to avoid shrinkage or distortion after sewing!
Step 4: Master Basic Sewing Techniques
Before tackling a clothing project, familiarize yourself with essential sewing techniques! Take some time to practice straight stitching, backstitching, and pivoting at corners on pieces of fabric you plan to create your project with. This way, you can familiarize yourself with the weight of the fabric and the speed you feel comfortable stitching.
Learn how to sew darts, gather fabric, insert zippers, and sew seams with different seam finishes. Knowing these techniques before you start the project will help the process go smoother, allowing you to add embellishes like a dress zipper closure or a button on the cardigan you’ve designed.
Understanding these basic techniques will ensure your garment’s construction is sturdy and professional-looking. Use online tutorials, sewing books, or even take a beginner sewing class at your nearest JUKI dealer for hands-on experience and guidance.
Step 5: Pay Attention to Finishing Details
Attention to detail will elevate any project you create as a sewist. Depending on the fabric and your machine’s capabilities, take the time to finish your seams neatly, either through zigzag stitching, serging, or French seams. Press your seams as you go, use a steam iron, and achieve a polished and professional finish. Consider using interfacing on collar or cuff areas for added stability. Remember, the small finishing details significantly impact the overall look and longevity of your new closet piece.
If you’re a beginner sewist venturing into the world of clothing projects, understanding these key concepts will set you up for a journey of joy. Start with those simple patterns, learn and practice taking accurate body measurements, learn how to select appropriate fabrics, master those basic sewing techniques, and take the time to add those finishing details.
With these things in your pocket, you’ll be well on your way to creating beautiful, well-fitting clothing pieces you’ll love. Enjoy the process, embrace the learning curve, and don’t be afraid to make mistakes. Happy sewing, and may your first clothing project be the start of a rewarding sewing journey!
When we first try sewing, our first idea is to learn from project and instructional videos or reading pattern and sewing instruction books. One of the top things you’ll need to know about is the type of stitches you can create and when it’s time to use them on your projects! Depending on what machine you’re working on, whether you’ll be able to complete every stitch we mention below, and how you’ll be able to create it.
Let’s Get to Stitching!
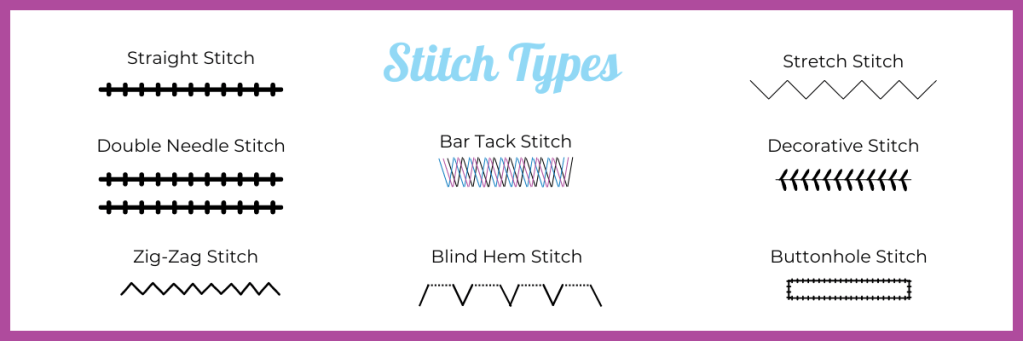
Straight Stitch:The straight stitch on all JUKI sewing machines is perfect for plain seams, darts, tucks, and topstitching! We recommend altering the stitch length to suit your project goals. The longer stitch lengths can be used for projects that require gathering or very long lengths for basting, making it easy to remove the stitches. Remember that your needle position should be set to the center of the presser foot for this to work.
Some machines will also offer a triple straight stitch. This is where the machines take 2 steps forward and one step back. This extra-strong stitch is excellent for crotches in pants where the seam is under extra stress.
Stitch Lengths to Know:
Seams and Majority Sewing: Length 2.0-3.0.
Gathering Fabric or Machine Basting Fabric: Length 4.0 is used for gathering fabric and machine basting fabric.
Double Needle Stitch:Add extra durability to your projects using this stitch! If you’re working on knits or stretch fabrics, this type of stitch creates parallel lines along the fabric and has the benefit of the fabric responding well to it.
If you’re working with woven fabrics, you won’t require this type of stitch, but it can be used to make a hem look more professional, giving your project that professionally finished look.
Keep in mind that twin needles come in a variety of sizes, and they have two number designations: one is the space between the needles, and the other is the needle size. So, for example, a 4/80 twin needle has 4 mm space between two sizes of 80 needles. Then for your extra needle, you’ll use your extra spool to place the second thread on your machine.
You can use this stitch to create decorative stitches, parallel rows of topstitching, and a coverstitch hem like those found on t-shirt hems or pintucks.
The Zig-Zag Stitch:Found on most of JUKI’s electrical and computerized machines, you won’t need to go over the fabric multiple times with this stitch! This stitch is solid and most commonly used to stop raw edges from fraying.
If you find yourself without a serger, this stitch is great for sewing knits as it has a built-in elasticity, meaning your stitches won’t break when pulled.
This stitch can also assist you in adding applique to your projects, like beautiful motifs for decoration.
Zig-Zag Width Setting Tips:
Sewing knits on the seams – We recommend a width of 1.0 and a length of 2.5. The stitch should be small and tight and look similar to a straight stitch.
Sewing knit hems – We recommend a width of 4.0 and a length of 3.0. The zig-zag should be much wider than the seams.
Finishing raw edges – We recommend a wide zigzag of width 4.0 and length 3.0 right on the edge of the fabric. This can stop your project from fraying and will increase the longevity of your creations.
Applique – We recommend a length of 0.5 and a width of 4.0. Again, you’ll want a very close zigzag stitch so that very little fabric shows between the stitches.
Blind Hem Stitch: This mix of straight and zig-zag stitches is perfect for hemming and mending your closet items! Nearly invisible, this stitch is used to either sew two pieces of fabric together or fold one fabric together.
A blind hem means you can’t see the stitching on the top of the outward-facing fabric. When done correctly, all you should see are little dots. These are the micro stitches, with all the visible stitching at the back. This stitch is perfect for skirts, dresses, and trousers with non-stretch fabrics.
You can also find presser feet accessories like the Blind Stitch Presser Foot to use in conjunction with this stitch option.
Bar Tack Stitch:This stitch was made for those areas that need extra durable stitches! Due to being in high-stress zones, you’ll want to use this stitch to reinforce project areas that are subject to stress and stretch, like your pant’s belt loops or pockets.
We also recommend this stitch for fabric bags because the stitch will provide strength to your stitches and the ability to withstand the stress of carrying multiple items.
This stitch does include the use of zig-zag and can be applied with a machine. If you want extra support, this stitch can be doubled up with a back stitch at the end of the seam.
The Buttonhole Stitch:This stitch can be used on a multitude of projects and depending on what machine you’re creating on you will either have one step to do, which measures and sews the buttonhole reinforcement for you, or take 4 steps and adjusts a few settings as it sews the 4 sides of the buttonhole.
You can use a zig-zag stitch for stitching buttonholes. Still, most sewing machines have the capability to create buttonholes with a special foot attachment or a pre-programmed buttonhole setting, like our DX-4000QVP.
You can also use the buttonhole stitch to make sewn eyelets, attach applique to ground fabric for personalization, and as couching stitches.
Stretch stitch:Use this narrow zig-zag stitch when working with knit fabrics! While a straight stitch would break under the stretch of these fabrics, a zig-zag stitch stretches according to the fabric stretch. You might also hear this stitch called the lightning stitch or elastic stitch. This stitch can also be used to join elastic and the fabric or for mending tears in cloth!
Decorative Stitch:While not commonly picked, many electrical and computerized machines offer many decorative stitches that you can work into your everyday projects. You can experiment with different color threads and stitch options to be as creative as you want in your project designs!
We recommend stabilizers when creating with decorative stitches so that your designs don’t pucker or stretch on your fabric bases. This will help create a smooth, consistent stitch in your designs.
Keep in mind when working with decorative stitches the difficulty of removing them. These stitches can be very dense, making them easier to fix if you don’t like your chosen design. We recommend using a sample fabric to test your decorative stitch on the fabric and confirming which designs you want to use before beginning our project.
The Right Machine
When choosing your machine, remember what stitch capabilities it has and what you’ll need to create the projects you’re dreaming of. A basic sewing machine will often only offer straight stitching sewing, so if you hope to work with other stitch options like we listed above, you’ll need to broaden your machine options. To use more stitch options, like decorative stitches, we recommend researching an electrical or computerized machine like our computerized sewing machines that commonly offer a variety of stitches for your project needs.
Want to test-drive a machine and check out our stitch options? Contact your nearest JUKI dealer today here!
Meet our JUKI National Accounts ready to help you find the right machine for your dream projects!
JUKI’s National Account Dealers have highly desired JUKI models on display. This allows you and other customers the ability to see and try the machines at a National Account Dealer location to help you find the right JUKI for your sewing needs.
To find your nearest JUKI National Account visit us here.
Get ready for a new season with a new look using JUKI! Whether you’re creating a new jacket, a dress for a night out on the town, or a swimsuit for the sunny days approaching, our JUKI machines are ready to help bring your projects to life. Enjoy the Season, and give yourself a new look!
Check out our serger machines and contact your local JUKI dealer here to learn more about our machine features by contacting us here today!