A Look Behind Center Street Quilts!

From her beautiful quilt projects to pattern creations that we love to try our hand at, today we’re spotlighting Kristina Brinkerhoff, owner of Center Street Quilts! If you’re a quilter who loves finding new inspiration for your future projects or a creator looking for new patterns to try your hand at, you’ll love Center Street Quilts’ shop and blog! Follow along as we cover Kristina’s journey in quilting and design patterns creating, what inspired her to become a pattern designer and how her platform grew to where it is today.

FFP Blocks

Like many of us quilters and sewists, Kristina’s journey starts right home. Surrounded by women who loved being creative, she watched them at work as they designed sewing projects and spent hours crocheting and knitting. Memories of Kristina’s childhood include playing under those big quilt frames, surrounded by tying and hand quilting around her. These little moments led to her interest in the hobby, starting with her first quilt at 13.

During a slow-moving summer, Kristina, at 13, asked her mother to help her make her first quilt. The research wasn’t as easy back then as it is today, so they went to their local quilt shops with a plan in hand! It was here she chose her first quilt fabric, a 30s reproduction fabric and a simple pinwheel block. By the end of summer, she had undergone quilting training. From learning quilt planning to cutting and sewing, she even began creating her own designs. Sewing on and off the years, Kristina was able to focus her time on the hobby regularly after getting married.

Inspired by day-to-day life, she found ideas in nature, art, books, and even tattoos! Kristina loved keeping a sketchbook on hand because of this, ready to draw down a design when the idea made its way into her mind. But, beyond the inspiration she found in life, her other hobbies encouraged her to keep designing and sewing. Crocheting, knitting, paper crafts, and drawing; were all projects that brought out the creativeness in her.

“It can be extremely liberating and ignite ideas by changing things up and working on projects that are different than normal.”

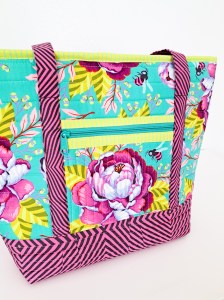
When she does sew, Kristina uses her TL-2000Qi. Purchased back in 2016, she chose this machine, not for its fancy features but because it offered power and reliability in her creative process, becoming her go-to sewing machine! With its accuracy for piecing quilt blocks and the motor strength’s ability to sew through thick seams, this machine has helped create pieces from quilts to her beautiful bags.

Center Street Quilts sewing space

When asked what recommendations she has for quilters purchasing a new machine, Kristina recommends not focusing on the features and whistles but instead on a machine with power and reliability. Below are three other features Kristina recommends for quilters and creators alike.

  • An ample throat space. (Good for quilting quilts and maneuvering bags.)
  • The ability to lower the feed dogs. (Needed for free motion quilting.)
  • The option of stopping the machine with the needle down. (Super valuable for quilting and bag making, so your project doesn’t slip as you adjust your hands.)

Whether you’re choosing your first machine or looking to upgrade, having the space to create and the power to build those quilts can be the ticket to a better sewing experience.

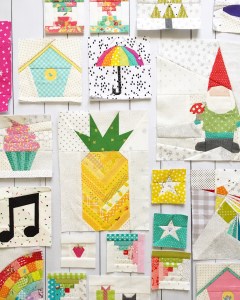
Kristina isn’t always sewing and quilting, though! When she’s not building a new project, you can find her designing her shop’s next pattern. What first was a challenge that involved a whirlwind of decisions, all the different ways to make a quilt block, size options, color variations, and more have now become a game of balance.

“I’ve learned to balance ease of construction with the aesthetic I’m looking for, but it still takes me plenty of samples to decide on the end product.”

Merry Little Trees Quilt

One thing Kristina loves about pattern creation, no matter the challenges the process comes with, is picking her fabric! Enjoying the opportunity to play with color schemes and choose her favorite fabric patterns, Kristina only wishes there was more time to see all the potential fabric options for quilts and bag making. Don’t we all!

With quilting and pattern creation under her belt, it was only a matter of time before Kristina began moving her hobby into a potential business. During this time, the name ‘Center Street Quilts’ was created! Based on an address from Kristina and her husband’s old family home, the Center Street home witnessed countless hours of sewing and creating to get done.

Center Street Quilts is an online pattern shop where quilters like you can find fun new patterns to try your hand at! When we spoke with Kristina about how she decided what patterns to create and sell, she focused on her love for the hobby and process.

“From the day I started Center Street Quilts, I decided if I was going to succeed as a business, I’d have to LOVE what I was doing.”

While this hasn’t always equated to the best financial decisions, she says, like a request to add products for paper crafting to her shop, the idea of loving what she’s doing has helped her be creative and stay true to herself.

One of the ways so many customers have learned about her shop is through her work on social media platforms. With over 100k followers, Kristina mentions it’s been astonishing and supportive to see how many fellow creators and quilt lovers are interested in her creations. With the quilting and sewing community growing each day, she focuses on how enjoyable it’s been having a small corner of the world where she can share her work with her followers and creators.

If you’re looking to make your own corner online, Kristina reminds us to not underestimate the power of a beautiful photo! Focusing on clear, bright photos that showcase your product well will get you farther than 10 mediocre ones, allowing your work to look its best! She also advises interacting with your community! Reach out to fellow creators, uplift, comment on others’ projects, and get involved in the community and online events. Above showcasing your work, these interactions will help you make lifelong friends in a hobby you love!

Kristina also reminds us to love what we’re doing. With the flows of social media constantly changing, it’s important to find fulfillment and joy in what you’re creating!

“If you find fulfillment and joy in what you’re creating, and that joy is the primary reason you create, then opening an online shop or starting social media pages will be a much more peaceful process.”

Fleetwood Tote Moon Garden

As for Kristina’s online shop and quilting journey, many hopes and dreams are still to be brought to life! From several bag patterns in the works to a dream of providing online courses for beginner quilters to share her knowledge, we can’t wait to see where ‘Center Street Quilts goes. From her journey in quilting to her advice for content creators, we had a great time getting to know Kristina and her shop Center Street Quilts! 

If you’ve enjoyed learning about Kristina and her journey in quilting, follow along and check out her blog, socials, and e-shop below!

Etsy shop: Shop patterns here!

Center Street Quilt’s blog with free tutorials and patterns: find here!

Instagram: follow along here!

Upgrading your Sewing and Quilting YouTube Page

With so many channels on YouTube, it can be difficult for new sewists and quilters to find your page! That’s why in today’s blog post, we’ll go over some tips you can put in place for your channel that will encourage viewers to stay and engage with your page.

Follow along as we go over pieces you can start editing today!

Cleaning Up Your Channel

Have you been posting videos for a while? We bet your skills in filming and editing have upgraded, so let’s review those old videos! Cleaning out videos that are low quality, outdated, or have a low amount of views can help your channel seem cleaner and build credibility.

Sometimes, those low-quality videos can turn a viewer off your page and prevent a new subscriber from joining, so it’s best to keep up to date with your content!

What’s Your Brand?

Having a brand goes beyond color scheme and font, but what viewers see in the background of your video and what you may even be wearing! Think of the space you’re creating and what viewers can see when you film. Remove pieces that may bring attention away from your projects, and add items that promote your brand or shop!

Here, you can focus on placing past projects, items that speak to your personality that allows viewers to feel like they know you, and wearing pieces you may have created or matched your personality. It’s these details that build a larger picture for your audience. When viewers like your personality, they’ll come back and watch just for you, even if the project isn’t something they’re interested in!

Lean into your brand; for example, if your page focuses on garment creation, try wearing past pieces you’ve created that encourage viewers to watch your old projects videos!

Creating a Channel Trailer

JUKIHomeSewing Trailer

Creating a promotional video for your page is a great way to share your goal and brand with new visitors. This video will automatically play for visitors that find your channel and pinned at the top of your page. We recommend creating a short trailer that covers about a 2-3 minute length!

Some items in your video are past video footage stitched together, a “pitch section” where you share what your channel is and what viewers can expect to see, and a section where you can request new viewers to join your page and subscribe. Focus on your tone and the script, and let your personality shine through!

Thumbnail Designs

Help your channel look coherent and professional with consistent thumbnails! Following a design theme, you can create thumbnails that attract viewers looking for projects.

While YouTube comes with preset options, creating your own on free software like Canva can help your channel feel clean, showcase your personality, and help viewers get an idea of what your video will be about.

Collaborating with Those in Your Community

Are you looking for exposure to a new audience? Then, reach out to your fellow sewist and quilter YouTubers!

Suggest an idea to another creator where you can cross-promote your channels while creating a fun project or pattern that viewers will love and engage with! Of course, the best way to do this is to appear on each other’s channels. We recommend introducing your new friend to your audience and where they can be found before diving into your video so viewers can see why you’re endorsing one another.

Using Binge Watching

Binge-watching is an excellent tool for encouraging new viewers to watch and follow your page. By creating playlists that viewers can follow along too, they can get a better idea of your credibility and have more time to decide if they’d like to join your channel. In addition, viewing multiple videos of yours will give viewers a better sense of why they should follow you.

Creating a playlist for your channel will also upgrade your SEO, depending on what keywords you use to title them. Your content can be organized by project type, level type, sewing or quilting, etc. Curating your playlist will depend on what videos you post and how you want viewers to watch and enjoy them.

Two ways binge-watching can encourage subscribers is by creating a playlist where you control the next video viewers are watching, stopping them from transferring over to a new channel or two; you can focus on a video series that is posted over a period of time, encouraging viewers to subscribe and get notified when the next video posts.

YouTube Video Cards

Easy to add to any video, YouTube cards are the perfect way to promote another video from your channel and a subscription from the viewer. While YouTube offers the option that automatically chooses the best video from your channel, you can also pick a specific video yourself that correlates with your project.

For example, if your video is on a new project for quilting, you can place a past video with another similar project or a different video you want to promote.

Be Consistent

Whether you’re posting once a day, a week, or a month, having a consistent schedule is needed! The key to success is consistency.

Beyond the theme and content of your channel, consistency will help viewers figure out your style and what you’re about. Viewers subscribe not just because they loved your video but because they hope to see more like it!

Find what your focus is and how you’re going to communicate this to viewers. Find the best schedule, and focus on your analytics to see what’s working.

For example, depending on your viewership, you might have better luck with views posted in the morning on the weekend than on weekdays in the afternoon. Your schedule should work for you and your viewers.

Sharing and Promoting Your Videos

While we can make beautiful videos, they can go nowhere without proper promotion! This is why posting your content in the right places is essential when looking for your audience.

The first location you can focus on is your go-to social media page. Facebook, Twitter, Instagram, and Pinterest. These are popular platforms that creators rely heavily on when looking for project inspiration and new ideas.

Another format can be diving into niche community pages. Think of fellow Facebook pages, Reddit pages, or specific quilting and sewing communities you’re a part of that would love to see your creation! Remember when posting in niche communities to share who you are (the creator) and what you do (your page); this way, members of those groups accept your posts and join your channel!

Implementing These Tips

While some of these tips can be implemented immediately, like creating a playlist for your seasonal projects or how-to’s, building your channel takes time! Focus on what you want viewers to learn and feel when they watch your channel, and create a brand you are proud of. Don’t worry about the number of viewers when you start off and prepare to be consistent and keep creating!

Looking for inspiration? Check out our JUKI Youtube page here today! Follow along as we showcase how we implement these tips on our page!

Designing Your Sewing Space

When we’re ready to get creative, we want to sit in a space that encourages our energy and helps us get our project done! That’s why in today’s blog, we’re going to cover some tips and tricks you can start using when setting up your workspace. Whether you’re creating in the studio room or your kitchen island, having the proper organization and setting up your space in a way that flows for you will help improve your project creation experience.

Follow along as we focus on four key aspects of any sewing area design: your space, budget, tools, and storage. Then, let’s set up a space to inspire you to get creative and have fun!

Choosing Your Space

While we may not always have options available, figuring out where to set up shop when we plan to sew can be difficult. If you have trouble deciding where to create, or keep jumping around spaces, view below for some things to consider the next time you’re ready to sew.

Think About Your Space

As long as you and your machine fit, you’ve found space! The good thing about sewing is that as long we can create an area where supplies are nearby and we can sew, we can now create our projects. Focus on organization and storage techniques if you work in a small space.

For example, if your space is limited, think of what you’re essentials are. Machines, tools, fabric, and notions can all be organized, placed, and readied for specific projects. Spend time in your space, decide what pieces you can use to expand your storage, and set up a spot that allows you to create comfortably. Options like wall organization, under-table storage, or allocating closet space can better enable you to have your tools and fabrics on hand.

Next, focus on lighting! When you’re creating, you don’t want to strain your vision to see how your stitching is going; therefore, we recommended to find a spot with natural lighting, using supplemental lighting like overhead, desktop, or portable lamps. Also, keep in mind that some machines include LED lighting, which can be another lighting option when working at night.

Last, let’s focus on how you can organize and keep it clean! While our project spaces can be free for all when sewing, it’s great to have a clean space. Think of what accessories, like baskets, drawers, carts, and more, can be brought into your room that will provide storage and organization to your project area. 

Budgeting

We all know sewing can be costly! This is why, when it’s time to set up your sewing space, it’s a good idea to allocate a budget and decide what you need or want for your area. While furniture and organization sets can be costly, there are ways to set up your space while being budget-friendly.

Upcycling

Have a desk in a spare room? How about a bookshelf rarely used or a closet with some space? These things can easily be added to your sewing space! Using what you have in your home is a great way to begin building your area because while it’s budget-friendly, it allows you to create a designated space for your craft.

It doesn’t stop at furniture, either. These are excellent storage pieces for notions and tools if you have empty cookie tins, unused containers, or storage bags. In addition, baskets can be used for fabric and even be created by you! For example, this basket (including the sewing basket on the JUKIHome website from LuAnn) is great for tossing in those scrap pieces you plan to use again in the future.

DIY

It can be extremely rewarding building furniture! For example, if you have the space allowance, you can create a piece like a custom cutting or ironing table. Or, if you’re working in a tight space, you can create custom organizational furniture that is in tune with your storage and space efficiency needs.

Thankfully, there are thousands of inspirational photos that other sewists and quilters have shared online that new sewists can find inspiration from. Search your favorite media sites like Pinterest and YouTube for tips, or check out your favorite sewist blogs, to gather ideas on what type of space projects you can do that will upgrade your sewing area without breaking the bank.

Furnishing

Finally, if this is within your budget, you can choose to purchase new furniture for your sewing room. We recommend focusing on pieces that offer ample storage space, vertical style furniture, and hanging an item like a pegboard for tools.

When setting up your space, think of the top 3 spots: your cutting area, your sewing machine spot, and your ironing area. These spaces don’t need to be large but comfortable enough for you to create and get the project done! Whether it’s your dining table, Kitchen Island, or a designated studio room, having these three spots will help get your project done.

Tools for Your Space

Think of your budget and what projects you plan to create before deciding what tools your studio needs. While it can be tempting to buy everything we see at the sewing shops, it’s best to start with the basics and build your way up to new tools and accessories. For example, a beginner sewist should create an essential sewing toolkit that includes cutting tools, a marking tool, a clear ruler, pins, needles, measuring tape, a pin cushion, an iron, and a seam ripper.

If you feel like it’s time to upgrade your toolset, pick accessories that can help you elevate your current skills. Items like curved rulers, pattern weights, seam gauges, or presser feet that weren’t included with your machine can help you create more professional-looking finished projects. If you plan to sew for life, you know new accessories and tools will always find their way into your studio space. Remember your budget, projects, and storage when choosing new tools and accessories for your studio.

Organizing Your Space

Whether we’re sewing in a small or large space, the organization is key to a tidy workspace. The fact is, if you’re creating on your kitchen table, you’re going to be packing and unpacking your machine often. Based on your needs, you can create an organization system that stores your equipment well and is within easy reach.

One of the best ways to organize your space is vertical! Using vertical shelving is perfect for all your supplies. Fabric, notions, tools, and accessories can be displayed, so you keep track of what equipment you have, and the shelving will allow you to fix the shelf sizing to your needs. You can also find add-ons like organization boxes that enable you to separate your accessories and tools easily. Other options include baskets for fabrics, hanging racks for tools, or boxes.

Since fabric tends to take over most of our storage space, we recommend folding flat or rolling the bundle to keep space. Stashing your fabric in a basket or clear container is best for viewing your inventory and keeping count of what fabrics you have on hand. Creating a swatch system with fabric descriptions or organizing by color or type is a couple of ways to organize your fabric and keep track.

For patterns, we recommend storing these in boxes or creating a pattern binder to keep track of your collection. If you’re someone who likes to purchase digital PDF patterns and don’t use them upon purchase, we recommend creating a filing system on your computer or laptop as well! Keeping these pieces organized will help you easily set up your next project and allows you to keep in mind what patterns you already have when you’re in the mood to create.

Focus on keeping your equipment clean and ready to use for machines and notions. A cover for your machine will reduce dust buildup and keep your machine safe when not in use. For your tools, a peg board for your wall can be the perfect furniture piece! Add hooks, buckets, and shelves to organize your tools by type and size. Lastly, keep notions organized with clear baskets and jars. Pieces like rolling carts, clear mini drawers, and clear plastic containers are best to easily see what you have when it’s time to create. Focus on making your most commonly used tools, notions, and accessories visible and in easy reach!

Get To Sewing!

Once you’ve planned your sewing space and have everything set up, it’s time to enjoy your new space! Keeping an organized sewing space can be hard when creating and amid the process, but having a designated area for our tools and fabrics can upgrade our creative process with each project! Of course, as you keep creating, you’ll reorganize your studio, and we hope these tips help you plan the space you’re happy to create in!

Are you looking for a new machine for your studio space? Visit your nearest JUKI dealer to learn more about JUKI near you!

JUKI’s Holiday Gift Guide

As the holidays get closer, we start thinking about those special people in our lives and what gift we will get them this year! If you have a quilter or sewist in the family, and you’ve been dreaming of getting them the perfect machine, follow along as we recommend our favorite devices depending on their project focus! From home decor creators to quilters and fashion garment designers, JUKI is here to help you find a suitable machine for your loved one this holiday season.

For the Fab Home Decorators

Buying the right gift for your creative friends can be difficult when you need help figuring out what to get them! So if you have a creator who focuses on home décor projects, we recommend our favorite home décor machine and accessories they would love!

If you’re looking to buy your loved one a sewing machine this holiday, the DX-2000QVP is perfect for home decorators! From decorative pillows to table runners and quilts, this machine can help them easily create their next project. Filled with sought-out features that beginners and advanced sewists will appreciate, like our JUKI Box Feed that moves your fabric for you, the floating button to prevent uneven seams, and comes with an assortment of presser feet that will help them bring their projects to life.

Does your loved one already own a DX machine? Then, upgrade their accessories kit and help them create new projects with a JUKI Creative Set! The Creative Set offers sewists a set of presser feet perfect for embellishing and adding decorative touches to their designs. This set includes pieces like the Applique Presser Foot, Cording and Embroidery Presser Foot, Pearl Attaching Presser Foot, Cording Presser Foot (for 3 Cords), Presser Foot with Guide, and Open Toe Presser Foot!

For Your Favorite Fashion Designer

Have a fashion designer in your life? Check out the Sayaka DX-3000QVP for their holiday gift! When creating fashion, designers are always ready to get creative and add personal touches to their work. With a machine like the DX-3000QVP, creators now have access to 351 stitch patterns, including beloved zigzags, 20 professional buttonholes, and four lettering fonts! They can bring their ideas to life with options like that while adding those personal touches they love.

The DX also offers a large workspace with a 12″ throat space for creating large projects like dresses, pants, and more. They’ll also enjoy a color touch panel where ease of use helps them change settings such as thread tension, presser foot pressure, pivot function, drop feed system, and automatic thread trimming with one touch. Add in free motion quilting, an Interchangeable Straight Stitch Feed System, and JUKI Smart Feed, and beginner and advanced sewists alike will love what they can create.

For sewists who have been dreaming of a serger, the MCS-1700QVP is the best of both worlds! Offering both coverstitch and chain stitch, this 3- and the the 4-thread machine is perfect for creating numerous projects like blouses, dresses, swimming suits, and athletic wear, thanks to how easy it is to work on stretch fabrics! In addition, strong chain stitch sections like waist seams and pants side seams become sturdier and cleaner.

If you’re looking to help them upgrade their sewing kit, we recommend our Invisible Zipper Foot and Double Fold Bias Binder! The Invisible Zipper Foot for the DX Series is perfect for adding that professional touch to their fashion pieces, where dresses, jackets, and even bags can now have a cleaner look. The Double Fold Bias Binder, created for the MCS machine series, can help fashion creators easily make straps for their camisole pieces or automatically fold the fabric to bind the garment edges for details like a neckline.

For the Quilters in Your Life

Quilters are always looking for more space to create! With the Miyabi J-350QVP, you can help them create a workspace that measures from 5 feet to 12 feet, where they can easily create quilts up to king size. In addition, this quilting machine offers features like our built-in JUKI SmartStitch titch regulator system, where quilters can produce accurate, precise stitching at any speed, helping them create beautiful designs and art. In addition, you can add Quilter’s Creative Touch 5 (QCT5) which allows you to easily design, lay out your quilt projects, and leave the machine to do the stitching for you!

If your loved one doesn’t have the space for a stand-up machine like the Miyabi J-350QVP, we recommend checking out the J-150QVP! The J-150QVP is the best of both worlds as it offers the space and free motion feature needed for quilting while also being a straight stitch machine that can help them complete their quilt in one space. Furthermore, with its digital screen, it is easy to change settings, the tension, speed, box feed system, lock/backstitch count, and more!

Finally, if your quilter already has their holy grail machine, check out JUKI’s newest quilting accessory! Our Free Motion Quilting Rings come in two sizes, 8″ and 11″, and offer creators the chance to add beautiful stitching with improved guidance by providing no-slip bottoms and using durable high-density polyurethane (HDPE) construction. Quilters tired of moving their quilt around as they add free motion quilting will love the ease of using this accessory the next time they’re creating!

For the Bag Creators

Finally, if you’re looking for the perfect gift for the bag creators in your life, look no further than the Haruka TL-18QVP! This single-needle, lock-stitch, portable sewing machine is built with industrial-quality sewing, helping creators with large projects create peace. No more fighting with the sewing machine because of heavy or thick material! This machine is equipped with our industrial mechanisms and features a float foot function that is great for many layers and thick seams that handbag-making needs.

Other features sewist will love about this machine is the brightness adjustment of the light and the drop feed for adding embroidery or free-motion quilting. In addition, this sub-tension unit ensures stitches are sewn with balanced thread tension and an automatic needle threader and thread trimmer!

If your bag creator has already found their perfect machine, help them upgrade their sewing kit with the Professional Attachment Set for the TL Series! This set of 3 presser feet and gauge is ideal for bag creators because it allows them to use more sewing techniques like working with leather and vinyl, attaching decorative piping and zippers, and working with a fixed seam allowance. The Hinged Zipper Foot is perfect for those narrow zippers they want to attach to your bag. A smooth foot will help them create using fabrics like vinyl and leather. The piping foot will help them easily create and attach pipping to their bags. Lastly, the swing gauge is used as a guide for the edge of the fabric when sewing with a fixed seam allowance.

We hope you find the perfect gift for your loved one this holiday season! Whether you’re choosing a machine or adding to their sewing kits, sewist and quilters alike will always love having new items for their sewing room. If you’re looking for help choosing the best gift for your friend or family member, contact your local JUKI Dealer; you can reach them by visiting us here!