Different Ways You Can Learn How to Sew!

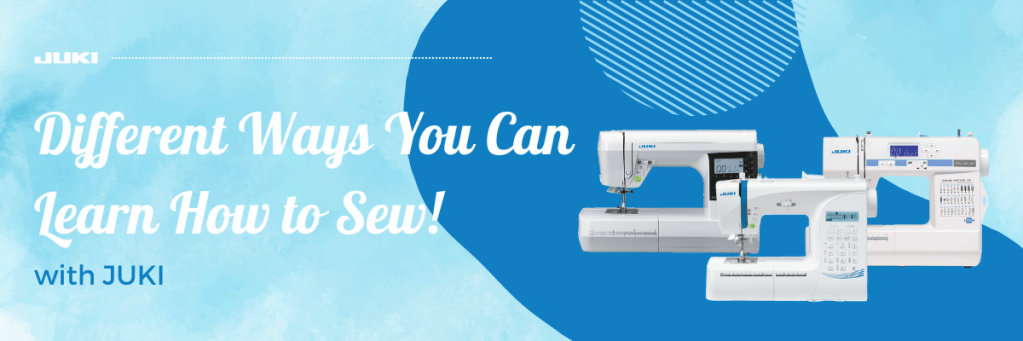
Have you been looking to pick up sewing but need help figuring out where to start? Then join us as we’ve gathered four different ways you can begin learning today! From in-person classes to self-study, the world of sewing is now at the touch of our fingers, and we will share how you can access this information.

Passed Down Knowledge

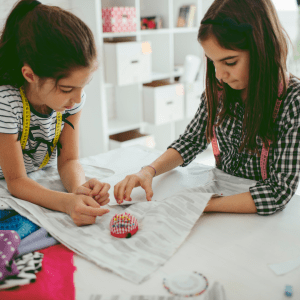
If you have a family member, or friend, who loves the hobby and may even be the reason you’re interested in learning, don’t be afraid to reach out and ask for some lessons! Having a connection in the sewing and quilting world will help you learn techniques, allowing you to practice on their machines before purchasing your own, and a lesson on what features they commonly use that you can practice using.

Choosing your first sewing machine can be intimidating if you need to become more familiar with what machine features you’ll need or what stitches you’ll use. Practicing with a family member’s or friend’s machine will make you get comfortable with the options available and help you understand what you need to create your projects. If you’re interested in learning more about beginner sewing machines that JUKI offers, you can learn more here.

Working with family and friends will also give you the feedback you need. While attending classes and using online resources is an option, we’ll cover these options in the following sections of the blog, having a connection that can provide feedback will be extremely useful when you create throughout the day. So take the time to learn from their past projects, follow along as they show you how to use different techniques, and ask those questions you would be embarrassed to ask in front of a class.

In-Person Training Classes

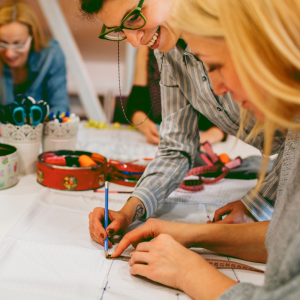
The easiest and most common way of learning to sew is by researching your local area for sewing and quilting classes! Many times you’ll find these programs in your local libraries, your nearest sewing and quilting machine dealers, or at specialized locations that offer crafting classes.

For example, if you’re a new owner of the Miyabi J-350QVP, you might be looking for some training on how to use your longarm quilting machine. At JUKI, we offer the opportunity to attend a longarm training 3-day course that teaches users the basics of the machine and how to use it and shares information on the Quilter’s Creative touch. These classes are offered at select JUKI dealers and can be found here.

You can also attend quilting and sewing tradeshows to find in-person sewing classes! For example, at JUKI, you can commonly find us hosting serger classes at OSQE, with sign-up availability on the OSQE website here. These classes are offered nationwide as the tradeshow travels from coast to coast, helping new sewists hone their skills.

Check out your local community colleges and community centers for sewing class events! These programs are usually offered at low rates and allow you to learn the basics of sewing. The classes also provide an opportunity to receive feedback and ask those questions you’ve been having. Don’t worry if you can’t attend face-to-face classes; thanks to the online world, we have many more options!

Using Your Online Resources

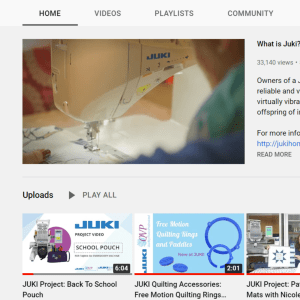
Thanks to the internet, we can now access many videos focusing on sewing skills, projects, tutorials, and so much more. Almost any question you have can now be answered with just one search. Using this, new sewists and quilters can find free or paid online resources to teach you how to complete certain stitches, use presser feet, thread your machines, and more!

These teaching formats can come in videos, PDFs, online books, and online classes, allowing you to find different resources as you learn new skills and techniques. One of the best resources you can find content on is YouTube! On JUKI Home Sewing’s YouTube, you can find out how to operate your machines, set them up for sewing, and check out accessories and what they’re used for. You can also follow along with past projects and lives, where we demonstrate how to create a project from beginning to end.

There are countless online creators out there who are so excited to demonstrate techniques, projects, skills, and machine features for new sewists and quilters like you, and the content can be found for free or at low costs. You can, however, choose to invest in your skills and join online programs with teaching professionals who show you how to build your skills step-by-step and offer constructive feedback and knowledge you can learn from, usually offered at varying prices depending on the skill level of the instructor.

Lastly, take advantage of what influencers in fashion and quilting can teach you on their social media pages! While many creators focus on posting project-based content, many will bring it to their media outlets for learning moments. These quick snippets can explain how to use a presser foot and other accessories to keep on hand, and much more.

Hit the Books!

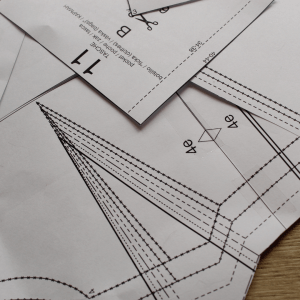
Let’s go back to the original days of sewing and check out the books available for quilting and sewing! Many of these books will offer resources on beginner basics for using your sewing machine, provide tips and tricks on what tools you’ll need in your studio, what presser feet are and which ones to have on hand to complete specific techniques, and even walk-throughs of a series of projects you can begin creating to start building your skill set.

There are also book resources that explain how to maintain your machines, offer beginner to advanced sewist projects where you build your skill set as you create, and so much more. Check out your local libraries or bookstores to see what’s available, and remember to browse the internet for recommended books!

No matter how you decide to learn, picking up a new hobby is a great adventure! Whether you go online and try it alone or pick up some classes at your local community center, sewing and quilting are great hobbies for letting your creativity flow. We hope today’s blog encourages you to start working on your hobby and learning new skills!

Know Your Stitches!

When we first try sewing, our first idea is to learn from project and instructional videos or reading pattern and sewing instruction books. One of the top things you’ll need to know about is the type of stitches you can create and when it’s time to use them on your projects! Depending on what machine you’re working on, whether you’ll be able to complete every stitch we mention below, and how you’ll be able to create it.

Let’s Get to Stitching!

Straight Stitch: The straight stitch on all JUKI sewing machines is perfect for plain seams, darts, tucks, and topstitching! We recommend altering the stitch length to suit your project goals. The longer stitch lengths can be used for projects that require gathering or very long lengths for basting, making it easy to remove the stitches. Remember that your needle position should be set to the center of the presser foot for this to work.

Some machines will also offer a triple straight stitch. This is where the machines take 2 steps forward and one step back. This extra-strong stitch is excellent for crotches in pants where the seam is under extra stress.

Stitch Lengths to Know:

Seams and Majority Sewing: Length 2.0-3.0.

Gathering Fabric or Machine Basting Fabric: Length 4.0 is used for gathering fabric and machine basting fabric.

Double Needle Stitch: Add extra durability to your projects using this stitch! If you’re working on knits or stretch fabrics, this type of stitch creates parallel lines along the fabric and has the benefit of the fabric responding well to it.

If you’re working with woven fabrics, you won’t require this type of stitch, but it can be used to make a hem look more professional, giving your project that professionally finished look.

Keep in mind that twin needles come in a variety of sizes, and they have two number designations: one is the space between the needles, and the other is the needle size. So, for example, a 4/80 twin needle has 4 mm space between two sizes of 80 needles. Then for your extra needle, you’ll use your extra spool to place the second thread on your machine.

You can use this stitch to create decorative stitches, parallel rows of topstitching, and a coverstitch hem like those found on t-shirt hems or pintucks.

The Zig-Zag Stitch: Found on most of JUKI’s electrical and computerized machines, you won’t need to go over the fabric multiple times with this stitch! This stitch is solid and most commonly used to stop raw edges from fraying.

If you find yourself without a serger, this stitch is great for sewing knits as it has a built-in elasticity, meaning your stitches won’t break when pulled.

This stitch can also assist you in adding applique to your projects, like beautiful motifs for decoration.

Zig-Zag Width Setting Tips:

Sewing knits on the seams – We recommend a width of 1.0 and a length of 2.5. The stitch should be small and tight and look similar to a straight stitch.

Sewing knit hems – We recommend a width of 4.0 and a length of 3.0. The zig-zag should be much wider than the seams.

Finishing raw edges – We recommend a wide zigzag of width 4.0 and length 3.0 right on the edge of the fabric. This can stop your project from fraying and will increase the longevity of your creations.

Applique – We recommend a length of 0.5 and a width of 4.0. Again, you’ll want a very close zigzag stitch so that very little fabric shows between the stitches.

Blind Hem Stitch: This mix of straight and zig-zag stitches is perfect for hemming and mending your closet items! Nearly invisible, this stitch is used to either sew two pieces of fabric together or fold one fabric together.

A blind hem means you can’t see the stitching on the top of the outward-facing fabric. When done correctly, all you should see are little dots. These are the micro stitches, with all the visible stitching at the back. This stitch is perfect for skirts, dresses, and trousers with non-stretch fabrics.

You can also find presser feet accessories like the Blind Stitch Presser Foot to use in conjunction with this stitch option.

Bar Tack Stitch: This stitch was made for those areas that need extra durable stitches! Due to being in high-stress zones, you’ll want to use this stitch to reinforce project areas that are subject to stress and stretch, like your pant’s belt loops or pockets.

We also recommend this stitch for fabric bags because the stitch will provide strength to your stitches and the ability to withstand the stress of carrying multiple items.

This stitch does include the use of zig-zag and can be applied with a machine. If you want extra support, this stitch can be doubled up with a back stitch at the end of the seam.

The Buttonhole Stitch: This stitch can be used on a multitude of projects and depending on what machine you’re creating on you will either have one step to do, which measures and sews the buttonhole reinforcement for you, or take 4 steps and adjusts a few settings as it sews the 4 sides of the buttonhole.

You can use a zig-zag stitch for stitching buttonholes. Still, most sewing machines have the capability to create buttonholes with a special foot attachment or a pre-programmed buttonhole setting, like our DX-4000QVP.

 You can also use the buttonhole stitch to make sewn eyelets, attach applique to ground fabric for personalization, and as couching stitches.

Stretch stitch: Use this narrow zig-zag stitch when working with knit fabrics! While a straight stitch would break under the stretch of these fabrics, a zig-zag stitch stretches according to the fabric stretch. You might also hear this stitch called the lightning stitch or elastic stitch. This stitch can also be used to join elastic and the fabric or for mending tears in cloth!

Decorative Stitch: While not commonly picked, many electrical and computerized machines offer many decorative stitches that you can work into your everyday projects. You can experiment with different color threads and stitch options to be as creative as you want in your project designs!

We recommend stabilizers when creating with decorative stitches so that your designs don’t pucker or stretch on your fabric bases. This will help create a smooth, consistent stitch in your designs.

Keep in mind when working with decorative stitches the difficulty of removing them. These stitches can be very dense, making them easier to fix if you don’t like your chosen design. We recommend using a sample fabric to test your decorative stitch on the fabric and confirming which designs you want to use before beginning our project.

The Right Machine

When choosing your machine, remember what stitch capabilities it has and what you’ll need to create the projects you’re dreaming of. A basic sewing machine will often only offer straight stitching sewing, so if you hope to work with other stitch options like we listed above, you’ll need to broaden your machine options. To use more stitch options, like decorative stitches, we recommend researching an electrical or computerized machine like our computerized sewing machines that commonly offer a variety of stitches for your project needs.

Want to test-drive a machine and check out our stitch options? Contact your nearest JUKI dealer today here!

JUKI Tip: Using the Needle Threader On Your MO Series

For this month’s JUKI tip, we go over how to use the automatic needle threader that can be found on select serger machines in our MO Series! Creating an easier sewing experience for you, this feature is perfect for getting your machine ready to create, without the hassle.

Follow along below as our National Account Trainer Alba showcases how to thread your automatic needle threader.

The needle threader on the Serger from JUKI is a mechanism that has a lever that goes right and left, whether you’re choosing to thread the right or left needle, before being pushed down to cover the needle in front of the eye.

As you watch the video, you’ll notice how our JUKI National Account Trinaer Alba moves the mechanism to the right-hand position, turning the hand wheel towards herself until the needles reach the highest possible position.

Ensuring the lever is set for the right-hand needle, we’re going to lower the self-threading lever, until it comes right around the needle. Here is where you’ll notice how the mechanism just hugs that needle, giving you the perfect spot to place your thread. Now, remember, for the best experience ensure your thread is not taut, and instead loose. This way the machine is able to thread your needle, without tugging.

Now, as you raise up the needle threader, as shown in the video, you’ll notice how it forms a loop that you can carefully pull through the eye of the needle, completing the threading of your needle. Pull the thread behind, and you’re all set on the right-hand needle!

For the left needle, we’ll position our needle threader for the left-hand position, before lowering the mechanism where it will hug your needle. Next, we recommend using two hands to place that thread in the groove of the needle threader; this will be right at the eye of the needle.

As you raise your needle threader mechanism, you’ll notice the loop form once again, before pulling the thread completely through and towards the back of the machine.

We hope this helps you the next time you want to use the automatic needle threader on your serger machine! What tip do you want to see next from JUKI? Let us know in the comments below!

Happy National Quilting Month!

Join us this month as we celebrate National Quilting month with some of our favorite JUKI quilting machines. Whether you’re working in a studio, or on your kitchen table, we make sure to have what you need to start creating.

Check out this month’s top quilting machines and contact your local JUKI dealer here to learn more about our machine features and projects you can start creating today!

5 Ways to Personalize Your Projects

As creators, we love being inspired by other sewist and quilters, but how do we take their inspiration and personalize it? Today we will discuss five ways to personalize your sewing and quilting projects. From adding lettering to printing on designs, there are so many ways we can find a project and turn it into our style. So follow along and check out what machines and accessories we recommend for your personalization touches.

Adding Lettering

Whether you’re inspired to create a tote bag, or a sweater, adding lettering to your projects can be just the touch of personalization you need! Add your initials with your partners on a sleeve to create the perfect valentines gift, place your child’s name on their new school bag, or gift a quilt with a quote to your loved one using the lettering feature on your creations.

To add this personalization technique, you can use an electric computerized sewing machine that offers lettering, like the Kokochi DX-4000QVP! An electronic computerized sewing machine like the DX-4000QVP offers lettering stitch choices, ranging in different fonts, that will allow you to quickly and easily stitch in your child’s name, favorite quote, or number one sports team name!

Adding lettering is an easy way to personalize your next project and can be done with just a tap of your finger and a stitch!

Adding Embroidery Designs

Using a specialized embroidery machine, you can start adding your designs and bring texture to your projects by adding a touch of your personality! For example, add a cool design to sneakers, pet collars, or even a child’s teddy bear to create a project representing you or the gift receiver.

A machine like the JUKI/Tajima Sai 8 Needle Embroidery Machine is an example of a machine that can offer this feature! With 8 different color options, you can create beautiful flowers, animals, and a scenic view from your last hike. Art is limitless with what you can create on an embroidery machine. Adding embroidery can be an exciting art form when creating personalized projects!

Want to try your hand at embroidering and creating a makeup bag? Learn how to create this makeup bag with our JUKI Ambassador Nicole Moore here!

Designing Your Fabric

Have you found yourself wanting a specific fabric design? Been drawing some designs of your own? Then take the leap and design your own fabric! With a machine like a Direct-To-Garment printer, the options in patterns and designs for your projects are now endless, thanks to the ability to design your own fabrics right from your studio.

The RICOH Ri 100 can help you print your art designs and patterns onto fabric easily and quickly. From canvas fabrics for your tote bags to cotton for your memory quilts, enjoy the freedom of designing and creating anything for your imagination, and enjoy a material that no one else would have!

Try your hand at printing your own fabric with this east mini quilt project! Learn how to create your own with our JUKI Ambassador Nicole Moore here!

Adding in Photos

Whether it’s a family photo or a memory from your favorite trip with friends, adding a memory photo to a project like a t-shirt or a quilt is a great way to personalize your projects! Whether you’re embroidering designs with free motion quilting, using a Direct-To-Garment printer, or using an embroidery machine, there are limitless ways you can get to designing and including your photos in your projects.

Our favorite projects are memory quilts users create with photos! From sweet newborn gifts to anniversaries and holidays, a quilt created with personalized love is an excellent idea for your next gift project! Using a machine like our Direct-To-Garment printer, the RICOH Ri 100 can easily print and place your photos directly onto the fabric you’re creating, letting you put your focus on your quilt block designs.

Want to create your own memory quilt like the one shown for your loved one? Follow along here to learn more here!

Creating a Set

One of the best things about personalization is the freedom to be creative in what we embroider and print on. Personalize your next gift by creating a matching set! Whether it’s a set of make-up bags for traveling, or a matching set of t-shirts for the father and daughter duo, sets can be a fun gift that allows you to try different project ideas.

One of the best ways to create sets is to intermix your work! Print on your fabric, embroider your design and sew it all together to create something unique and different. Whether your project is small, like a glasses case, or large, like a king quilt, adding these touches of personalization will bring the whole idea together!

So the next time you create a project, add your name, embroider a design, or print on a pattern and show your personality when showing off your project!

Want to try your hand at creating a matching set? Check out our Daddy and Daughter duo set project here!

Want to personalize your next project? Then, visit us here today to find your nearest JUKI dealer!