It’s Always Halloween with Christina O.

With the fall season upon us and our favorite spooky holiday around the corner, we’re here to introduce Christina O, owner, and designer of Agashi! A handmade collection, the Agashi style focuses on modern gothic apparel & accessories; intended for those who love to celebrate Halloween every day of the year. Join us this month as we get to discover the history of how Agashi came to be and how Christina found her passion for fashion and running her shop.

From a young age, Christina became obsessed with sewing and crafting. From creating outfits that her Barbie dolls could wear to upcycling projects on her mother’s old Kenmore, Christina would constantly find a way to work on her craft. Then, with dreams of leaving her small town after high school to become a fashion designer, she focused on what she would need to do to achieve her goals.

Classic & Bat Wing Kiminos

Coming from a family where becoming a fashion designer seemed more like a faraway dream than reality, Christina was prepared to do everything it took. Evaluating her options, she entered her community college before transferring to Indiana University of Pennsylvania (IUP) for their fashion merchandising program. While her path to becoming a fashion designer changed for Christina and may have been different than she planned, her dream is still happening!

“It wasn’t going to happen easily for someone like me, and I was prepared to do whatever it took. Not having many resources will force you to become resourceful.”

While Christina admits she would’ve chosen the path of the self-taught designer over school, her hard work was beginning to pay off. After college, her downtime was focused on sewing and creating. However, after trying her hand at creating accessories for her shop, she soon realized apparel was her favorite project to focus on. By Halloween of 2010, she was able to move to Philadelphia, where she ended up meeting her future husband, Paul.

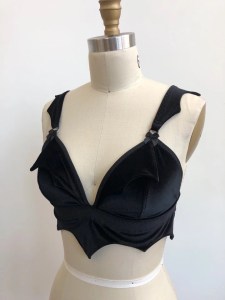
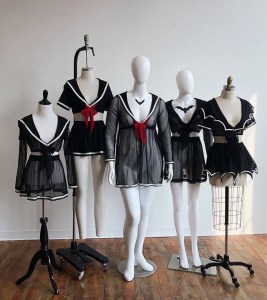
It wasn’t until 2013 that Christina launched her current fashion brand Agashi! With only $50 worth of material, she was able to put together a few harnesses and kawaii-style dresses for the first few months of her shop opening. Over the next couple of years, Christina would go on to add theatrical crinoline pieces and obtain some of her first custom-order customers, burlesque performers! This success was a step in the right direction, leading to her career change in 2015, where she could quit her day job and place all her focus on her brand.

Battress Gown

It was in 2017 when Christina and Paul moved into their first home in Philadelphia. Agashi began growing faster than ever, surpassing their home space and pushing Christina to open up her first official studio space in 2018, including shop assistants. While the shop continued to see great success over the next couple of years, 2020 brought the shop to a slow down, causing Agashi to be brought back home after closing the studio due to the pandemic.

Due to Christina’s passion for the business, Agashi is still live and running! She also launched her first YouTube channel for sewing, DIY, and Behind the Seams content during the summer of 2020, creating a new connection to her community of followers and new sewists. During this time, she began modeling a new path for her business, one where her passion for creating fashion and teaching sewing skills could intermix. Now, Agashi offers smaller quantities of made-to-order wear at faster turnaround times, allowing Christina to slow down and push her passion for teaching into the mix.

One focus about Agashi that never changed was sustainable fashion. While she acknowledges that not everyone has the financial ability to only buy made-to-order, Christina sees sustainable fashion as “buying with a purpose and purging clothes slower.” To avoid over-production, Christina focuses on creating made-to-order pieces and upcycles 90% of her fabric scrap pieces when sewing.

“My entire process is slow, intimate, and intentional. I’m grateful to have customers who invest in my custom pieces. They aren’t ordering for instant gratification, but rather an affordable luxury item they can cherish.”

Battrix Velvet Bralette (made 100 from upcycled velvet scraps)

Avoiding offers from manufacturers, the quality of her work and products is what Christina focuses on when creating her apparel. With each project feeling personal, she continues to place a lot of thought, time, and labor into each stitch of her pieces. Her dedication and message seep into her packaging with a handwritten thank you note, sustainable packaging, and self-sewn reusable gift bags.

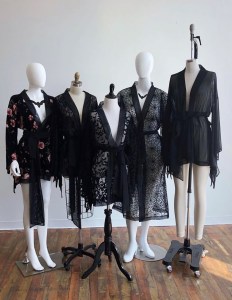
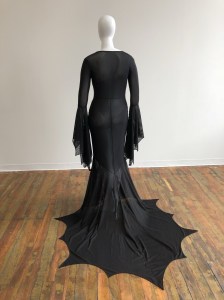
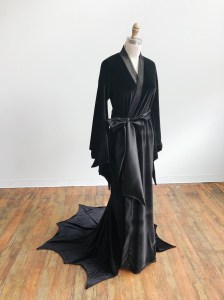
While the shop’s plans for sales may have changed, her fashion design hasn’t! Those lovers of the gothic aesthetic and Halloween can find a piece they’ll love in Christina’s shop. Christina was inspired by cinema with darker themes like Addams Family Values, The Dark Crystal, and The Return to Oz. She found herself naturally drawn to the characters portrayed, connecting to the “weirdos” of the films. As someone who grew up having trouble making friends, finding a connection in these films inspired her to design fashion for grown-up sizes. With a variety of minimal designs, horror lovers like herself can easily wear fashion with spider webs and bat wings, celebrating their gothic ways!

Her style inspiration can also be pinpointed to vintage lingerie catalogs and old runway shots from McQueen, Mugler, and Gaultier. Victorian and Rococo fashion inspire Christina heavily over today’s fashion, feeling that the style now is only a repetition of the past.

“Agashi is for anyone who celebrates Halloween once a year or every day.”

It’s this niche design and theme that brings attention to Christina’s shop, where lovers of all Goth and horror can find fashion pieces that fit within the modern world. Thanks to social media, Christina has been able to build a community of over 100 thousand followers that have followed along the journey to where the business is today. Whether they’ve followed because they found interest in the shop, or her recent videos showcasing tips and tricks to sewing, she’s been able to utilize these platforms to grow her business and expand her brand awareness.

Ayumi Seifuku Classic Collection

As a business owner focused on social media for branding, she consistently posted content multiple times a week that revolved around her work and brand aesthetic. With Instagram being her platform, she’s focused on showcasing her work and her as a creator and behind-the-scenes looks. Focusing on building that connection between her customers and art is one of the reasons she’s been successful, with social media allowing her to connect with other creators, customers, and sewists.

While today’s social media can be more brutal to gain popularity on, Christina’s advice is to diversify your social media presence and focus on platforms that will help build your community. She recommends focusing on video content that’s popular right now and seeing how you can share behind the scene looks or process videos, as viewers will always love feeling like they can relate to you! Sites like Tiktok and YouTube are her favorites. This is thanks to their ease to use and the sewing communities that have been built.

Her new focus on sewing tutorials and tips is an excellent passion for Christina. When asked about her current sewing machine choices and what she would recommend for a new sewist, she reminded us that finding the perfect machine is just like dating!

“You want to know what you’re looking for and find the best machine to match your sewing needs and goals. And yes, just like dating, you will be disappointed with some machines.”

Her first tip for new sewists is to find a second-hand or vintage machine. Focusing on budget-friendly when entering a new hobby will allow you to get a taste of the craft while letting you hone your skills. A few basics, like a straight & zigzag stitch and a buttonhole feature, are perfect when starting off. Once you feel more comfortable or your skills begin outgrowing your machine, you can start focusing on upgrading and buying the suitable machine for you. For Christina, this answer comes in a rotation of 3 domestic sewing machines, 4 sergers, and 1 coverstitch machine, one being her trusty TL-2000Qi!

Greta Peignoir

It was in August 2020 when she searched for a “straight stitching beast,” focusing on the features wishlist, the budget, and the space, she chose the TL-2000Qi. Looking for industrial power that would fit her studio space, Christina loves its power and the finished quality of her projects when she creates on it, using it for her final seams on every order. Her dream goal? All industrial JUKI machines!

Beyond her tips and tricks for sewing, Christina also has advice for sewists out there who plan to open their small businesses. “Always invest in yourself and learn from your mistakes,” she says, encouraging those out there to keep investing in their passion and to never stop learning. While Christina earned a degree in Fashion Merchandising, she still acclaims herself as a self-taught sewist and designer. She encourages you to find your best path, whether it be fashion school or self-taught, and to learn at your own pace to enjoy the journey.

Focus on building relationships with those in your community, and choose it over the competition. Christina focuses on finding her own identity and experiments by not comparing herself to others. Because of this, she’s been able to plan the new future for Agashi. With a new effort to prioritize her mental health, Agashi will begin scaling down on made-to-order apparel and start focusing on teaching sewing next year. This will include DIY sewing kits for clothing and accessories and focus on those who don’t have many resources to learn sewing beside the internet.

“There is plenty of space for everyone to succeed together.”

Grateful to the community she’s been able to build and proud of how the brand has grown and evolved over the years, Christina and her brand Agashi will continue to flourish in the fashion industry! We can’t wait to see the new changes soon to come, and we’re excited to learn alongside her followers! If you love Halloween or want to learn new sewing tips and tricks, join us in following Christina’s journey below and wishing her a Happy Halloween!

Find Agashi and Christina below!

Agashishop.com

Instagram

Facebook

Etsy (Paper Bats)

Tiktok

Pinterest

Starting Your Sewing or Quilting Blog

Have you wanted to start your own blog? In today’s post, we’ll teach you steps you can follow for creating your own blog today. Businesses, creators, influencers, and more can all benefit from having a blog. With this channel being a great way to back up your expertise, share your story, and inspire others, having a blog is the perfect addition to any business. Follow along as we go over what a blog is, where you can start yours, and tips for designing and writing your post.

What is a blog?

A blog can be many things. For some, a blog is a journal documenting their journey. For others, it’s a great way to promote their business plans and products. Focused on a specific topic, a blog is more personal than a news outlet and pushes toward creators having a deeper connection with their audiences. Whether we’re sharing our passions, teaching others, hoping to make money, or a combination of all of them, blogging can be a fun and rewarding venture.

Anyone can start a blog! Readers enjoy blogs because of the different personal perspectives they gain. With an informal and conversational style at the forefront, you can write about various topics without needing to be an expert, just a new view. In addition, readers want to know about your experience with techniques, projects, products, and more.

Now that you know what a blog is let’s start planning yours!

Blogging is also a commitment. You can choose the regularity for your posting; some will do it weekly, some monthly, depending on your preference and audience. The aim should be consistent and create content that people want to see. Bloggers rarely see results when they first begin, but those who stick to the idea find themselves in a new community.

Step 1: Naming Your Blog

Your blog name is a small preview of what readers can expect to find on your page. First, think about what you want to call your blog. Yourname.com? Yourbussinessname.com? Maybe you want to title the blog something creative and different and use a wordplay name like “That’s Sew Susy.” Get fun and creative when creating a name so it can stand out! Once you’ve written down a few ideas, the next step is confirming the domain name is free.

You can check with multiple ways to confirm if the blog idea is free. Depending on what platform you use to create the blog, they’ll have a check system that will inform you whether or not the idea is available. Some tips to keep in mind if your idea is being used, try different extensions (like .org or .net), or add small fluff words like “my,” “a,” or “best” (SewSusy.com vs. ThatsSewSusy.com).

Remember, most blog sites will offer a free domain with their site on front; (wordpress.thatssewsusy.com.) If you’d like to have a domain with only the blog name, this will cost a monthly or yearly fee; depending on the platform’s options.

Step 2: Finding Your Niche and Topic

Let’s go through those blog ideas now! While there are a wide array of blogs out there, there are always readers looking for new perspectives. So when it comes to choosing the topic for your blog, pick a topic that allows you to consistently create content without burning out the idea. The more breathing space you allow yourself, the more content you’ll be able to create posts that readers are interested in.

For example, if we’re creating a quilting blog, we don’t focus on only sharing patterns. Instead, by covering cover quilting as a whole and including pieces like projects, behind-the-scenes, how-to’s, personal messages, and more, readers get personal while learning new ways to approach their interests.

Keep in mind that blogs can often lead to opportunities for monetization. Whether through advertisements or connecting the blog to an e-shop, you want the message to align with your future goals. Just like creating videos for YouTube, or content for social media, look for what solutions and perspectives your blog can offer that differ from others out there.

Step 3: Hosting Your Blog

Once you’ve settled on the blog’s name and general topic, it’s time to research host sites. To fully create a blog online, you’ll need a hosting program and blogging program; luckily, these two programs usually come in a package deal.

The host is the website that readers will access. All your blogs will be stored and organized according to tags and design. On the other hand, the blog software is where you’ll write up and design the content for readers.

Below are 3 recommendations for hosting and building your blog. Each offers package deals that allow you to host and create your blog in one location.

WordPress.com: Designed to let you build your blog quickly, WordPress allows users to upload and manage media, text, blog posts, and eCommerce products online. Completely free and open to anyone who wishes to download the program, WordPress is both popular and influential.

Completely hosted by Automattic, bloggers only need to choose a free or paid plan and the domain. All other aspects of hosting are handled by Automattic and WordPress directly. Easy to use and set up, WordPress offers creators a variety of template designs that can be edited to fit their theme and topic. You can also include plug-ins for an eCommerce store, blogs, social media channels, and more.

There are multiple payment plan options, ranging from freelance bloggers to businesses requiring more storage and freedom in design and coding. Powerful, WordPress is known for being one of the top blog sites for creators.

Wix.com: Wix offers accessible design features and free or paid subscriptions for your site. In addition, you can easily add in media content like videos, photos, and PDFs, as well as a variety of applications that can interwork into the blog. In this case, you can easily add applications for e-shops, reservations, and so much more.

Like WordPress, Wix offers blog creators an opportunity to host and build their blog on one site. In addition, their site will offer full technical support, even on free accounts, and has a beautiful SEO system to help you get your blog up on search platforms.

Squarespace.com: Stylish and easy to edit, Squarespace is comparable to WordPress for its power and popularity. Offering over 140 template designs for your blog, Squarespace focuses on keeping a clean design for their sites, adapting the screen size for tablet and phone users on its own. Like the two programs stated above, users can host and create their blogs on one site.

The only cons of working with Wix is that larger websites exceeding 50 individual pages experience slow loading or difficulty. You’ll need to look for alternatives like WordPress for a more prominent website host.

Squarespace offers bloggers the opportunity to create teams with multi-author functionalities, engage readers with their comment features, and allows you to easily organize and schedule your blog posts. Thanks to their Squarespace application for bloggers, you can also blog on the go! With a larger page limit than Wix, hosting up to 400 pages while containing excellent resolution and speed, Squarespace can be a great alternative to WordPress for your website needs.

The cons of working with Squarespace are that you can’t create a large assortment of menu items, as this will slow to load down, and all save when editing automatically publishes onto the website in real-time.

Once you’ve decided on your host and blog site, you can begin designing! Look for designs that relate to your topic and theme while offering easy navigation for readers and a clean look. All programs we’ve recommended above come with built-in templates that can be edited and improved according to your needs.

Step 4: Writing a Blog and Publishing

Let’s begin with setting the site up and creating the content readers should view when they first find your blog. Some basics to set up on your blog are the about page, contact page, and any other page readers should browse with your focus.

Other items you can add to the site include a photo of yourself, a logo, images, a comment section, your social media channels, and other applications to which you’d like readers to have direct links. Your blog represents yourself and the topic you’ve chosen, so make sure to have fun designing and personalizing the site!

Moving on to the blogs themselves, focus on being informative and engaging! Our top recommendation for bloggers is to create a supply of idea topics and plan ahead to ensure you’re always on track for posting. Remember, consistency is what builds your blog following. Using a calendar or spreadsheet is perfect for keeping those ideas organized and will help the creative process go smoother.

When you write your blog, there are key aspects you should focus on like post titles, engaging and lengthy information, original content, and editing. No matter what topic you focus on, having an intriguing article title will bring a reader’s attention. Likewise, having engaging and informative information in your article while keeping it personal and including your perspectives will keep readers coming back.

Need ideas for your blog post? View below for posts you can include in your schedule.

  • Curated content: Focusing on your niche, these blog posts gather valuable pieces of information that readers are interested in learning about.
  • Topical content: stay in touch with current events and topics in your niche! Readers will enjoy seeing your perspective on current happenings in your community.
  • Visual content: Incorporate photos, videos, sound clips, and more to engage readers beyond reading.
  • Feature pieces: Interview popular creators and businesses in your niche! Networking and spotlighting others in your community is a great way to meet new friends and bring new readers to your site that are in the interviewee’s community. 
  • Evergreen content: answer your blog posts’ questions and educate readers on your niche topics.
  • Interactive content: Countdowns, quizzes, word finds, giveaways, and so much more will encourage audiences to interact with your site and blog. In doing so, they’ll help your SEO and give you a better insight into who your readers are.

Step 5: Getting Your Blog Out There

Now that your blog is running let’s get some readers! The first step is creating a plan to promote your blog. Then, follow along as we go over strategies you can implement to start getting your blog out there.

  • Word of Mouth: Contact your friends, family members, and colleagues to tell them about your new blog! By asking them to visit, read and follow, you’ll begin getting your site out there and raising awareness. Encourage them to share your blog posts, and don’t forget to thank them!
  • Social Media: Whether you use your personal page, or create a business solely for the blog, getting your blog link onto top social sites like Instagram, Facebook, Twitter, and Pinterest is the place to start. Post relevant photos, videos, and announcements for your blog on these sites to bring attention to your brand and writing. Asking friends and family members to share your profile and links will multiply your reach and help you gain that following you’re looking for.

Another significant aspect of social media is networking and using their search systems to your advantage! Reach out to other members of your niche, and use notions like hashtags and profile tags, to raise your posts on the algorithms.

  • Interacting with other creators: One way to create a name for yourself in a community is by interacting with other creators’ content. Leave comments, like their posts, re-share and more to begin building those connections within the community.

When you build these connections, you have a higher chance of broadening your audience and the opportunity to speak with others in your niche. In addition, this is an opportunity to create bonds leading to future collaborations and new projects.

  • Interacting with your readers: Let them know you care and interact with them! Whether liking their posts, replying to comments, or discussing your blog topics, readers like to know the author cares about their community.
  • Post regularly and keep in contact: Consistency is vital when building your blog. So create that calendar we mentioned and follow a routine for posting. This will keep readers engaged and waiting for a new post each time. Also, don’t forget to create an email list! This way, you can keep in direct contact with your readers and keep them updated when new posts or news about your brand are happening.

Step 6: Enjoy Your Blog!

Whether you created this blog for your small business, or your hobbies and passions, remember to enjoy the creative process! While building your audience at first can be difficult, remember these projects take time. So post regularly, engage with your community, plan ahead, and you’ll begin seeing your audience and opportunities grow.

Focus on creating content you’re proud of; remember, this project can be a stepping stone to new opportunities!

5 Projects you can create this Spooky Season!

It’s almost time for spooks and candy JUKI Lovers! For today’s blog, we will share our top 5 favorite Halloween projects you can begin creating this weekend. So whether you’re going trick-or-treating, or staying at home, follow along below for ideas you can start today!

Halloween Patchwork Quilt

Stay warm this fall and create a Halloween patchwork quilt! Using a variety of Halloween fabric pieces, think witches, pumpkins, and ghosts, you can begin making your very own patchwork quilt. Quilts are the perfect accessory to any home, used and loved by everyone.

We recommend checking out your local quilt shop for holiday quilt bundles. Great options when you want to create a patchwork quilt, and don’t have the scraps, are browsing charm bundles, jelly rolls, and mini-charms! Also, don’t forget to grab batting for your quilts and have fun by bringing texture to the surface using free-motion quilting techniques.

Some great tools to have when quilting is your Open Toe Quilting Presser Foot, Quilting Rulers, and a ¼” Presser Foot for finishing.

Costume Cape

The perfect addition to so many costumes, a cape can be used for various characters ranging from royals to superheroes. To use this cape multiple times, create your piece using basic colors like white, red, or black so you can enjoy this project through the years.

For creating a cape, we recommend having fabrics like stretch velvet, fleece, or wool! Usually, you’ll use about 2 yards of fabric for an adult cape and 1 yard for a child’s cape. This is an excellent apparel project for a beginner to try their hand at. For more advanced sewers, you can add features like trims and a hood for a more finished and professional look.

We recommend having a Cording Foot on hand if you plan to attach a string inside for the cape hood. Also, use a Decorative Stitch Presser Foot to add designs on your cape’s ends for extra personalization!

Spooky Placemats and Table Runner

Decorate your home with a spooky table runner and matching placemats! A fun and easy home project, you can accessorize and personalize your kitchen and dining table with fun fabric designs and colors.

When creating placemats and table runners, we recommend having some tools on hand. Inside your placemats and table runner, you’re going to place a fleece or batting; this will stabilize your project. Spray glue is an excellent adhesive for this! Once you’ve pieced together your mat, you can choose to leave it as is or add designs with free motion quilting.

For yardage, we recommend 2-3 yards of fabric. With one yard, you can create up to 8 basic-sized placemats, and with your other yards, you can create your table runner depending on your table length! Keep a ¼ presser foot on hand when you’re ready to complete your project, so you can quickly finish the edging.

Halloween Garland

Decorate your archways and doorways with a fun garland! Easily created with less than a yard of fabric for the hanging pieces and string, this décor piece is the perfect touch. For the hanging details, we recommend using backing fabric for stabilization.

For this project, keep your ¼” presser foot nearby! Perfect for creating a clean edging on each hanging piece and the edging on the hanging string, this accessory can be the only foot you need for the project.

Trick–or–Treat Bag

Lastly, don’t forget to have your trick-or-treat bag ready! Wishing you a happy spooky season, download our free instructions for our see-through trick-or-treat bag here. With a finished size of 14″ x 16″, this bag will carry all those treats home!

Happy Halloween, JUKI Lovers!

Catching Up with Rob Appell

You may recognize this month’s spotlight from “Michael Miller Fabrics Making It Fun” or “Man Sewing,” we’re so excited to spotlight our JUKI Ambassador, Rob Appell, during National Sewing and Quilting month! In today’s blog, we get to speak with Rob about his journey in quilting, his passion for the craft, and how he came to be where he is today.

Robs journey in quilting began when he moved back home from college, spending his free time outside and snowboarding. His mother, the manager and eventual owner of the local quilt shop brought Rob into the business, where he started as a clerk. When his mother began bringing in machines to sell, Rob eventually shifted to machine repairs, and here is where he started falling in love with sewing!

Creating fun Hawaiian shirts as his uniform for the quilt shop, he found himself having fun making them and eventually began looking into patchwork quilting. A fun and easy way to pick up quilting, he began testing his skills in free motion quilting his projects. Again, finding himself loving the hobby. The rest, as they say, is history!

Since he began to quilt, Rob has accomplished a published quilt book, starred in and hosted multiple quilting YouTube shows, created a community for his teachings, and so much more! His videos encourage new quilters to be creative and enjoy their projects! With a focus on basic techniques, his hope when he’s creating for viewers is that they find something they can take away from his lessons and learn how to make their versions.

Recently starring in ‘Michael Miller Fabrics’ Making it Fun,’ you can follow along with his high-energy videos and view the different patterns and free motion quilting techniques Rob uses. While he offers some design patterns and templates for quilters, his work mainly focuses on organic creation. Going with the flow, his work often doesn’t follow design patterns; the finished design patterns he has sold usually come from these organic works he’s completed after the fact!

“The Free Motion Quilting, I prefer to go freestyle, no pattern, sometimes a plan, but usually pretty random and free.”

Quilting didn’t take him away from the outdoors he loved. Combing two of his favorite things, Rob is known for his landscape quilts. These beautiful pieces focus on nature and showcase views in bright colors. In fact, in 2009, Rob created 12 different quilts that featured faces of endangered species. Using the patterns from his work, he was able to fundraise and advocate for these species through sales that went toward endangered species charities.

He also authored a pattern book, “Making Waves … Adventures of a Surf Quilter,” a self-published print book featuring his landscape and seascape quilts. Early in his quilting journey, Rob was known for his scenic creations. Then, using free motion quilting and applique, he would add fun designs like fish, coral, rocks, lighthouses, ships, and more! Then, bringing in his love for surfing, he created a piece that intertwined surf terms with quilting terms, going above the average and setting himself apart.

Now, as someone who’s been quilting and creating those quilting videos we love for years, we asked Rob what keeps him going. “Videos are free and can be viewed over and over again if you’re learning from them. I love to present my passion for quilting.” Rob likes to focus on basic quilting techniques because he’s often reminded of how many new quilters have emerged in the community over the years. Thanks to video cameras and social sites like YouTube, where Rob hosts, he can teach how to construct quilts and the basic skills all quilters want to know. Keeping himself motivated with fun fabrics and the creative process has pushed him to bring that energy into each episode’s studio. Thankful for the following he’s gained on YouTube that keeps him going!

Rob at his studio with the J-350QVP & J-150QVP

He recently created a new quilt, the “Synergy Remix,” designed by Kristie J. Smith in her pattern book, “Splice Magic,” that he loved! Always excited to try out new and different quilting techniques, like he encourages his viewers, Rob locked himself in the quilt shop, Stitchin’ Heaven, his latest collaboration where he’ll be hosting new quilting episodes, and went to work! In one night, he created a quilt and video, maligning the entire project and finishing it. Yet, this project places a smile on his face when he thinks about it.

While Rob has gone on to try other ventures, like his work in textile design with Free Spirit Fabrics, he vouches for his love of quilting. Sharing his love of fabric and free motion quilting, he focuses on his desire to quilt the top to push him through the construction process. Recently, he’s begun focusing on improving his precision in his patchwork! By creating little half-square triangles and trimming them up, he’s found joy in practicing his skills.

Always learning and growing, Rob has begun a new journey in his quilting career with Stitchin’ Heaven! As their new YouTube manager and Content presenter, he’ll be able to create a team of quilt lovers like himself who can share their passion for the craft while teaching others worldwide. Stepping back from handling all processes by himself, he’ll now have quilting friends who will help him create new and exciting projects for viewers like you. We’re excited to see the different techniques and quilting styles that will emerge from this new partnership!

“The thing I love most about the quilting industry is that there is so much for everyone.”

With the quilting community constantly growing as new members find their passion for the hobby, we asked Rob what advice he has for JUKI Quilters. “Get to know your machine, spend 7me learning the nuances, understand what the different feet do and when to use them. Then, remember – this is a hobby, not a race. Please slow down to enjoy the process.” When you enjoy the steps to what you’re creating and take a moment to appreciate each technique you’ve picked up, you’ll truly enjoy the finished project. As Rob mentions, so many people need something positive in their lives. Take the time to find your passion, teach and work with others in your quilting community, and enjoy the process.

We hope you enjoyed learning more about Rob with us, and we hope this inspires you to join him on an online video one day and check out quilting! A hobby for everyone, we hope everyone enjoys National Sewing and Quilting month with a fun new project!