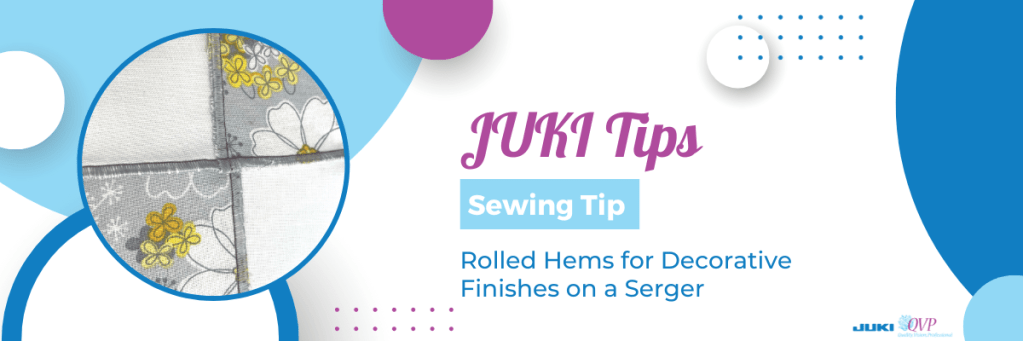
In this month’s tip, JUKI National Account Trainer Alba showcases how to use rolled hems as a decorative touch to your quilt projects and create this on the Serger. In this video, we’ll be using our latest MO-3000QVP model.
Follow along below for a rundown of what Alba covers on today’s JUKI Tip!
Hello all my JUKI friends, welcome to another JUKI tips and tricks. My name is Alba and today we’re talking sergers.
I am working on the MO3000, but this can be done with any serger. So, today I’m talking about rolled hems, and mostly everyone uses a roll hem to finish up a hem. I’m going to take it to my next quilt project and use it as a decorative finish. I’m working on a chandelier Quilt Block. it is a very easy block to do, and I just wanted to give it a Decorative Touch. So what I have done on this one, is I’ve added is a rolled hem, and I’m doing a wide rolled hem so that it catches more of the fabric and I am going to create that Quilt Block using that rolled hem as my actual seam and that Decorative Touch. Now when you are doing this I would not recommend using woolly nylon, which is typically used for a rolled hem, because when you do press your blocks the woolly nylon may melt at the higher settings. Now, I’m going to bring this to the machine and finish up this Quilt Block.
I am at the MO 3000, but you can use any serger that allows you to do a rolled hem. Now the trick to doing that rolled hem, is placing the fabric right side out and my wrong sides together; so opposite of how you would normally put your fabric together. Now here at my intersection, I am going to show you just like we alternate the seams, I have alternated and nested those rolled hems. So I will be bringing this to my machine and sewing, and I am going to get as close as I can to show you exactly what I’m doing.
Now I am lining up my fabric just before my needles, and I am bumping it up against the knife, and I have left the knife up to catch any of those little fraying edges that can happen on cotton fabric. Now, I am going to start slowly and then build up speed, and I am going to go over all of those. Now I have not pinned, so I am just Gathering and making sure my pieces are together, and I’m sewing all the way down that edge, and surging off and I am going to cut right to the edge because I know that all of my seams will be covered in another seam.
Now I am going to bring this to the table, and I am going to just finger press but you would really want to bring that to your iron, but look at how lovely that is with that thread detail and that’s going to be 3D where it will be dimensional and just give this Quilt Block a lot of texture. So just a tip that rolled hems are not just for hems they’re great for decorative touches. So I would love to see this also on garments as an exposed seam.
I’m so glad you were able to join me with this tip, and I wanted you to get a really closeup look at how pretty that just three-dimensional finish looks on that Quilt Block. So don’t forget to give me your messages and give me some other things that you’d like to see tips on. Make sure to like and share with all of your friends so that they could get these amazing JUKI tips see you next time, bye-bye!
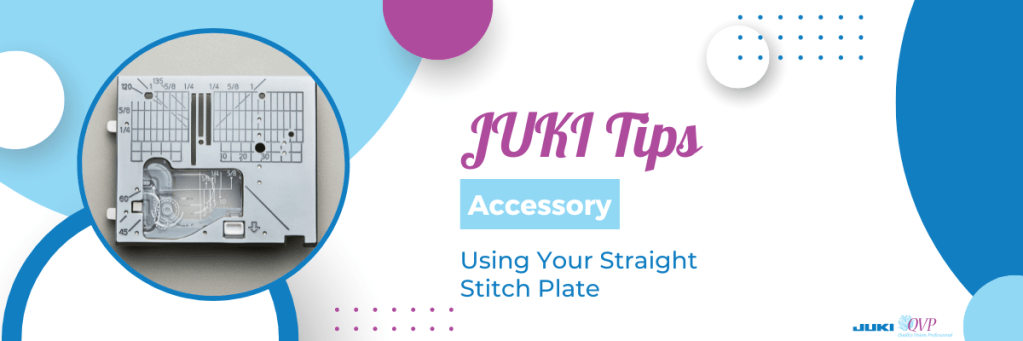
In this month’s tip, JUKI National Account Trainer Alba showcases how to use the straight stitch plate and straight stitch presser foot. Going over when, and how to use them, follow along to begin using yours on your next project. In this video, we talk about the DX series and the TL series.
Follow along below for a rundown of what Alba covers on today’s JUKI Tip!
Hello all my JUKI friends, my name is Alba, and welcome back to my studio. Today I am going over a tip, a trick, for JUKI machines, and in the last session that I did several of you asked about straight stitch plate and straight stitch foot. What are they? When do I use them? Why would I want to use them? How do I use them?
So today I am going to be showing you the straight stitch plate and foot. How they get installed, how you use them, and also some tips on when you use them and when they make your sewing easier. I will be showing you this on two machines, on the DX-2000 QVP and on the DX-4000 QVP.
Both of these machines, this goes on a little bit differently. On the DX-2000 QVP the straight stitch plate is built into the machine, so it’s a lever that you’re touching to activate this feature and I wanted to show that because it is just such a great way to do that; and on the DX-4000 QVP it is an actual plate that you’re changing out but there’s also a feed dog system that you’re switching out when you go to the straight stitch plate,
I’m really looking forward to getting up close and personal with both of these machines and showing you how to do that. Now when you use a straight stitch plate, for some people if they’re using a straight stitch on their machine that straight stitch plate is always on, and for others, it’s only on for certain scenarios that they use it. What a straight stitch plate does, is it turns a machine with lots of decorative stitches that has that sideway needle movement into a straight stitch only machine. It stabilizes that needle bar so that the straight stitch is straighter and also the opening in the plate is smaller so that when you are sewing, the fabric that you’re sewing onto, does not get pushed into the feed dogs; and if that’s ever happened to you that alone is a reason to switch out to a straight stitch plate.
Welcome back everyone just like I promised I am right in front of the machine and I wanted to get really up close, very personal with the machine, so that you could see exactly what I am doing; and I am just making sure that I am at a straight stitch because I will be talking about the straight stitch plate and feed dog. Now the first thing I wanted to do is, most of you are familiar with the straight stitch plate that has a hole that just the needle goes into as opposed to the zigzag plate which this opening goes wide across and is sometimes referred to as the shape of the Jelly Bean.
What JUKI does differently on their full-size, 12-inch throat, machines is that they give you the feed dogs that match up to the plate, so that you’re getting full contact with the foot and the plate at all times. Now, I’m going to move a little bit closer and I’m going to show you removing the plate as well as putting on the new feed dog. Right now, I do not have a foot or needle in my machine just for safety reasons and to give you the clearest view possible.
So this is the zigzag plate and this is to allow the needle to move to different positions, to do decorative stitching. And because this needle moves on a straight stitch the straight stitch plate gives it a bit more stability because its opening is only allowing for that needle drop. For no movement whatsoever. So that is the main difference between that straight stitch plate and the zig-zag plate.
Now, I’m going to zoom in on that feed dog system and I am just lifting that out and pulling it out of my machine. If you notice my zigzag plate matches up to my zigzag feed dog, that’s a nice close-up shot, and I want you to see the difference in how narrow the two are.
I am going to put in the straight stitch feed dogs, and you could see that just slid in really easily, and it just went right into place, and this allows for me to clean in between my feed dogs and also be able to get into this area for cleaning really nicely.
Now I’m gonna place my straight stitch plate on my machine and just pop it back down and it sets into place, and as you could see right here is where that needle would be dropping. So as I said, especially when you’re doing triangles and you’re doing half Square triangles, when you’re sewing right on the edge of the fabric to sew, that fabric will sometimes get pushed down into the feed dog system and because this opening is smaller that allows for that not to happen.
Now, the DX-2000 QVP does not have the plate and the feed dog system like we just saw on the DX-4000QVP. It’s a little bit different and I’m going to get into how to activate this and again I’m going to remove my foot and I’m going to zoom in so that you can see. Right now I have that zigzag opening and I mentioned that this machine has a straight stitch plate built into it and this mechanism here when I activate that plate it slides up and gives me a straight stitch plate.
Let me show you how easily that’s done. I am removing my bobbin cover and with a quick slide of that mechanism, I’m going to do this with the tweezer so that you can see that, so here it is all the way to the left and I have that zigzag opening right here where that needle drops, and when I slide that over, my looks like a stitch finger on a serger came forward and look at where my needle is dropping into and I’m going to try and get just a little bit closer and zoom a little bit more but you could see that that is allowing for stitching to take place in a smaller opening which is why you would want to use that straight stitch plate so again with the automatic this is on the DX-2000 QVP and the changing of the plate was done on the DX-4000 QVP
I hope you enjoyed that demonstration of putting in a straight stitch plate, and some of the uses for straight stitch plate, and when and why you would use it. When I am piecing, and I know I’m going to be piecing for a long time, or even if I’m doing garment sewing where I’m constructing, I like to put in my straight stitch plate because as I said it just gives me that feel and that Stitch quality like a straight Stitch machine would. For any time when you’re working with very fine sheer fabrics that tend to get pulled down into that feed dog system, the straight Stitch plate eliminates that.
Until next time for the next tip and trick with JUKI, I will see you then. I want to thank you for joining me, please make comments during the video and at the end so that we know what to present and what you would like to see just like the few people who commented that they needed to understand that straight stitch plate better! I was able to do that for you, so please leave your comments and share the video with your friends.
Join us in meeting Hannah, daughter of Cyndi Grome, one of the operators of Grome’s Sewing Center located in Austin, Texas!
Keeping San Antonio in Stitches Since 1950 Grome’s Sewing Center is so passionate about helping sewists like you create their dream projects! At Grome’s Sewing Center, they want their customers to come in and feel welcomed to find the right machine for their needs, browse their machine accessories, choose your notions, and pick the perfect fabric for your designs. Follow along below as Hannah shares everything you should know before visiting!
Follow along below for the transcript version of our interview with Hanna from Grome’s Sewing Center.
Hi everyone I’m Hannah from Grome’s Sewing Machine Company in both San Antonio and Universal City Texas. Welcome!
Grome’s Sewing Machine Company is a family-owned and operated business that’s been running since 1950. My great great grandfather, Isador Grome, started Grome’s Sewing Machine Company with his son Lou Grome and then Lou brought in Richard my grandfather, and then my grandfather brought in my mom and my mom took over the business, brought in her sister Irma, and now I’m the fifth generation here at Grome’s Sewing Machine Company working here alongside my mother Cindy Grome.
What JUKI machines can a customer find at Grome’s Sewing Machine Company?
You can find a lot of great JUKI machines and accessories here at Grome’s Sewing Machine Company. We have your favorite quilting machines, like your J350, we even have the infamous TL series, which is great for bag makers and Quilters alike. We have the J150, the DX4000, DX3000 F600, so if there’s any JUKI machine that you need for your sewing needs you can come to Grome’s and you’ll know that you’ll be able to find exactly what you need. And our sales staff can help you fit into just the perfect machine for you.
We have a wide array of JUKI accessories like the JUKI quilting rulers, as well as all of the JUKI feet, and we have the extension tables, we have the thread stands, so whatever accessory that you’re looking for Grome’s has it.
What are the benefits of being a Grome’s customer?
Purchasing from Grome’s has a great amount of benefits. Not only do we service your JUKI machines here in our store with certified technicians, and technicians who’ve gone to many dealer trainings and technician trainings to know how to work your machine inside and out; we also do in-person classes. So when you purchase your machine from us we can sit down with you, make sure you know how to thread your machine, wind a bobbin, and we have classes where you can learn how to use all the decorative functions of your machine as well. It’s a really great deal!
What can customers expect to find while shopping at Grome’s?
As you can see behind me we have a beautiful selection of fabrics in-house. We also have all of your quilting, sewing, and embroidery notions. We have everything that you need to finish your products. We have all of the amazing threads that you’re going to want, we have quilting threads, embroidery threads, general sewing threads, stretch cover lock threads, serger threads, everything you can think of.
We have kits that we make here in-house as well for all of your fun projects. If you want like a three-yard fabric project we got it. If you want patterns, we got it. You want books? We got it. You want anything special order? Shoot! Give us a call, we can find it for you and try to order it. So Grome’s, we got so much and we’ve been doing this like I said for 73 years so if you’re talking about something you can rest assured we know what you’re looking for and we can help you find it.
What makes Grome’s unique?
One of the best and most unique things about Grome’s Sewing Machine Company is that we are a family business that has been passed down generation through generation. We know the ins and outs of sewing machines all the way back from when my great grandfather brought the first zigzag sewing machine to the San Antonio area from Europe. So when it comes to knowledge base we’ve got my mom, I don’t know how she does it, but she can just pull up parts out of her head like a crazy person! But she’s amazing and we have the family support and knowledge base to help you figure out if you’re having issues with your machine, we can walk you through it, we can help you solve problems, we have techniques that we’ve known because we all work together here. You know I may be the fifth generation, the youngest here, but I always bring a fun and new modern twist to maybe some of the more contemporary things that my mom brings to our table. So we’re a fun family here that has a knowledge base that just kind of blends together and helps to help you create all your beautiful projects on your JUKI machines.
Does Grome’s have a message for future customers?
Grome’s is a great place in our community to come together and sew with each other, create projects, find all of the items that you need to create your amazing beautiful designs and ideas. We are always having great classes, with great instructors and we have events all throughout the year that we just keep scheduling and scheduling and scheduling and it’s a lot of fun. We do our best to try to get the entire community involved with the multiple events that we have throughout the year. We’re always running you know sales and having just a fun time together. I mean that’s what the sewing industry is about, it’s an art, we like to have fun and create.
We would be so honored if you would come to visit us here at Grome’s or even shop with us online. We are doing so much to grow our business here in the next few years and we would love for you to join our journey and we hope to see you soon. On our social media pages we have our Facebook at Grome’s Sewing Machine or Instagram at Grome’s Sewing. We have our YouTube at Grome’s Sewing and we’re always just trying to do our best to put out so much content for you because this is what it’s all about, is serving you all and creating your JUKI projects with your JUKI machines and helping you to create even more beautiful designs, ideas, quilts, and project garments and all of such. So we look forward to seeing you soon visiting us at Grome’s Sewing Machine Company, thank you!
To learn more about Grome’s Sewing Center, visit their website here! Thank you for joining us today in getting to know Hannah from Grome’s Sewing Center. We hope you get a chance to visit the next time you’re in the area!
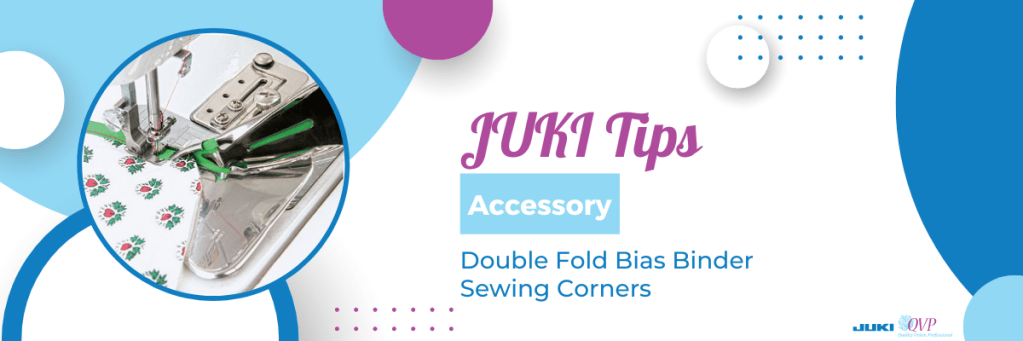
On this JUKI tip, we use the Double Fold Bias Binder and show you how to sew corners with this accessory and create a fun sewing experience!
Follow along below for a rundown of what Alba covers on today’s JUKI Tip!
Hello all my JUKI friends, my name is Alba and welcome to another tips and tricks with JUKI! Today I am talking about the double-fold bias binder and I have one in front of me, and I wanted to show you the components of this. I did another video previously on how to load the fabric and just tips with getting it to run smoothly, but today I’m going to be showing you how to use it with quilts and doing those mitered corners.
I wanted to show you the binder itself so that you could get a little bit familiar with this tool. First, it comes with the foot that’s very short allowing you to really get a nice top stitch onto that, and also two thumb screws. Now this pivots and opens up and this section here with that wide opening is where you would put your thumb screws, to screw it right into the bed of the machine.
Now there’s also a set of screws right by where you feed your bias, and this allows you to move closer and further away from your foot, depending on the machine, depending on the material that you’re using, and likewise, that big screw allows you to move left and right to get this positioned perfectly.
Now with this I feed my bias in, and I just pushed that fabric that I got it all the way into there, and I have it being held by my needle right now. So as I am sewing this I want to make sure that I’m holding my quilt right into that corner and as I’m coming to a stop I want my needle to be right at the edge of the fabric. You will see where my needle is, and where my fabric is, I went right to the edge; and I am touching my scissor button and what I will be doing is releasing enough of that bias and I want to give that a little finger press. I am going to move this fabric closer to me and you want to make sure that you have enough to be able to work with. What I am going to be doing, again with that finger press, I am going to open this up and kind of force that bias.
This will allow me to pull that tape back through, and a long silk pin would come in really handy for just holding that in place. In fact, I am going to put a pin into that corner to hold it; I have that nice miter, and I’m going to put my pin right in there and I am going to bring that fabric all the way towards me.
I am going to position this right underneath the foot so that my needle catches that very corner. Now with my stiletto, I’m using tweezers here, I’m making sure that my fabric is tucked all the way in, and I am going to sew. You would do this on all four of your Corners.
Now you can see that beautiful corner that I’ve just completed, and I want you to see how beautifully that is top stitched right at the edge and it catches the front and the back beautifully, and I’m just gonna allow you to get a really close look at that.
Now at that corner, I did add a PIN to secure, you could also add some fusible web tape, that quarter-inch fusible web tape, and press that first inch and force that miter in place. But, with the bias binder, that double-fold bias binder, gives you the ability not only to do curves but to do those beautifully mitered corners.
How beautiful is that for your quilts, your crafting projects, everything that you could imagine. I really like to do this when I’m sewing garments and I am not lining like a jacket. I would do this on my inside seams and those are called Hong Kong scenes and it just gives a beautiful professional look to that garment.
Thank you for coming and sharing your time with me, what do you want to see next on JUKI tips? Lets us know down below!
Join us in meeting Faith, one of the operators of Premier Stitching located in Bryan, Texas!
As one of the largest sewing machine dealers in America, and with 25 years of business under their belt, Premier Stitching offers most major brands like your favorite JUKI, and a large selection of tools, notions, accessories, and fabrics for your project plans. They offer repair services, online ordering and shipping, one on one teaching and so much more! Watch below as Faith covers everything you need to know before visiting their shop.
Follow along below for the transcript version of our interview with Faith, one of the operators of Premier Stitching.
Hi, I’m Faith, and I work at Premier Stitching. We are a sewing and quilting shop here in Bryan, Texas, and we were primarily online before, but back in January, we just opened our brick-and-mortar store!
So history started with my grandpa in the 70s. He owned Singer stores, and in 87′ he decided to open his own store and run the kinds of machines he sold and who he could sell to. So then, in 99′ when my dad was working with him, they decided to start the online business, and it was called SewVacDriect, and just back in January, we actually changed our name to Premier Stitching because we stopped selling vacuums a while ago, and people would you know, ask us for vacuums all the time but we wanted to focus on the Premier Products that we sell, the quality, the customer service, and everything. We just wanted to make our name what we’re focused on.
What JUKI Machines can customers find at Premier Stitching?
So we do sell almost all the JUKI machines. In our store, we do sell all of the home machines, and online, we do have all the home machines, as well as the industrial machines, available. So if you want an industrial machine or information, you would need to go on our website, and you could call us for information. For home machines, also on our website or in our store. Accessories, we have all the accessories at our store and available on our website.
What can customers expect while shopping at Premier Stitching?
Shopping at Premier Stitching, you can expect excellent in-house customer service, on-site authorized repair technicians, a wide range of classes, and you can always trust that we will do our best to get you what you need and at the best price.
What classes are provided at Premier Stitching?
We created a class specifically for homeschool students so that they can learn how to sew, and we have one semester for beginners and we also offer a semester class for intermediate. We also have beginner sewing classes for adults and children, as well we also do summer camps for adults and children. We also have a multitude of other classes available and the calendar is on our website.
How can customers contact Premier Stitching?
If you’re ever in Bryan, stop by. We have a multitude of items that are exclusively available in our store; such as fabric, threads and notions. If you want to get in touch with us, you can visit us at our store in Bryan, located at 700 South Bryan Avenue or you can give us a call at 800-229-889 or visit us on our website, http://www.premierestitching.com.
To learn more about Premier Stitching, visit their website here! Thank you for joining us today in getting to know Faith, one of the operators of Premier Stitching. We hope you get a chance to visit the next time you’re in the area!