Embarking on a sewing journey is akin to unraveling a treasure trove of creativity and skills waiting to be discovered. For beginners eager to delve into the craft with a reliable JUKI sewing machine this new year, here are five delightful and straightforward projects that promise a smooth learning curve!
1. Chic Coin Purse

Crafting a coin purse is an ideal starting point for newbies. When selecting fabrics for this project, consider using lightweight cotton or canvas for the exterior and coordinating cotton or polyester for the lining. These fabrics are easy to handle and come in many colors and patterns.
Using a simple design and thanks to its practicality, this project is functional and rewarding! This project also only consumes a little time, which is excellent motivation when just starting.
Recommended Notions:
- Zipper: Opt for a standard nylon or polyester zipper in a matching or contrasting color. A zipper attachment is an important skill to learn, as this skill will be used in various projects like bags, garments, and more.
- Thread: Use a good quality all-purpose thread for exterior and lining fabrics. Using the right thread will help your project have a longer-lasting quality and reduce thread breakage when creating your coin purse.
- Sewing Foot: A zipper foot is essential for precise stitching when attaching the zipper. Using a zipper foot will help you easily attach the zipper and reduce mistakes in your project!
2. Hair Scrunchies

Creating scrunchies allows beginners to experiment with different textures and stretchy materials. Opt for fabrics like cotton, satin, or velvet. These materials are readily available, accessible to work with, and come in various colors and prints.
The skill of working with different fabrics is essential! As you learn to sew, you’ll learn that some fabrics have more stretch than others, what fabrics can handle constant use, what threads and needles will work best, and more.
Learning how to attach an elastic is also an excellent tool! Attaching elastic is a popular skill in garment creation, and using this project as a stepping stone is a great way to learn how to run the elastic through project pieces or attach them to fabric,
Recommended Notions:
- Elastic: Choose a narrow, soft elastic that is comfortable to wear. The best thing to do is decide how big you want your scrunchies and then pick the correct width. The typical width of an average scrunchie usually falls within ¼ inches.
- Thread: Use a matching thread for seamless blending. Remember any scrunchies you may have at home, and study the design and stitching to better understand how your closure should look when you finish your project!
- Sewing Foot: A basic sewing foot works well for this project, making this perfect for all beginner sewers.
3. Stylish Eye Glass Case

When making an eyeglass case, consider using fabric with a bit of structure, like quilt-weight cotton or denim, for durability. A soft cotton or felt for the lining will help protect the glasses.
This project will teach you how to create projects with a form or shape that requires maintaining structure. These fabrics can be thicker and offer stability to more than just eyeglass cases; even used in tote bags, hats, quilts, and more. You can also learn to use different thread weights and needle sizes, as denim requires a larger needle than chiffon or cotton.
This project will also help you learn the basics of small buttons or snap closures. While zipper closures are a popular option, button closures and snaps are expected in bag creations, home décor, garments, and more. Learning this skill will help you when you step up to creating dresses, skirts, and more!
Recommended Notions:
- Button or Snap: Opt for a small button or snap closure for easy use. JUKI machines offer button attachment accessories, and we have a selection of machines that offer buttonhole creation. Those tools would help any sewist, beginner or advanced, create quality finished closures for their projects.
- Thread: Use a sturdy thread to ensure durability. Eyeglass cases receive a lot of use, like your scrunchies, so make sure to use a thread that can handle that form of wear and tear and even a little stretch in case your glasses fit snugly in their new case.
- Sewing Foot: A walking foot helps when sewing through multiple layers of fabric. With a walking foot, you’ll notice even feeding, reduced slippage as you have layers placed together, and prevention of wrinkles and puckering, giving you that finished quality look you’re aiming for!
4. Quaint Coasters

Coasters are an excellent canvas to showcase your creativity. Choose absorbent fabrics, such as cotton, linen, or a cotton-linen blend, to absorb moisture from glasses effectively. Remember to bring that skill of layering into play! Placing layers in between tour fabrics will help with creating a sturdy project.
The simple and manageable design size will help you build your confidence in project creation while allowing you to experiment with different stitch designs, fabric types, patterns, and more! This will also teach you basic techniques like measuring and cutting fabric accurately, sewing straight seams, turning corners, and finishing edges neatly.
This project is also a low-cost and low-time-consuming idea, giving creators a budget-friendly option that builds their confidence.
Recommended Notions:
- Batting or Interfacing: Adding a layer of batting or interfacing between the fabrics gives the coasters a sturdy feel, perfect for guests and homebodies.
- Thread: Use a coordinating thread for neat finishing.
- Sewing Foot: A walking or quilting foot helps maintain even stitches when working with multiple layers. As we mentioned before, prevent those wrinkles and puckers, and enjoy the finished quality.
5. Nook Carrier for Books

Select durable fabrics like canvas or twill for the exterior to provide adequate protection for a nook carrier or book sleeve. Use soft cotton for the lining to prevent scratches on the nook or book. This book sleeve can be used for travel, so you want to use a fabric that can handle heavy use and possibly different weather conditions.
This project is a great skill builder for beginners because it has a straightforward design that is easily customizable to your needs; you can take the opportunity to learn how to attach straps to a carrier case, an important lesson for garment and bag creation, and beginners can experiment with fabric choices, colors, patterns, and embellishments to add a personal touch to the project.
Recommended Notions:
- Velcro or Button Closure: Choose a closure option that secures the carrier while offering easy access. Velcro options are popular thanks to how easy they are to install onto projects and their budget-friendly cost. It’s also easy for many users to use as a closure with its easy opening. In some cases, if the Velcro wears out due to heavy use, it’s relatively easy to replace without having to reconstruct the entire project.
- Thread: Use a strong thread for structural integrity. A Book or Nook carry will be heavily used by a book lover, so keep that in mind when choosing your thread and building your project. Backstitching is a great skill to learn for enforcing the durability of your project and can be done with the press of a button on our JUKI machines.
- Sewing Foot: A walking foot ensures smooth stitching through different fabric layers. This will help as you attach a lining to the carrier case for solid protection. Remember that these carries will be used for travel, and a good, durable fabric and filler will protect the item.
Pro Tips:
- Fabric Preparation: Always pre-wash and iron your fabric before starting any project to prevent shrinkage or distortion after sewing.
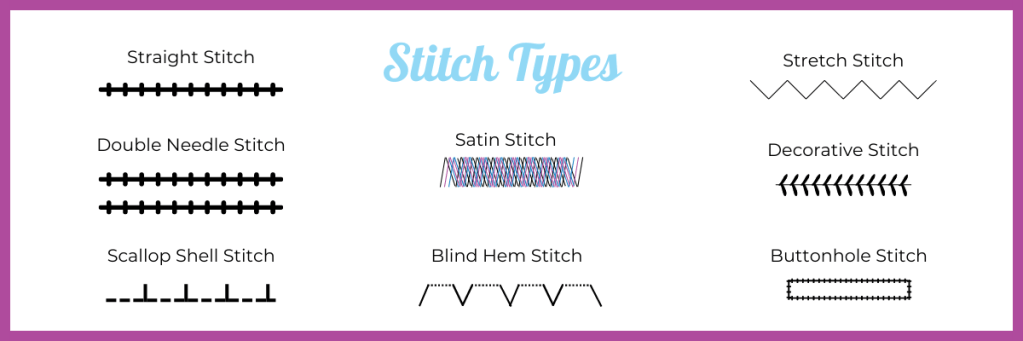
- Practice Stitches: Familiarize yourself with different stitch options on your JUKI machine before starting the projects to achieve the desired finish. Grab the fabric you plan to create for your project to test how the stitches will work with your fabric and design choice.
- Seam Allowances: Pay attention to seam allowances; they ensure accurate sizing and neat finishing. We recommend checking out JUKI’s ¼ Presser Foot for a seamless and measured look.
These beginner-friendly JUKI sewing projects offer an excellent way to learn while creating practical and visually appealing items. With the recommended fabric choices, notions, and sewing accessories, beginners like you can confidently embark on their sewing journey, guided by the reliability and precision of their JUKI sewing machine.
So, gather your materials, unleash your creativity, and let your sewing adventures begin! Visit our project page here for more project ideas that beginners and advanced sewists alike will love creating.