Become Inspired by Nature and JUKI

In its intricate tapestry, life often encourages us to seek inspiration in various places, moments, and experiences. For creators immersed in sewing, finding that elusive inspiration is akin to uncovering a treasure trove of ideas, designs, and possibilities. At JUKI, we understand the importance of fueling creativity and want to offer a few tips to navigate through creative blockades, so to celebrate the final weekend of National Quilting Month, we’re going to talk about ways you can go out and become inspired by nature for your next quilt!

Embracing Nature’s Bounty

In its beauty, nature often holds the key to unlocking boundless creativity. Picture the tranquil embrace of the beach, the calming rhythm of waves against the shore, or the reflective stillness of a lake. These natural settings serve as sanctuaries for rejuvenation, clearing the clutter from the mind and allowing fresh inspiration to flow in.

JUKI Rulers

Taking a break from the sewing room and venturing into these natural retreats can invigorate the senses and provide a new perspective. Nature’s sounds, sights, and sensations can ignite dormant creativity, sparking ideas that translate into unique sewing projects!

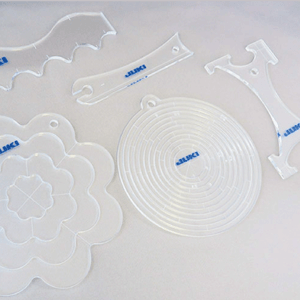
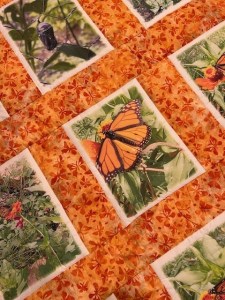
Consider incorporating earthy tones, vibrant floral hues, serene blues, or natural greens into your fabric selections for quilting or sewing. Let nature guide your color choices. Think of intricate patterns in leaves, water ripples, or petals’ symmetry to inspire quilt block designs or embroidery motifs. You can easily create shapes on your quilting machines with JUKI rulers like these. Experiment with free-motion quilting techniques to emulate natural shapes like waves, foliage, or clouds.

Also, the most beautiful part is that nature isn’t perfectly symmetrical. Embrace asymmetry or organic shapes in your designs, allowing a more natural and spontaneous feel to your quilting or sewing projects!

Seeking Inspiration Amidst Adventure

For those drawn to the thrill of adventure, camping amidst the wilderness is a playground for the imagination. The vast expanse of nature, the crackling of a campfire, and the star-studded night sky all weave tales that can inspire new sewing designs and concepts.

Butterly Quilt, created by NA Trainer Kelly Latreille

From the bustle of everyday life, camping fosters an environment of simplicity and introspection. It’s a canvas where creators can disconnect, immerse themselves in the present, and allow inspiration to find its way in.

While camping or at the playground, sketch the landscapes, wildlife, or exciting patterns you encounter. Use these sketches as inspiration for embroidery designs or quilt patterns later! You can also notice textures like tree bark, grass, or the grainy surface of land around you. Try experimenting with different quilting techniques or stitch patterns to replicate these textures in your projects.

We also recommend collecting small souvenirs like leaves, pebbles, or twigs that catch your eye! Use these as templates for appliqué designs or as inspiration for color palettes in your quilting projects. By merging the experiences and inspirations gained from your outdoor adventures into your sewing and quilting, you can create a unique and personal project, making them functional and reflective of your cherished moments in nature.

Digital Wellsprings of Inspiration

In the digital age, inspiration is merely a click away. Our YouTube channel is a treasure trove of tutorials, tips, and projects designed to ignite creativity. From beginner-friendly guides to advanced techniques, these videos offer knowledge and inspiration.

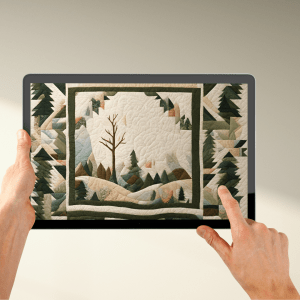
You can also visit craft sites like Pinterest and create digital mood boards or collages. Collect images, colors, and patterns that resonate with you! These visual boards can serve as references for fabric selection and project inspiration. Extract color palettes from nature photographs or videos and experiment with landscape quilting, appliqué depicting natural scenes, or using various fabric manipulation techniques to emulate natural textures.

Additionally, our project page serves as an oasis of ideas, hosting many sewing projects for creators to explore. Whether it’s quilting, home decor, or embroidery, many projects spark inspiration and guide enthusiasts through their creative journey.

Connecting through Social Media

Social media platforms serve as vibrant hubs where creators connect to share ideas, showcase their work, and draw inspiration from fellow enthusiasts. Our social media channels foster a community where sewing enthusiasts engage, exchange ideas, and celebrate the artistry of sewing!

You can stay inspired by nature on Social Media! There are lovely sewing and quilting accounts that focus on nature-themed projects and accounts dedicated to nature itself. You can also follow nature photographers or accounts that share stunning images of landscapes, flora, and fauna and use that to create color palettes, patterns, and motifs for your projects.

Engaging with like-minded individuals, participating in discussions, and exploring the creations of others can be a funnel of inspiration! These platforms can offer a window into a variety of perspectives and techniques. Share your progress, and celebrate your nature-inspired creations! And remember, when you’re creating, inspiration can come not just from the images but also from the stories, tips, and experiences shared by fellow makers.

Joining Local Dealer Events and Sewing Communities

Attending events hosted by local dealers or sewing communities is an excellent way to immerse yourself in the sewing world! These events offer opportunities to connect with fellow creators, learn new techniques, and gain inspiration from workshops and demonstrations. At JUKI we host training classes and events with our JUKI dealers, ready to help you create! You can learn more about our events and training classes by visiting us here.

Local dealer events also host workshops and classes where you can learn new techniques or gather ideas for projects. We recommend participating in these sessions to expand your skills and try new techniques! This is also a great way to get in touch with your sewing community and get inspired by other creators like yourself.

At JUKI, we believe inspiration is woven into the fabric of everyday life, waiting to be discovered in the most unexpected places. From the tranquility of nature to the digital realm and vibrant sewing communities, there’s a world of inspiration out there waiting to be explored.

Creativity knows no bounds, and finding inspiration is an ongoing journey! Whether through the calming embrace of nature, the digital world of education and tutorials, or the exciting energy of your sewing community, enjoy nature and uncover a world brimming with innovative ideas and endless possibilities!

JUKI Tip: How to Get Started with Ruler Work

In this month’s tip, JUKI National Account Trainer Alba teaches us a fun and easy way to use our new JUKI ruler set in the Hearts and Wings collection! Showcased by Alba, check out examples of patterns you can create and an easy trick on how to plan out your designs the next time you’re creating.

Follow along below for a rundown of what Alba covers on today’s JUKI Tip!

Hello, all my JUKI friends my name is Alba and I am the national accounts trainer for JUKI Home Sewing! I’d like to welcome you to my home and today I’m really excited because this is almost like a double video for you. I am not only introducing a new product but I’m going to give you a tip on getting started with that new product. So let’s get right to it and let me show you the new product!

What I’m referring to is the hearts and wings ruler set. This is absolutely beautiful, you’re getting five different rulers that I have spread out on the video and they are clear rulers so I do have them down on white paper to try and make it easy for you to see them. As you could see, they give you five different shapes and really endless possibilities and a lot of people when they get started with rulers and quilting one of the first questions they ask is “so how do I get started?” And that’s exactly my tip for you today!

Now you notice I have no machine set up because really getting started with rulers or any free motion for that fact is on paper or a dry-erase material. So you can work on paper with pen, and I do recommend getting a pen that does not have a click on/off, because that pen will close on you as you are tracing those rulers or templates. You may hear this term, ruler or a template, and they refer to the same thing.

What I am going to do, is at my local Dollar General they have a dry-erase wallpaper and for me, I put this on the back of my cutting mat and it makes it really easy for me to audition and practice with my rulers. So the first thing I am going to do is I will be doing a border with this ruler here, and what I like about the JUKI ruler is, it doesn’t show well on camera, but there are a little dots of grips fabric grips on these rulers so it makes it really easy to start using them.

To start in the video I’ll draw a center line, and what I like about the dry erase is I can just erase if I’ve make a mistake and it makes it really practical on this dry erase material but remember to use a dry erase marker that’s especially made for this. Now with free motion it really doesn’t matter where you start at the beginning or at the end because you have full 360 movements; but for me when I start I like to start at the top of my fabric with the bulk towards me so as I move I’m moving into the machine and that’s exactly what I will be doing here.

I am going to place my ruler down and you will notice on the video all the cross markings, and these are indicator markings to keep you straight, plum and even. So I am going to line up, and when using rulers you want to put some of your fingers on the ruler and some of them off the ruler guiding it and having you keep it from moving or shifting. Now if this were my machine I would be following the edge and at any point stop because that is what will give you a nice beautiful point. Now I am going to move my ruler and line up and make sure that I am staying on those lines.

Now I’m going to turn my ruler around and go to the other side. I could either start from the top or the bottom and always when you’re doing this, pause at that corner. Im going to make sure I am lined up beautifully, and look at what a beautiful design this makes for a border!

As you play with this you could put a medium size one in between and audition but this is what I like about working with a dry erase area paper pen, you’re getting to play with it and really experimenting with the movement and the shape that you will create. Now by using the dry erase, it will be slightly larger because my foot does grip about A4 of an inch from that ruler base but this is a good way to get that general idea of how that ruler will take shape and also to play with it and trying create new and exciting shapes of your own.

I want to thank you for sharing this time with me! If you enjoyed this video and others that you’ve seen make sure to hit subscribe and make sure to leave comments as well on what you’d like to see. Please come back and show me your progress that you’re making with your rulers and again this is the new hearts and wings ruler set that I am playing with a five-piece ruler set so please reach out to your local dealer and get a really nice look at this set!

JUKI Tip: MO-2800 Features

In this month’s tip, JUKI National Account Trainer Kelly showcases how to use the features on one of our latest sergers, the MO-2800! From the useful air threader to safety features that keep sewing fun, follow along for Alba’s favorites.

Follow along below for a rundown of what Alba covers on today’s JUKI Tip!

Hello all my JUKI friends, my name is Alba and I am a trainer for JUKI America. Today I want to share with you one of the newer JUKI surgers and I’m going to be talking about the MO-2800. I’m going to go over some of the key features in that made me fall in love with this machine.

First of all,l you may notice that there is a knee lift on the machine. What the knee lift does as you’re sewing, is it raises and lowers the foot, which can be really handy when you’re working with corners or any other areas.

The MO-2800 is a two, three, and four-thread serger and it has that easy threading, our air thread capability. That means with a push of a button, and a jet of air, your lower and upper looper are instantly threaded.

I also love the fact that my tools that I require for the serger also have a spot and a home right on the inside cover.

One of the safety features in their machine you’ll notice is that the machine will not run if the front storage door is open or the foot is up. Isn’t that just absolutely wonderful?

Now, the one feature that I fell in love with, I’m going to be I’m going to be honest with you, is that needle threader. Now, in the video, I’m just going to turn the machine slightly so you can see that needle threader, and the feature threads your right and left needle. I absolutely love not having to fuss with tweezers, a magnifying glass, or getting an extra pair of glasses to thread my needles.

Now the other feature I want to show you is going to be a little bit difficult to show but hopefully you will be able to follow along in the video. I have a stitch width adjustment where I can move my knife to the right and to the left. Normally that would be the only way to adjust your stitches, but on the MO-2800 I have an independent adjustment to also move my stitch finger independently of my knife. This really allows for perfect stitches, especially on those super fine delicate lacy knits that I find such a hard time getting that perfect stitch on. JUKI has thought of it all!

Now a rolled hem is something that I do and this machine handles a very sheer fabric, to my home deck fabrics, so it could handle a wide variety of fabrics. But when I switch to a rolled hem, I have this quick easy tweak, that allows me to get that picture-perfect rolled hem as well, which you can see in the video.

Now that I’ve gone over some of the features on the MO 2800, please reach out to your local dealer and get a really nice look at this machine and test it out for yourself. I think you’ll love it as much as I do. Until next time, bye-bye!

JUKI Tip: Using the JUKI Smooth Foot

In this month’s tip, JUKI National Account Trainer Kelly showcases how to use the JUKI Smoot Foot, an accessory available on both the TL series and the DX series, which allows you to create with fun fabrics like vinyl, leather, suede, and more!

Follow along below for a rundown of what Kelly covers on today’s JUKI Tip!

Hi, I’m Kelly with JUKI America, and on today’s tip if you like to sew on a variety of fabrics and get a professional finish every time, invest in the JUKI smooth foot. The JUKI smooth foot is white on the bottom because it’s made out of resin material that’ll enable a smooth feed for fabrics like leather, cork, and vinyl! I love to make bags on my JUKI Haruka, but recently I chose to make a leather tote bag from an old long leather coat I had, and I realized quickly that I needed the smooth foot to get a superior feed for that type of fabric. Watch above as we demonstrate!

With my stitch length set at three and a half, the leather does not want to move through the machine with the standard presser foot. Let me change to the smooth foot and show you the difference.

The only change I made was to put on the smoked foot, and you can see now top stitching this leather is easy.

Take a look at the beautiful stitch quality on the leather!

Topstitching is made easy on leather with this wonderful smooth foot.

It also sews beautifully on the cork!

The smooth foot is available for the TL series and our computerized sewing machines. You can go to JUKIHome.com and then select accessories to find the smooth foot that’ll work with your machine. You can visit your local JUKI retailer to purchase the smooth foot for your JUKI. Have fun with your JUKI making bags with all kinds of fabrics, with your smooth foot by JUKI!

Efficient Stitches: Sewing Room Organization Tips

A well-organized sewing room or dedicated sewing space can be the key to a productive and enjoyable sewing experience. From neatly storing fabrics and notions to creating a good workflow, a functional workspace allows you to focus on your creative projects without the frustration of clutter! This blog post will explore practical tips and tricks for organizing your sewing room, innovative storage solutions, and space-saving ideas. Get ready to transform your sewing space into a haven of creativity and efficiency!

Start Evaluating and Decluttering:

Start your sewing room organization journey by evaluating your current setup and decluttering unnecessary items. Sort through your fabrics, threads, and notions, and donate or discard anything you no longer need or use. By minimizing clutter, you’ll create more space and make finding and accessing the supplies you truly need easier.

Plan Your Fabric Storage:

Proper storage of fabrics is essential for easy access and preservation. We’ve gathered a few tips for getting your storage well organized.

  • Categorize and Sort: Start by categorizing your fabric based on different criteria, such as color, fabric type, or project type. This will make finding the fabric you need easier when starting a new project.
  • Use Clear Containers or Bins: Store your fabric in clear plastic containers or bins. This lets you see the contents at a glance, saving time and effort when searching for specific fabrics.
  • Fold and Label: Fold your fabric neatly and uniformly to maximize space and prevent wrinkles. Use labels or tags to identify the fabric type, color, yardage, or other relevant details. This makes it easier to locate specific fabrics without unfolding everything.
  • Vertical Storage: Consider storing your fabric vertically rather than horizontally. This method saves space and allows you to easily browse through the fabric stacks without disturbing the neatly folded fabrics.
  • Utilize Shelving or Cubbies: Install shelves or use cubbies to store your fabric. These provide a dedicated space for each fabric category and help organize your sewing room. You can even sort fabrics by size or project type within each shelf or cubby.

Organize Your Notions and Tools:

Organizing notions and tools in your sewing and quilting room is essential for maintaining a functional and efficient workspace. Start by grouping similar items, such as needles, pins, and buttons. Utilize clear plastic containers, small jars, or compartmentalized organizers to store these smaller items, ensuring they are easily accessible and visible. Consider using a pegboard or wall-mounted tool organizer to hang scissors, rulers, and other frequently used tools, keeping them within reach and saving valuable workspace.

Designate specific shelves or drawers for larger tools like cutting mats and rotary cutters to keep them safely stored and neatly organized. Additionally, labeling containers or using clear bins for items like zippers, ribbons, and trims can make it quick and easy to find what you need. By implementing a well-thought-out organization system, you’ll streamline your sewing and quilting process and have a clutter-free environment that inspires creativity!

Organizing Those Threads and Bobbins:

Practical thread and bobbin organization in your sewing and quilting room is crucial for a smooth and efficient workflow. To keep your threads easily accessible and neatly arranged, consider using a thread rack or spool holder. These can be mounted on the wall or placed on a table or shelf, providing a convenient display of your thread collection. Group threads by color or type, allowing for quick identification and selection. Alternatively, you can store threads in clear plastic containers or drawers, protecting them from dust and light exposure.

To keep your bobbins organized, use a bobbin storage case or tray specifically designed for holding bobbins securely in place. This prevents them from unwinding and tangling. You can also match bobbins with corresponding thread spools, storing them together to easily locate the appropriate combination when needed. By implementing an effective thread and bobbin organization system, you’ll save time and frustration, allowing for a more enjoyable sewing and quilting experience.

Creating Your Workflow:

Creating an efficient workflow in your sewing and quilting room is essential for maximizing productivity and enjoying a seamless creative process! Start by organizing your workspace in a way that suits your working style. Arrange your sewing machine, cutting table, and ironing station in a seamless layout, and ensure easy access to all your needed tools and materials. Consider setting up your own assembly line for different stages of the process! Such as cutting, piecing, and assembly, to keep everything organized and efficient.

Next, establish a workflow that works best for you! Start by planning your projects in advance. Gather your fabric, confirm your pattern, and have your cutting instructions ready. With a clear roadmap, you can avoid unnecessary interruptions or backtracking during the creative process.

Prioritize tasks and break your sewing down into manageable steps! This allows you to focus on one project piece at a time, cutting fabric, sewing seams, or ironing. Remember to declutter and tidy your workspace to maintain a clear and inspiring workspace. By creating an efficient workflow tailored to your needs, you’ll be able to fully immerse yourself in your sewing and quilting projects, resulting in beautifully crafted creations!

Inspiring and Personalized Decor:

Create an inspiring environment in your sewing room by adding personal touches and decorative elements. Display finished projects, hang inspirational quotes, or place around artwork that sparks your creativity. Look into incorporating good lighting to avoid eye strain during your project creation. Maybe add a pinboard or corkboard to pin inspiration, project ideas, or fabric swatches!

A well-organized sewing room is a haven for creativity and productivity. By implementing the tips and tricks in this blog post, you can create a functional and inspiring workspace that enhances your sewing experience. From efficient fabric storage to optimizing workflow and adding personal touches, these strategies will help you maximize your sewing space and enjoy a clutter-free environment. Embrace the joy of organization and watch your sewing projects flourish in a space designed for creativity and efficiency. Happy sewing!