Unlock New Possibilities with JUKI’s MO Attachment Set (6pcs)!

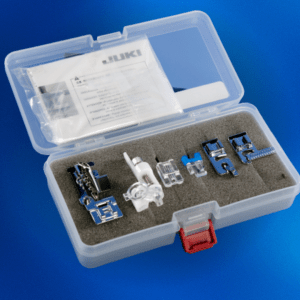
The JUKI MO Attachment Set 6pcs is the ultimate accessory set for anyone looking to take their serging game to the next level! This kit is packed with tools that will help you achieve professional, high-quality results with ease. Whether you’re an experienced sewist or just starting out, these presser feet will enhance your efficiency and precision, letting you focus on what truly matters—bringing your ideas to life!

What’s Included in the JUKI MO Attachment Set 6pcs?

Each presser foot in this set is designed to make your sewing projects easier, faster, and more professional. Here’s what’s included and how they can transform your workflow:

  1. Blind Stitch Presser Foot (For Right Needle): This foot is perfect for hemming delicate fabrics where you need an almost invisible stitch! It’s designed to stitch the fabric without leaving visible lines on the front, ideal for creating professional-looking hems on pants, skirts, and dresses.
  2. Elasticator Presser Foot: This foot is a must-have for adding elastic to your projects! This foot allows you to easily insert elastic into waistbands, cuffs, or any project requiring a stretchy finish, all while maintaining consistent tension for an even, secure fit.
  3. Cording Presser Foot: This foot is ideal for adding decorative cords to your projects! Whether you’re working on home décor or fashion pieces, this foot helps you sew over cords smoothly, creating elegant texture and dimensional details in your fabric.
  4. Beading Presser Foot: Add a touch of glamour with this foot! It’s designed to easily insert beads or small pearls onto your fabric while stitching them securely in place. Whether you’re embellishing a dress, accessories, or home décor items, this foot ensures beads are sewn evenly and securely.
  5. Piping Presser Foot: This foot is great for adding custom piping to your projects, whether for garments or home décor! It helps you sew neatly around piping to create sharp, defined edges that bring a professional finish to your projects.
  6. Gathering Presser Foot: This foot is for creating gathers or pleats with ease! Whether you’re making ruffled skirts, dresses, or decorative elements for home décor, this foot gathers the fabric as you sew, saving time and effort on one of the most intricate tasks in sewing.

Choosing the Right Presser Foot for Your Project

Choosing the right presser foot for your project can greatly impact the outcome of your work! Here are some tips to help you select the perfect presser foot for each task:

  1. Finishing Edges: Use the standard presser foot or overlock foot to create clean, finished edges. This is perfect for fabric types that fray easily.
  2. Decorative Touches: Choose the piping presser foot or cording presser foot if you’re looking to add some dimension or texture to your project.
  3. Hemming: The blind hem presser foot is perfect for neat, almost invisible hems, while the gathering foot will make your gathering tasks much easier.
  4. Adding Trims: Use the taping presser foot when you need to apply trims or narrow tape to edges for a professional finish.

How the Right Presser Foot Can Help Your Project

The right presser foot can make a world of difference in your sewing projects! It ensures that you’re using the right technique for each task, which ultimately leads to better results. A presser foot that is well-suited for the job can:

  • Improve Stitch Quality: Using the correct foot can prevent uneven stitches, bunching, or skipped stitches, ensuring your project has a clean, polished finish.
  • Save Time: The right presser foot speeds up your sewing process by minimizing the need for manual adjustments. For example, a gathering foot allows you to gather fabric as you sew, which would otherwise be a time-consuming task.
  • Enhance Professionalism: Whether it’s creating precise hems, evenly applying decorative details, or adding custom piping, the correct presser foot gives your projects a professional look and feel.

Ready to Elevate Your Serging Experience?

The JUKI MO Attachment Set 6pcs is your key to unlocking new design possibilities, improving efficiency, and achieving high-quality finishes with ease. Whether you’re working on fashion, home décor, or custom projects, these presser feet will take your sewing to the next level!

Click here to learn more and get yours today!

Setting Up Your Quilting Space

Quilting is more than just a craft—it’s a creative escape, a way to bring ideas to life, and a skill that thrives in the right environment! Whether you’re transforming a cozy corner into a sewing nook or dedicating an entire room to quilting, your setup plays a major role in how enjoyable and efficient your experience will be.

The right machine can make all the difference, ensuring you have the space, power, and features needed to bring your projects to life. Some machines are compact enough for small areas, while others require more room. Let’s dive into how to organize your space, pick the best machine for your setup, and start quilting with confidence!

Small Quilting Spaces

Small quilting spaces require creative organization to make the most of a limited area. Whether you’re working from a corner of your home or a small desk, keeping things tidy will help you sew comfortably! Choosing a machine that fits on your work surface without sacrificing power is key. Look for practical storage, and try using shelves, rolling carts, or pegboards to keep tools and materials easily accessible.

Choosing the Right Machine & Setup for a Small Space

When working in a tight area, a smaller machine like the TL Series or HZL-F Series is ideal. The TL measures around 14″ W x 7″ D x 12″ H, while the HZL-F Series is slightly larger at 17″ W x 8″ D x 12″ H. Both machines fit well on a standard 36″ sewing table, making them perfect for tight spaces!

Another fun idea we recommend for a small workspace is using a foldable or wall-mounted sewing table! These tables can provide flexibility, allowing you to tuck it away when not in use. Keeping essential tools nearby in a rolling cart or mounted on the wall ensures everything stays organized without cluttering your workspace.

Medium Quilting Spaces

A medium-sized quilting space offers more room to work but is still manageable within a home. Usually, you’ll find this kind of space in a dedicated craft room, home office, or spare bedroom. Having a larger work surface can allow for a more comfortable sewing experience, and gives you enough room for fabric handling, quilting, and storage. Thoughtful organization is key to creating a comfortable sewing space. Create designated areas for sewing, cutting, and pressing and invest in the right machine to ensure that you can tackle a variety of quilting projects without running out of space!

Choosing the Right Machine & Setup for a Medium Space

A machine with more quilting features and space is a great fit for a medium-sized area. Our DX Series measures about 18″ W x 9″ D x 12″ H, while the EE models are slightly larger at 20″ W x 10″ D x 12″ H. These machines work well on a 48″ wide sewing table, giving you more space to maneuver fabric while quilting. With additional workspace, you can set up a small pressing station nearby for quick seam pressing or create an organized storage system for fabric and accessories! Make sure to think about lighting as well; a well-lit craft room with both natural and project lighting ensures a better view of your stitching while working on detailed projects.

Large Quilting Spaces

Having a large quilting space means you can work on full-sized projects without worrying about running out of room! A dedicated quilting studio, basement workspace, or extra-large craft room allows for specialized areas for cutting, sewing, pressing, and quilting. With this much space, you can even invest in a stand-up quilting machine and frame, making it easier to work on larger quilts! Organization is still important, so having designated storage for fabric, thread, and tools will keep your space functional and efficient. Keep in mind all your tasks for quilting, and you create the perfect craft room for your needs.

Choosing the Right Machine & Setup for a Large Space

A stand-up quilting machine like the J-350 QVP Miyabi Stand-Up Quilter is perfect for those who want to expand their quilting capabilities! The Miyabi with a compact frame requires at least 5′ x 5′ of space, while a full-length frame setup can take up 5′ x 12′.

When you’re working with these types of large quilting machines, it’s best to opt for a workspace that can reach at least 6 feet wide to allow for easy movement around the frame. Think about your other spaces as well if you’re going to create large projects. A large cutting table is ideal for managing fabric, while deep storage bins and shelving units help keep your tools, fabrics, and accessories organized. A design wall is also a great addition, allowing you to plan quilt layouts before sewing!

Designing your perfect quilting space can be just as exciting as starting a new project! Whether you have a cozy corner or a full craft room, finding the right setup and machine will make quilting more enjoyable and inspire creativity. The key is to create a space that works for you—one that fits your needs, keeps you organized, and allows you to focus on what you love most: sewing. Ready to start creating? Explore our projects on our website and turn your space into the ultimate quilting haven!

What Is Free Motion Quilting?

Imagine taking your quilting skills to the next level by stitching intricate, custom designs with total creative freedom! That’s the magic of free-motion quilting (FMQ). This technique, paired with the right presser feet, gives you the freedom to stitch any pattern you can imagine, making your quilts truly one-of-a-kind.

Whether you’re a beginner or an experienced quilter, FMQ offers limitless possibilities for artistic expression. But how has FMQ become a beloved and popular technique? Let’s take a closer look at its history and why quilters everywhere are embracing its creative potential!

Free motion quilting began gaining popularity in the 1980s and 1990s as quilters looked for ways to break free from traditional stitching constraints. Unlike traditional quilting, where the sewing machine feed dogs (the mechanism that moves fabric) helped control the fabric’s movement, free motion quilting disables those feed dogs, allowing the quilter to move the fabric in any direction. This technique opened up endless design possibilities, from swirls and flowers to geometric patterns! Free motion quilting is perfect for customized, intricate stitching that can’t be achieved with basic straight lines, making it a favorite among quilters.

Benefits and Uses

Allowing you to move the fabric in any direction to create intricate designs without the restrictions of the feed dogs, FMQ opens up endless possibilities for creativity and allows quilters to create unique and one-of-a-kind pieces. With the right quilting foot, you can achieve smooth, even stitches while minimizing puckering.  Its versatility also makes it perfect for a wide range of projects, including quilts, home decor, clothing, and accessories, adding texture and dimension to any fabric-based creation!

Essential JUKI Free Motion Quilting Feet

At JUKI we offer multiple feet that will elevate your free-motion quilting, but let’s focus on the 4 below:

  1. Quilting Foot Front Open Toe: Provides excellent visibility, making it easy to see every stitch. Ideal for delicate stippling or small, intricate designs.
  2. Quilting Foot Side Open Toe: Features a side opening for added ease of movement, giving you more space to move the fabric freely, perfect for swirling patterns or feather designs on larger quilted areas!
  3. 1/4” Quilting Foot (For Ruler): Designed to work with quilting rulers, this foot ensures precise 1/4″ seam allowances and perfect straight lines for ruler-based quilting techniques.
  4. Echo Quilting Foot: Creates evenly spaced echo lines around shapes, adding depth and texture to quilt blocks and appliqué designs.

Tips for Quilting and Sewing

  • Start Slow: When you’re new to free-motion quilting, go slow and focus on maintaining a steady rhythm with your fabric movement, the bunny speed is your friend here!
  • Practice Makes Perfect: Try quilting on a small practice sandwich (fabric, batting, and backing) to build muscle memory and refine your technique.
  • Light Grip, Easy Movement: Guide the fabric gently without excessive pulling or pushing to maintain smooth, even stitches.
  • Choose the Right Thread: Cotton provides a matte finish and smooth stitching, while polyester offers strength and elasticity. Most quilting projects use a 40-weight thread, but a 50-weight thread is good for finer, more delicate designs, and a 30-weight thread works well for larger, bolder patterns. Always match the thread weight to the design—finer threads like 50-weight are perfect for small, intricate patterns like stippling, while heavier threads like 30-weight add texture to larger designs. For consistent results, use the same thread type for both the top and bobbin to prevent tension issues and ensure smooth stitching.
  • Keep Your Hands Steady: Move the fabric gently and steadily with both hands—one on the top and one on the bottom—to avoid erratic stitch patterns. There are also tools like paddles or quilting rings that can help make this part smoother.

For more tips on setting up your machine for free motion quilting, check out our step-by-step video guides here.

Creative Ideas for Projects with FMQ

The free-motion quilting feet open up endless possibilities for creative projects, allowing you to add custom designs and intricate stitching to a variety of projects! You can create beautiful quilted wall hangings that have personalized patterns or bold, creative designs for pillow covers that bring flair to your home. This technique also shines when working on custom quilts, whether for special occasions, as gifts, or for everyday use!

Besides quilts and home decor, the free-motion quilting feet options are perfect for adding dimension and personality to accessories like bags, purses, or even clothing! The versatility of the free-motion quilting foot makes it an ideal tool for any project where you want to infuse creative stitching and texture, whether you’re working on large quilts or smaller items that benefit from a bit of extra detail.

Ideas for Downloadable Practice Sheets:

To help you get started with free motion quilting, downloadable practice sheets can provide a structured way to learn new designs. Here are a few we’ve created for beginner quilters!

  • Loopy loops
  • Woodgrains
  • Pebbles
  • City Terrace

Free motion quilting is an exciting way to take your quilting projects to the next level, allowing you to add personal touches, intricate designs, and creative textures with ease. Whether you’re just starting out or looking to refine your skills, using the right free-motion quilting foot and practicing different patterns will help you gain confidence and control. With the right tools, techniques, and practice sheets, you can transform ordinary quilts into stunning works of art!

Ready to get started? Grab your free motion quilting foot, download our practice sheets, and start stitching your way to beautiful, custom quilting designs today!

JUKI’s Seasonal Cleaning Guide

Spring is here, and it’s the perfect time to refresh our sewing space and ensure machines are in top shape! Whether you use a sewing machine, quilting machine, or serger, regular maintenance is essential for smooth operation. Things like lint buildup, thread debris, and oiling can lead to performance issues. By taking the time to properly clean, organize, and check out a professional servicing with your JUKI dealer, you can extend the life of your machine and enjoy uninterrupted creativity in a clutter-free studio!

Each JUKI machine has unique maintenance needs. JUKI’s semi-industrial TL Series machines require regular oiling and manual cleaning, while the DX and HZL Series computerized machines have self-lubricating mechanisms and need careful electronic component care. Let’s dive into essential spring cleaning tips, professional maintenance schedules, and how to optimize your sewing space!

Cleaning & Maintaining Your Sewing Machine

Your sewing machine is the heart of your craft, and keeping it clean ensures clear stitching, smooth operation, and a long machine life! Understanding your machine’s maintenance needs will help keep it in top condition for years.

JUKI TL (Semi-Industrial Straight Stitch Machines) & Longarm Series

  • These machines require regular oiling, especially in the hook and the lubrication points shown in your manual. Use the machine oil. Without proper lubrication, you may experience skipped stitches or increased noise.
  • Use a lint brush to remove debris, especially after working with heavy fabrics like denim or quilting layers.
  • Since these machines are mechanical, periodic manual adjustments and cleanings help maintain smooth operation.

JUKI DX & HZL Series (Computerized Machines)

  • These models do not require manual oiling, thanks to their internal lubrication systems.
  • Avoid compressed air! It can push lint deeper into the machine. Instead, use a lint brush or vacuum attachment.
  • Because of their electronic components, avoid excessive moisture when cleaning. We recommend a soft, dry cloth to clean the machine.
  • Regularly update firmware (if applicable) and make sure your machine is plugged into a surge protector to avoid electrical damages!

JUKI MO Series (Overlock Sergers) & MCS Series (Coverstitch)

  • Regularly clean the loopers, feed dogs, and knife area using a lint brush or vacuum attachment to remove accumulated lint and thread.
  • Apply a few drops of sewing machine oil to the moving parts as recommended in your manual to ensure smooth operation.
  • Replace needles frequently, as serger needles dull faster due to high-speed stitching.
  • Check and adjust thread tension regularly to maintain balanced and professional-looking stitches.
  • Avoid using compressed air, as it can push debris into delicate internal components.

Regardless of your machine type, changing your needle regularly (about every 8-10 hours of sewing or every new project) and using high-quality thread reduces tension issues and lint buildup.

Professional Servicing: When & Why?

Even with diligent home maintenance, your machine needs professional servicing to ensure all internal components are aligned, lubricated, and calibrated correctly. Here’s a guide to when you should schedule servicing based on usage:

  • Occasional Use (A Few Times a Month) – Service your machine once a year to prevent internal wear.
  • Frequent Use (Several Days a Week) – Schedule servicing every 6 months to maintain peak performance.
  • Heavy Use (Daily or Professional Sewing) – A check-up every 3-4 months is recommended, as frequent use increases wear on moving parts.

Your JUKI dealer is your best source for professional servicing! They’ll inspect tension, replace worn parts, and ensure that your machine is operating at its best. If you notice unusual noises, skipped stitches, or thread tension problems, it might be time for an early tune-up!

Timing & Storage Tips

A clutter-free sewing space makes it easier to focus on projects and prevents dust from settling into your machines. Here are some tips on how to maintain a clean and organized studio:

  • Create a Seasonal Cleaning Schedule – Set aside time each season for deep cleaning. Empty out drawers, dust off surfaces, and reorganize tools!
  • Cover Your Machines When Not in Use – Use dust covers or hard cases to prevent lint and debris from settling inside.
  • Invest in Smart Storage Solutions – Clear bins for fabric, drawer organizers for notions, and labeled shelves for tools help keep everything within reach without clutter.

What to Do with Last Season’s Fabric Scraps?

If your scrap bin is overflowing, get creative or give them a new home! Here’s how:

  • Sort & Donate: Quilting guilds, local schools, and nonprofit organizations often accept fabric scraps for community projects.
  • Repurpose for Small Projects: Use scraps for appliqué, patchwork quilts, fabric bookmarks, or fabric baskets for storage.
  • Host a Scrap Swap: Organize a trade event with fellow sewists to exchange materials and refresh your collection.

Visit Your Local Dealer for Maintenance & Service

Your JUKI dealer is the best place to get expert servicing for your JUKI sewing machine. Regular maintenance ensures precision stitching, extends the lifespan of your machine, and prevents costly repairs. Contact your dealer here today to schedule your next tune-up!

By maintaining your machines, organizing your sewing space, and finding creative ways to repurpose fabric, you’ll start each season refreshed and ready to tackle new projects. Happy sewing!