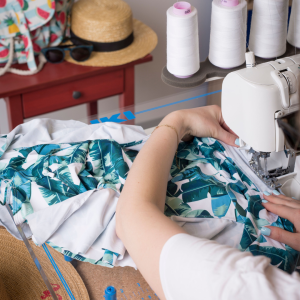
In a world increasingly dominated by technology and fast-paced living, finding a fulfilling and engaging hobby has become essential for maintaining a sense of balance and well-being. Sewing, an age-old craft, has experienced a renaissance in recent years, captivating both seasoned crafters and newcomers alike. As we step into the new year, there has never been a better time to embrace the sewing revolution and connect with other sewists through various online sewing groups, workshops, and sewing retreats! Let’s delve into the significance of sewing communities and events and discover the multitude of benefits they offer in 2023.
1. Support and Inspiration:
Sewing can occasionally present challenges, and having a support network can make all the difference. Engaging with fellow sewists through online groups or workshops allows for the exchange of ideas, troubleshooting of issues, and sharing of accomplishments. The encouragement received from others can ignite the spark of inspiration and creativity, propelling one’s sewing journey to new heights. Additionally, witnessing the remarkable projects undertaken by community members serves as a wellspring of motivation to take on new challenges.
You can also connect with our National Account dealers here who throughout the year, have JUKI trainers visit to keep their staff up to date on the newest JUKI home products so they can help provide you with reliable support during and after your purchase.
2. Learning and Skill Development:
The world of sewing is vast and ever-evolving, with a plethora of techniques, styles, and materials to explore. Sewing communities often host workshops and classes, both online and in-person, led by skilled instructors and industry experts. These workshops not only introduce new skills but also offer a platform for improving existing ones. The chance to learn from experienced artisans can boost confidence and competence, enabling sewists to tackle more intricate and ambitious projects.
Connect with your local JUKI dealers here to learn more about what class options they have available to the sewing community! From weekly clubs to monthly events or special class dates, our JUKI dealers are ready to help you start creating.
3. Fostering Creativity:
Creativity thrives in environments where ideas are freely shared and celebrated. Sewing communities provide a safe space for individuals to express their creativity without judgment. Through collaborative challenges and sharing sessions, members can explore different perspectives and experiment with their creativity, leading to innovative and imaginative sewing creations.
Fostering creativity in sewing and quilting is essential to unlocking the full potential of these crafts and producing truly unique and captivating creations. Try stepping out of your comfort zone by experimenting with different fabrics, colors, and patterns. Embrace mistakes as opportunities to learn and grow, allowing them to inspire new design directions. Draw inspiration from various sources, such as nature, art, and everyday life. By giving yourself the freedom to think outside the box and incorporating diverse influences, your sewing and quilting projects will undoubtedly flourish with newfound creativity and originality.
4. Sewing Retreats: A Time for Renewal:
For many, the hustle and bustle of daily life can impede the full enjoyment of their hobbies. Sewing retreats present an opportunity to escape distractions and immerse oneself fully in the craft. These retreats, often set in picturesque locations, offer dedicated time for sewing, learning, and connecting with fellow participants. The serene ambiance, away from the pressures of everyday life, encourages a profound sense of relaxation and rejuvenation.
You can also attend sewing and quilting exhibitions that host a variety of sewing classes ranging from serging to sewing and quilting. These expos also offer the chance to purchase new JUKI machines at show deal prices and the opportunity to find new notions and fun fabrics! Learn more about the events JUKI attends by staying up to date on our socials here or visiting our events page here.
5. Adapting to the Digital Age:
The internet has revolutionized the way we connect and share information. Online sewing groups have thrived, attracting sewists from across the globe. These virtual communities transcend geographical boundaries, bringing together people who would have never met otherwise. Through online platforms, members can share their work, participate in discussions, seek advice, and make friends, all within the comfort of their homes.
Check out JUKI’s YouTube page from the comfort of your home and learn how to create fun and easy projects by following our step-by-step videos! Thanks to the digital age, we can share our favorite projects that we love creating, and display tips and tricks you can start using on your sewing journey.
As we enter 2023, the sewing community stands stronger than ever, enriched by the passion and dedication of its members. Joining sewing communities and participating in sewing events opens doors to a world of creativity, camaraderie, and personal growth. The support, inspiration, and friendships cultivated through these interactions make the sewing journey not only enjoyable but also deeply rewarding. Good luck on a new year of creating and Happy sewing!
The holiday season presents a wonderful opportunity for crafters who have honed their skills to join in on the festive spirit and create unique, handmade projects for sale! By setting up online shops on platforms like Etsy or Instagram, or displaying your wares at local holiday markets and fairs, you can connect directly with your community by spreading joy and warmth while making a meaningful income during the most magical time of the year.
Selling sewing machine projects during the holiday season not only allows crafters to share their passion with the world but also grants them to explore their artistic ideas. The possibilities for products are limitless, from whimsical Christmas-themed throw pillows to elegant tree skirts and personalized stockings. The online marketplace, allows artists like you to reach customers far and wide, making your creations part of celebrations across the globe! You can also participate in local markets, which allows for a more personal connection with buyers and fosters a sense of community.
Let’s talk about 5 ideas you could create and sell this holiday season.
Festive Decorative Pillows:
Sewing a festive decorative pillow for the holiday season is a delightful way to add a touch of charm to any home! We recommend creating with an edge-stitching foot to ensure precise seam allowances and neat edges and a decorative stitching foot for embellishments that you can add to the pillow’s borders or seams. If you want to incorporate embroidery, opt for an embroidery foot to effortlessly stitch intricate designs on the fabric.
When it comes to fabric options, choose materials that evoke the holiday spirit. Rich, textured fabrics like velvet, brocade, or even burlap can add a luxurious or rustic feel to the pillow. Festive prints such as snowflakes, reindeer, or poinsettias are perfect choices for the pillow cover. For the back of the pillow, complement the theme with coordinating solid colors or a complementary print.
You can use metallic threads for a touch of sparkle or opt for contrasting thread colors to make the decorative stitches stand out. Embroidering holiday motifs like holly leaves, candy canes, or seasonal messages can elevate the pillow’s festive appeal. Alternatively, try free-motion embroidery to create custom designs or add personal messages to the pillow cover.
Christmas Tree Skirts:
Selling a Christmas tree skirt for the holiday season is a perfect addition to a customer’s home decoration! To achieve precise and professional results, we recommend using a walking foot or even-feed foot to handle multiple layers of fabric smoothly, as tree skirts often require thicker fabrics and padding. For decorative elements like edging or trim, a stitch-in-the-ditch foot can help you neatly sew along seams and create a polished look.
When selecting fabric options, consider durable and luxurious materials to ensure your tree skirt stands the test of time! Felt or wool-blend fabrics work well for a cozy and classic look, while velvets or brocades add a touch of elegance. Quilted or fleece fabrics can provide extra warmth and comfort. As for decorative stitching or embroidering, consider adding festive appliqués of snowflakes, holly leaves, or Christmas ornaments to give your tree skirt a unique touch. You can also experiment with decorative stitches, such as scallops or swirls, along the edges of the skirt to elevate its overall appearance.
For the best thread options, opt for high-quality threads that complement your chosen fabrics. For decorative stitching or embroidery, metallic threads can add a touch of shimmer and festive flair. Don’t forget to use a sturdy thread for any topstitching or edging to ensure your tree skirt is both durable and visually appealing.
Holiday-themed Aprons:
A holiday-themed apron is a great way to add festive charm to a kitchen and make cooking or baking even more enjoyable! For a professional-looking apron, we recommend a straight stitch foot for securing seams and hems, and an overcasting foot to prevent fraying on the raw edges of the fabric. Additionally, a bias binding foot can be useful if you want to add a neat and decorative binding around the edges of the apron.
For fabric, consider both durability and design. Cotton or linen fabrics are excellent choices for aprons due to their sturdiness and ability to handle frequent washes. For a holiday-themed touch, opt for fabrics with prints featuring snowflakes, gingerbread men, or festive ornaments. To add decorative elements, consider using embroidery to personalize the apron with names or seasonal messages. You can also include appliqués of holiday motifs such as holly leaves, Christmas trees, or reindeer for an extra touch of merriment. Metallic or variegated threads can also add a touch of sparkle to the embroidery, while high-quality polyester or cotton threads are excellent choices for construction and topstitching to ensure your holiday aprons remain durable and vibrant for many celebrations to come.
Personalized Christmas Stockings:
A heartwarming and cherished tradition personalized Christmas stockings are a popular shop item! Achieve professional-looking stockings with an edge-stitching foot; neatly attach stocking lining and ensure clean seams with each stitch! Add decorative elements like appliqués or trims with a blind hem foot, and get that precise stitching, giving your stockings a polished look.
Choose fabric material that is both durable and cozy. Felt or wool-blend fabrics are popular choices for their softness and ability to hold their shape. For a more luxurious touch, consider using velvet or brocade fabrics. To personalize the stockings, embroidery is a fantastic option! You can add names, initials, or festive motifs like snowflakes, Santa Claus, or reindeer. Metallic or shiny threads can add a touch of magic to the embroidery, making the stockings truly stand out. For construction and topstitching, high-quality polyester or cotton threads in coordinating colors will ensure the stockings are sturdy and long-lasting, ready to be filled with treats and treasures for many joyful Christmases to come.
Whether you choose traditional designs or contemporary themes, stockings are the perfect addition to any home holiday decor.
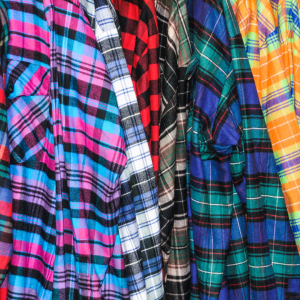
Cozy Flannel Pajama Sets:
There’s nothing quite like cozying up in flannel pajamas during the winter season. Sewing and selling pajama sets in festive prints or plaid patterns can be a lucrative venture. Offer a range of sizes and styles, such as full-length pants with long-sleeved tops or shorts with tank tops. Pay attention to detail, ensuring comfortable and durable construction. Packaging these pajama sets in festive gift boxes or bags will make them even more appealing for holiday shoppers.
To achieve professional-looking pajama sets, we recommend using a walking foot or even-feed foot to ensure smooth and even stitching on the thick flannel fabric, preventing any shifting or puckering. A buttonhole foot is also essential for creating neat and precise buttonholes on pajama tops.
When selecting fabric options, opt for high-quality flannel in festive holiday prints or classic plaid patterns. Flannel is soft, breathable, and perfect for keeping warm while lounging or sleeping. To add a touch of holiday flair, consider decorative stitching or embroidery. You can add festive motifs like snowflakes, reindeer, or holly leaves to the pajama tops or bottoms. Choose complementary thread colors for the decorative stitching or embroidery, and opt for durable polyester or cotton threads for the construction and topstitching to ensure the pajama sets hold up well to regular wear and washing.
The holiday season presents a prime opportunity for sewing enthusiasts to turn their passion into a profitable venture. By creating and selling handmade items like decorative pillows, Christmas tree skirts, holiday-themed aprons, personalized stockings, and cozy pajama sets, you can tap into the market’s demand for unique and festive products. Remember to showcase your craftsmanship, pay attention to quality, and market your creations through online platforms, local markets, or social media. Embrace the joy of sewing while spreading holiday cheer and generating income during this magical time of year. Happy sewing and happy selling!
The holiday season is the perfect time to embrace the joy of giving by creating heartfelt presents for your loved ones. Sewing personalized gifts not only adds a special touch to the celebrations but also allows you to express your creativity. Whether you’re a seasoned sewing enthusiast or a beginner looking for meaningful projects, we’ve got you covered with these five heartwarming holiday presents you can sew:
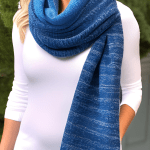
Cozy Flannel Scarf:
A warm and stylish flannel scarf makes for a thoughtful and cherished gift, ensuring your friends and family stay snug during the chilly months. To create this cozy accessory, opt for soft and colorful flannel fabric in either plaid or solid patterns, offering a classic yet trendy look. To enhance the scarf’s warmth and comfort, consider adding a layer of fleece as the backing, providing an extra layer of insulation. When stitching the layers together, utilizing a walking foot on your sewing machine ensures smooth and even stitches, preventing any shifting or bunching.
For that personal touch, explore the world of decorative stitches and experiment with scallops or waves along the edges of the scarf, adding a dash of uniqueness and creativity. Completing the ensemble, gift the scarf alongside a matching beanie or mittens, creating a delightful winter set that showcases your care and affection for the recipient!
Quilted Pot Holders:
Create beautiful quilted pot holders to add a touch of warmth and love to your family and friends’ kitchens! To start, opt for sturdy cotton fabric designed with festive holiday prints or vibrant colors, ensuring durability and visual appeal. Between the fabric layers, include insulating batting to provide effective heat protection, making these pot holders not only decorative but also functional.
Now, let your creativity shine by incorporating decorative stitching into your pot holder designs! Utilize an open-toe side quilting foot to have more control and flexibility while stitching unique patterns onto the fabric. You can experiment with various motifs such as holly leaves, snowflakes, or elegant swirls.
Complete the project by adding thoughtful finishing touches! Sew a loop for hanging on one corner, making it convenient for your loved one to store the pot holders when not in use. For a polished look, add decorative binding around the edges of the pot holders. This final step not only secures the layers together but also enhances the overall aesthetic, turning these practical gifts into joyful and eye-catching accessories that will brighten up any kitchen.
Personalized Fabric Ornaments:
Create heartfelt memories with personalized fabric ornaments that will adorn your Christmas tree with love and warmth. Delve into a delightful mix of fabrics, such as felt, cotton, or repurposed scraps from previous projects, each offering a unique blend of colors and textures. The magic lies in the art of decorative stitching, where your sewing machine becomes a tool of creativity. Choose from an array of enchanting stitches, like stars, hearts, or letters, and let them grace the ornaments, turning them into truly special keepsakes.
To bring intricate beauty to the fabric shapes, embrace the technique of free-motion quilting. This method empowers you to add intricate details that will captivate the eye and touch the heart. Consider incorporating initials, names, or special messages into the design, making each ornament a personalized treasure for its destined recipient. The amalgamation of decorative stitches and free-motion quilting unveils a captivating display of craftsmanship, showcasing the love and care poured into each ornament. As you hang them on the Christmas tree, they will not only infuse the surroundings with festive cheer but also carry the essence of your affection, making them cherished symbols of the holiday season!
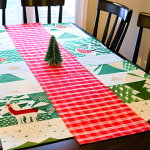
Holiday-themed Table Runner:
Elevate the festive ambiance of your loved ones’ dining tables by gifting them a beautifully crafted holiday-themed table runner. Embrace the versatility of cotton fabrics, choosing from an array of bright, cheerful colors or elegant metallic prints to suit their unique style. To infuse the table runner with visual charm, opt for intricate appliqué techniques, bringing to life delightful designs like Christmas trees, snowflakes, or stars. Your artistic flair will shine as you experiment with decorative stitches on your sewing machine, adding a touch of glamour and sophistication to the overall piece.
For a flawless finish, utilize the walking foot during the quilting process. This specialized presser foot helps to smoothly feed the multiple fabric layers through the sewing machine, preventing any shifting or puckering. As you quilt the layers together with precision, the holiday table runner will exude a polished and professional look, elevating the dining experience for your loved ones. With its festive design, impeccable stitching, and thoughtful creation, this holiday-themed table runner will undoubtedly become a cherished centerpiece, spreading joy and warmth during the holiday season.
Quilted Laptop Sleeve:
For your tech-savvy friends and family, a quilted laptop sleeve makes for a thoughtful and stylish gift. When crafting this practical accessory, opt for durable fabrics like canvas or denim for the exterior, ensuring it can withstand the rigors of daily use. For the lining, choose soft flannel or cotton to provide a gentle, protective touch to their laptops. To achieve neat and even stitching through the layers, utilize a walking foot during the sewing process. This special presser foot will help feed the fabric smoothly, preventing any shifting or bunching as you assemble the sleeve.
Enhance the laptop sleeve’s appeal with decorative stitching or free-motion quilting to add a personal touch. Get creative and create unique patterns, or even embroider your recipient’s favorite quotes, making the sleeve truly one-of-a-kind. Not only will the decorative stitching elevate its aesthetics, but it will also showcase the effort and love poured into its creation. To ensure their laptops stay safe and secure during travel, incorporate a secure zipper closure and a padded interior. This combination of functionality and style will make the quilted laptop sleeve a cherished and practical gift that your tech-savvy loved ones will appreciate every day.
As you embark on these heartwarming sewing projects, remember that the love and effort you pour into each creation will undoubtedly be cherished by your loved ones. Embrace your sewing machine’s features and get creative with different fabrics, presser feet, and decorative stitching to make these holiday presents truly special. Happy sewing and happy holidays!
Get ready for the holidays with JUKI and check out our latest deals for the season! With so many options to choose from, we offer a variety of machines to help you find the best gift for yourself or someone you love this holiday season.
Check out your nearest JUKI dealer here to learn more about JUKI’s holiday specials and how you can find your dream machine!
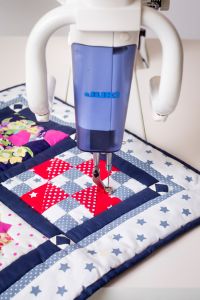
Quilting is an art form that has captured the hearts of people for centuries! Whether you’re a seasoned quilter or just starting out on your journey, choosing the right quilting design is one of the most common decisions you’ll make. The selected designs will elevate your quilt and add texture, depth, and visual interest. In this blog post, we’ll explore the various quilting design options available, including traditional, modern, and contemporary styles. We’ll also offer tips on matching quilting designs to quilt patterns and fabric choices for visually appealing results.
Traditional Quilting
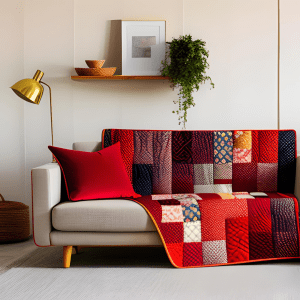
Traditional quilting has a rich history deeply rooted in the heritage of various cultures. It is characterized by meticulous handcraftsmanship and a focus on preserving classic motifs and techniques passed down through generations. One hallmark of traditional quilting is intricate geometric patterns, often inspired by nature or everyday life. Popular designs include the Log Cabin, Flying Geese, and Nine Patch patterns, which are meticulously pieced together to create visually stunning and symmetrical quilts. Traditional quilting emphasizes the art of storytelling, as each quilt may carry its unique narrative, capturing the essence of the quilter’s life, experiences, and cultural background.
In traditional quilting, the stitch design plays a pivotal role in enhancing the overall beauty and texture of the quilt. Examples of traditional stitch designs include the timeless hand quilting method, where skilled artisans create delicate, uniform stitches using a needle and thread. This technique not only reinforces the layers of the quilt but also adds a touch of elegance and depth to the finished piece. Another standard stitch design is the classic cross-hatch pattern, achieved through machine quilting, which imparts a sense of structure and sophistication to the quilt’s surface. Traditional quilting stitch designs are often kept simple and complementary to the overall quilt pattern, celebrating the craftsmanship and patience invested in every stitch.
Colors are an essential element of traditional quilting, with a preference for a warm and earthy palette. Traditional quilts frequently showcase a harmonious blend of muted tones and natural hues reminiscent of the colors found in the countryside or the quilter’s immediate surroundings. Soft yellows, warm reds, gentle blues, and earthy greens are common choices, evoking a sense of comfort and nostalgia. While solid colors are prevalent, traditional quilts may also feature small-scale, repetitive prints or calico fabrics, adding subtle textures and visual interest to the overall design. The colors are carefully selected to create a sense of unity and balance within the quilt, emphasizing this quilting style’s timeless and enduring nature.
Regarding fabric options, traditional quilting celebrates using natural fibers like cotton and wool. Cotton is especially favored for its softness, breathability, and ease of manipulation during quilting. The selection of fabric is crucial to achieving the desired visual effect, and quilters often opt for high-quality cotton fabrics with a tight weave to ensure durability and longevity. Batik fabrics, which undergo a unique dyeing process, are also cherished for their intricate patterns and vibrant colors that add depth to the quilt’s design. In traditional quilting, the fabric serves as a canvas for the quilter’s creativity, ensuring that each quilt becomes a unique and cherished work of art, handed down through generations as a testament to the beauty of this timeless craft.
Modern Quilting
Modern quilting emerged as a refreshing departure from traditional norms, embracing modern style and innovative techniques. This style encourages quilters to explore new possibilities, break free from rigid patterns, and experiment with asymmetry and improvisation! Modern quilts often feature bold geometric shapes, minimalistic designs, and negative space, allowing the quilter’s creativity to shine through. The emphasis is on clean lines, open spaces, and creative quilting, giving the finished piece a modern and dynamic look. Unlike traditional quilting, which often focuses on symmetry, modern quilts celebrate asymmetry and intentional irregularity, giving the quilter greater artistic freedom to express their unique vision.
In modern quilting, the stitch design serves as a means of artistic expression, going beyond mere utility to become an integral part of the quilt’s design. Examples of modern stitch designs include free-motion quilting, ranging from geometric shapes to organic motifs like swirls and pebbles. Quilters may also experiment with unconventional stitch lengths and thread colors, adding texture and dimension to the quilt. Additionally, matchstick quilting, with its dense rows of parallel stitching, is another popular modern stitch design, creating a contemporary and linear effect that complements the overall aesthetic of modern quilts.
Modern quilts embrace a vibrant and eclectic color palette, often featuring bold, contrasting colors that make a statement. Bright and saturated hues, including vivid oranges, electric blues, vibrant yellows, and striking magentas, are favored. Quilters may also use high-contrast color combinations to emphasize their designs’ geometric shapes and negative space. In contrast to traditional quilting, where colors tend to be more subdued and earthy, modern quilts exude energy and a sense of playfulness. Furthermore, modern quilters often mix and match fabrics from different collections or experiment with solid-colored fabrics to create striking visual contrasts and enhance the contemporary aesthetic.
Regarding fabric options in modern quilting, quilters have many options to explore. While cotton remains a popular choice due to its versatility and availability, modern quilts may also incorporate fabrics with unique textures and contemporary prints, like linen, silk, or even metallic fabrics! Modern quilting also celebrates using unconventional materials like denim, wool, or even repurposed fabrics to unleash your creativity! The fabric options in modern quilting are limitless, encouraging quilters to think outside the box and push the boundaries of traditional quilt-making, resulting in captivating and exciting works of art that reflect the spirit of modern design.
Contemporary Quilting
Contemporary quilting represents a fusion of traditional techniques with modern touches. Embracing artistic expression, storytelling, and experimentation, contemporary quilts often feature a mix of traditional piecing and appliqué methods combined with innovative design concepts, such as imagery, photo transfers, or digital printing! Quilters in this style are not bound to strict rules or patterns, allowing them to incorporate various elements, fabrics, and materials. Contemporary quilts often showcase a sense of eclecticism, pushing the boundaries of traditional quilting while still preserving the essence of the art. The emphasis is on individuality, creativity, and the integration of personal stories, making each quilt a unique and expressive work of art.
In contemporary quilting, stitch design is key in enhancing the quilt’s impact! Quilters often explore a wide variety of stitch techniques, combining machine quilting with embroidery and embellishments. Contemporary stitch design examples include thread painting, where quilters use different colored threads to create detailed images and textures on the quilt’s surface. Additionally, modern quilting may incorporate dense and elaborate quilting patterns to add intricate layers of dimension and depth to the overall design. Quilters may experiment with unconventional stitch shapes, combining straight lines with organic curves, resulting in captivating juxtapositions that elevate the visual appeal of the quilt. The stitchwork in contemporary quilts is a functional element that holds the layers together and is an integral part of the quilt’s artistic expression.
Colors for contemporary quilts are diverse and often reflect the quilter’s personal style and artistic vision. While some contemporary quilts embrace bold and vibrant colors similar to modern quilting, others may take a more muted and monochromatic approach, evoking a sense of sophistication and elegance. Quilters in this style may draw inspiration from various sources, including nature, urban landscapes, or abstract art, allowing their color choices to convey emotion and mood. Contemporary quilts may incorporate unexpected color combinations or elements of minimalism with predominantly neutral palettes, focusing on the interplay of texture and stitchwork instead. The freedom to explore an extensive range of colors allows contemporary quilters to create visually striking quilts that defy expectations.
Regarding fabric options in contemporary quilting, the sky’s the limit! Quilters in this style often go beyond traditional quilting cotton and explore various options. Use hand-dyed fabrics, silk, and velvet, or even incorporate recycled materials, like repurposed clothing or vintage textiles, adding layers of history and uniqueness to their quilts. Additionally, contemporary quilters may use digitally printed fabrics to incorporate unique designs, family photos, and more.
Matching Quilting Designs to Quilt Patterns and Fabrics
To ensure visually appealing results, it’s crucial to consider the quilt pattern and fabric choices when selecting a quilting design. Here are a few tips to keep in mind:
Consider the Quilt Pattern: The quilt pattern can guide suitable quilting designs. For example, a quilt with intricate block patterns may benefit from simpler quilting designs to avoid overwhelming the overall design. Conversely, a quilt with a more minimalist pattern might lend itself well to elaborate quilting designs for added interest.
Enhance Fabric Characteristics: Consider the characteristics of the fabric you’re using. Solid fabrics can showcase intricate quilting designs, while busy or highly patterned fabrics might benefit from more straightforward quilting to avoid competing with the fabric’s design. Consider how the chosen quilting design will interact with the fabric’s texture, color, and pattern.
Test Before Committing: Before quilting the entire quilt, we recommend creating a small test piece using the same fabric and design to see how they interact. This allows you to assess the overall effect and make necessary adjustments before proceeding with the whole quilt.
Choosing the right quilting design is an exciting part of the process that allows you to infuse your personal style and creativity into your quilt. By exploring different quilting styles, such as traditional, modern, and contemporary, and considering various techniques like free-motion quilting, straight-line quilting, or hand quilting, you can create quilts that are not only visually appealing but also reflect your artistic vision. Remember to match the quilting design to the quilt pattern and fabric choices to achieve a harmonious and well-balanced result. So, embrace your creativity, experiment, and enjoy the journey of selecting the perfect quilting design for your next quilt!