Exploring the Creative Set with JUKI

The Creative Set Accessory Kit by JUKI is a treasure trove for sewists looking to expand their creative possibilities. With an assortment of specialized presser feet and essential accessories, this kit allows you to add unique and professional touches to your sewing projects. In this blog post, we’ll explore the presser feet included in the Creative Set and their various applications. From appliqué to pearl attaching and cording, we’ll also provide project ideas that showcase the versatility and potential of these fantastic accessories.

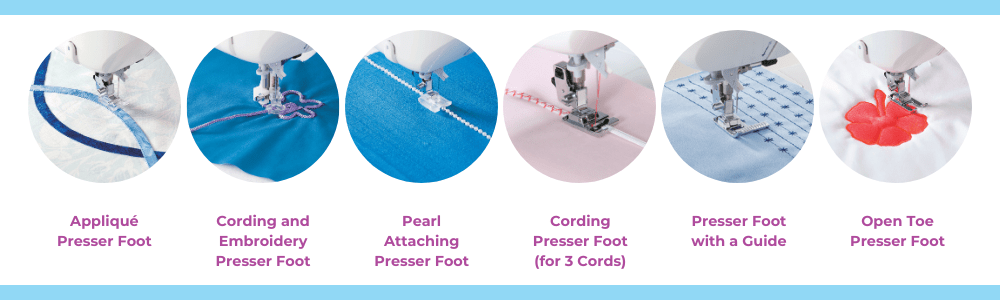
The appliqué presser foot is designed to facilitate the application of appliqué designs onto fabric. It allows for precise stitching along the edges of the appliqué pieces, securing them in place seamlessly. Use the appliqué foot for quilts, garments, and home decor projects to add decorative fabric shapes or motifs. Create beautiful appliqué designs on t-shirts, table runners, or personalized pillows.

This presser foot is a versatile tool for embellishing your sewing projects with decorative cords or embroidery threads. It has a groove on the underside that holds the cord or thread, allowing it to be stitched securely in place. Use this foot to add texture and dimension to garments, handbags, or home decor items. Create unique corded or embroidered designs on collars, cuffs, or even the edges of tote bags or cushion covers.

The pearl-attaching presser foot is designed to attach pearls or beads to fabric. It has a channel that holds the pearls in place as you sew, ensuring even spacing and secure attachment. This foot is perfect for adding elegant and eye-catching details to bridal wear, evening gowns, or accessories like clutches and headbands. Create stunning pearl trims on necklines, bodices, or along the edges of a veil.

The cording presser foot for three cords is ideal for incorporating multiple cords into your sewing projects. It allows you to guide and stitch three cords simultaneously, creating beautiful raised designs or decorative trims. Use this foot to add intricate corded details on garments, such as piping on collars or bodices. You can also use it to create unique corded accents on bags, belts, or home decor items like curtains or cushions.

The presser foot with a guide is a versatile accessory that helps you achieve accurate and consistent seam allowances. The guide runs along the fabric’s edge, ensuring precise stitching and alignment. This foot is perfect for projects that require precise topstitching or edge stitching, such as quilt bindings, bag handles, or garment details like collars and cuffs.

The open-toe presser foot provides excellent visibility, making it ideal for projects that require precise stitching along marked lines or intricate patterns. Its open front lets you see the stitching area clearly, making it suitable for quilting, appliqué, or free-motion embroidery. Use this foot to create intricate quilt designs, stitch along curves, or add decorative motifs to the fabric.

Quilted Appliqué Pillow: Use the appliqué presser foot to create beautiful fabric shapes on a quilted pillow cover, adding texture and visual interest.

Embellished Tote Bag: Utilize the cording and embroidery presser foot to add decorative cords or threads to a plain tote bag, creating a unique and personalized accessory.

Pearl-Trimmed Evening Dress: Attach pearls using the pearl attaching presser foot to the neckline or bodice of an evening dress, adding an elegant and sophisticated touch.

Corded Collar Blouse: Incorporate multiple cords with the cording presser foot (for 3 cords) to create a striking corded collar detail on a blouse, making it a standout garment.

Topstitched Quilted Table Runner: Use the presser foot with a guide to achieve precise topstitching on a quilted table runner, enhancing its visual appeal.

The Creative Set Accessory Kit by JUKI provides a range of specialized presser feet and accessories to elevate your sewing projects. These presser feet open up endless creative possibilities, from appliqué and cording to pearl attaching and topstitching. Incorporate these accessories into your sewing projects and bring your unique ideas to life. Unleash your creativity and let the JUKI Creative Set inspire your sewing journey!

Stay tuned for a future JUKI Tip to showcase these accessories!

JUKI Tip: Using Your Straight Stitch Plate

In this month’s tip, JUKI National Account Trainer Alba showcases how to use the straight stitch plate and straight stitch presser foot. Going over when, and how to use them, follow along to begin using yours on your next project. In this video, we talk about the DX series and the TL series.

Follow along below for a rundown of what Alba covers on today’s JUKI Tip!

Hello all my JUKI friends, my name is Alba, and welcome back to my studio. Today I am going over a tip, a trick, for JUKI machines, and in the last session that I did several of you asked about straight stitch plate and straight stitch foot. What are they? When do I use them? Why would I want to use them? How do I use them?

So today I am going to be showing you the straight stitch plate and foot. How they get installed, how you use them, and also some tips on when you use them and when they make your sewing easier. I will be showing you this on two machines, on the DX-2000 QVP and on the DX-4000 QVP.

Both of these machines, this goes on a little bit differently. On the DX-2000 QVP the straight stitch plate is built into the machine, so it’s a lever that you’re touching to activate this feature and I wanted to show that because it is just such a great way to do that; and on the DX-4000 QVP it is an actual plate that you’re changing out but there’s also a feed dog system that you’re switching out when you go to the straight stitch plate,

I’m really looking forward to getting up close and personal with both of these machines and showing you how to do that. Now when you use a straight stitch plate, for some people if they’re using a straight stitch on their machine that straight stitch plate is always on, and for others, it’s only on for certain scenarios that they use it. What a straight stitch plate does, is it turns a machine with lots of decorative stitches that has that sideway needle movement into a straight stitch only machine. It stabilizes that needle bar so that the straight stitch is straighter and also the opening in the plate is smaller so that when you are sewing, the fabric that you’re sewing onto, does not get pushed into the feed dogs; and if that’s ever happened to you that alone is a reason to switch out to a straight stitch plate.

Welcome back everyone just like I promised I am right in front of the machine and I wanted to get really up close, very personal with the machine, so that you could see exactly what I am doing; and I am just making sure that I am at a straight stitch because I will be talking about the straight stitch plate and feed dog. Now the first thing I wanted to do is, most of you are familiar with the straight stitch plate that has a hole that just the needle goes into as opposed to the zigzag plate which this opening goes wide across and is sometimes referred to as the shape of the Jelly Bean.

What JUKI does differently on their full-size, 12-inch throat, machines is that they give you the feed dogs that match up to the plate, so that you’re getting full contact with the foot and the plate at all times. Now, I’m going to move a little bit closer and I’m going to show you removing the plate as well as putting on the new feed dog. Right now, I do not have a foot or needle in my machine just for safety reasons and to give you the clearest view possible.

So this is the zigzag plate and this is to allow the needle to move to different positions, to do decorative stitching. And because this needle moves on a straight stitch the straight stitch plate gives it a bit more stability because its opening is only allowing for that needle drop. For no movement whatsoever. So that is the main difference between that straight stitch plate and the zig-zag plate.

Now, I’m going to zoom in on that feed dog system and I am just lifting that out and pulling it out of my machine. If you notice my zigzag plate matches up to my zigzag feed dog, that’s a nice close-up shot, and I want you to see the difference in how narrow the two are.

I am going to put in the straight stitch feed dogs, and you could see that just slid in really easily, and it just went right into place, and this allows for me to clean in between my feed dogs and also be able to get into this area for cleaning really nicely.

Now I’m gonna place my straight stitch plate on my machine and just pop it back down and it sets into place, and as you could see right here is where that needle would be dropping. So as I said, especially when you’re doing triangles and you’re doing half Square triangles, when you’re sewing right on the edge of the fabric to sew, that fabric will sometimes get pushed down into the feed dog system and because this opening is smaller that allows for that not to happen.

Now, the DX-2000 QVP does not have the plate and the feed dog system like we just saw on the DX-4000QVP. It’s a little bit different and I’m going to get into how to activate this and again I’m going to remove my foot and I’m going to zoom in so that you can see. Right now I have that zigzag opening and I mentioned that this machine has a straight stitch plate built into it and this mechanism here when I activate that plate it slides up and gives me a straight stitch plate.

Let me show you how easily that’s done. I am removing my bobbin cover and with a quick slide of that mechanism, I’m going to do this with the tweezer so that you can see that, so here it is all the way to the left and I have that zigzag opening right here where that needle drops, and when I slide that over, my looks like a stitch finger on a serger came forward and look at where my needle is dropping into and I’m going to try and get just a little bit closer and zoom a little bit more but you could see that that is allowing for stitching to take place in a smaller opening which is why you would want to use that straight stitch plate so again with the automatic this is on the DX-2000 QVP and the changing of the plate was done on the DX-4000 QVP

I hope you enjoyed that demonstration of putting in a straight stitch plate, and some of the uses for straight stitch plate, and when and why you would use it. When I am piecing, and I know I’m going to be piecing for a long time, or even if I’m doing garment sewing where I’m constructing, I like to put in my straight stitch plate because as I said it just gives me that feel and that Stitch quality like a straight Stitch machine would. For any time when you’re working with very fine sheer fabrics that tend to get pulled down into that feed dog system, the straight Stitch plate eliminates that.

Until next time for the next tip and trick with JUKI, I will see you then. I want to thank you for joining me, please make comments during the video and at the end so that we know what to present and what you would like to see just like the few people who commented that they needed to understand that straight stitch plate better! I was able to do that for you, so please leave your comments and share the video with your friends.

Until next time, bye bye!

Sew Like a Pro: Your Step-by-Step Guide to Becoming a Fashion Sewist!

Embarking on your first clothing sewing project can be an exciting and fulfilling experience. However, it’s essential to know a few things before diving into the world of garment construction. As a beginner sewist, knowing these key concepts and techniques will set you up for success and promise a smooth sewing journey. In this blog post, we’ll explore five things every beginner should know before creating their first clothing project. Let’s begin your path to becoming a confident and skilled sewist!

As a beginner, choosing sewing patterns matching your skill level is important. Begin with simple designs that have minimal pattern pieces and straightforward construction techniques. Look for patterns labeled as “beginner” or “easy.”

These patterns often include clear instructions and diagrams to guide you through each step. Starting with simpler projects will build your confidence and help you understand the basics of garment construction before moving on to more complex designs. Some options for patterns we recommend for beginner sewists are skirts, shorts, dresses, or even bucket hats!

Beginning with projects that are easier to create will set you up for success! Remember, it’s okay to start small. You don’t have to make a whole outfit for your first project! Check our simple and fun pattern options you can try on our project page here.

Before starting any clothing project, taking accurate body measurements is crucial. Measurements serve as the foundation for choosing the correct pattern size and ensuring a proper fit. Use a flexible measuring tape to measure your bust, waist, hips, and other relevant areas, following the pattern’s measurement guide.

If you’ve never measured yourself before for clothing, refer to online tutorials or sewing books for guidance on how to take accurate measurements. Remember, a well-fitting garment begins with precise measurements! Make sure to have a measuring tape and some fabric chalk to mark your spots when you’re ready.

Another great way to get measurements is by using pieces in your wardrobe that you already love and following their style and sizing.

Choosing the suitable fabric is vital to the success of your clothing project! As a beginner, it’s best to start with fabrics that are easy to handle, like using cotton or linen. These fabrics are stable, have minimal stretch, and are forgiving when it comes to sewing mistakes. Consider the fabric’s weight, drape, and care instructions before creating your project.

Make sure to note down any recommended fabric types mentioned in the pattern instructions. The recommended fabric is because the project’s final look might be for outdoor weather needs, additional stretch, or even more flow! Remember how you want the final outcome to look will influence what fabric you’ll create with.

Additionally, prewash and press your fabric before cutting to avoid shrinkage or distortion after sewing!

Before tackling a clothing project, familiarize yourself with essential sewing techniques! Take some time to practice straight stitching, backstitching, and pivoting at corners on pieces of fabric you plan to create your project with. This way, you can familiarize yourself with the weight of the fabric and the speed you feel comfortable stitching.

Learn how to sew darts, gather fabric, insert zippers, and sew seams with different seam finishes. Knowing these techniques before you start the project will help the process go smoother, allowing you to add embellishes like a dress zipper closure or a button on the cardigan you’ve designed.

Understanding these basic techniques will ensure your garment’s construction is sturdy and professional-looking. Use online tutorials, sewing books, or even take a beginner sewing class at your nearest JUKI dealer for hands-on experience and guidance.

Attention to detail will elevate any project you create as a sewist. Depending on the fabric and your machine’s capabilities, take the time to finish your seams neatly, either through zigzag stitching, serging, or French seams. Press your seams as you go, use a steam iron, and achieve a polished and professional finish. Consider using interfacing on collar or cuff areas for added stability. Remember, the small finishing details significantly impact the overall look and longevity of your new closet piece.

If you’re a beginner sewist venturing into the world of clothing projects, understanding these key concepts will set you up for a journey of joy. Start with those simple patterns, learn and practice taking accurate body measurements, learn how to select appropriate fabrics, master those basic sewing techniques, and take the time to add those finishing details.

With these things in your pocket, you’ll be well on your way to creating beautiful, well-fitting clothing pieces you’ll love. Enjoy the process, embrace the learning curve, and don’t be afraid to make mistakes. Happy sewing, and may your first clothing project be the start of a rewarding sewing journey!

JUKI Tip: Double Fold Bias – Sewing Corners

On this JUKI tip, we use the Double Fold Bias Binder and show you how to sew corners with this accessory and create a fun sewing experience!

Follow along below for a rundown of what Alba covers on today’s JUKI Tip!

Hello all my JUKI friends, my name is Alba and welcome to another tips and tricks with JUKI! Today I am talking about the double-fold bias binder and I have one in front of me, and I wanted to show you the components of this. I did another video previously on how to load the fabric and just tips with getting it to run smoothly, but today I’m going to be showing you how to use it with quilts and doing those mitered corners.

I wanted to show you the binder itself so that you could get a little bit familiar with this tool. First, it comes with the foot that’s very short allowing you to really get a nice top stitch onto that, and also two thumb screws. Now this pivots and opens up and this section here with that wide opening is where you would put your thumb screws, to screw it right into the bed of the machine.

Now there’s also a set of screws right by where you feed your bias, and this allows you to move closer and further away from your foot, depending on the machine, depending on the material that you’re using, and likewise, that big screw allows you to move left and right to get this positioned perfectly.

Now with this I feed my bias in, and I just pushed that fabric that I got it all the way into there, and I have it being held by my needle right now. So as I am sewing this I want to make sure that I’m holding my quilt right into that corner and as I’m coming to a stop I want my needle to be right at the edge of the fabric. You will see where my needle is, and where my fabric is, I went right to the edge; and I am touching my scissor button and what I will be doing is releasing enough of that bias and I want to give that a little finger press. I am going to move this fabric closer to me and you want to make sure that you have enough to be able to work with. What I am going to be doing, again with that finger press, I am going to open this up and kind of force that bias.

This will allow me to pull that tape back through, and a long silk pin would come in really handy for just holding that in place. In fact, I am going to put a pin into that corner to hold it; I have that nice miter, and I’m going to put my pin right in there and I am going to bring that fabric all the way towards me.

I am going to position this right underneath the foot so that my needle catches that very corner. Now with my stiletto, I’m using tweezers here, I’m making sure that my fabric is tucked all the way in, and I am going to sew. You would do this on all four of your Corners.

Now you can see that beautiful corner that I’ve just completed, and I want you to see how beautifully that is top stitched right at the edge and it catches the front and the back beautifully, and I’m just gonna allow you to get a really close look at that.

Now at that corner, I did add a PIN to secure, you could also add some fusible web tape, that quarter-inch fusible web tape, and press that first inch and force that miter in place. But, with the bias binder, that double-fold bias binder, gives you the ability not only to do curves but to do those beautifully mitered corners.

How beautiful is that for your quilts, your crafting projects, everything that you could imagine. I really like to do this when I’m sewing garments and I am not lining like a jacket. I would do this on my inside seams and those are called Hong Kong scenes and it just gives a beautiful professional look to that garment.

Thank you for coming and sharing your time with me, what do you want to see next on JUKI tips? Lets us know down below!

JUKI Tip: Double Fold Bias Binder Overview

On this JUKI tip, we use the Double Fold Bias Binder and show you how to feed the fabric into the machine with this accessory and create a smooth sewing experience!

Follow along below for a rundown of what Alba covers on today’s JUKI Tip!

Hi, friends my name is Alba and I would like to welcome you to another tips and tricks with JUKI! Today I am talking about the double-fold bias binder and I have two sets in this video; one is a 38-millimeter and one is a 32-millimeter. The one I have on my machine is the wider of the two and I want to show you what exactly is in the package when you open this up.

I am going to open it right in front of you and I am going to pull out the binder itself and it comes with fabric and binding on it. It also comes with a little package with a thumb screw and a foot, and it comes with an instruction sheet. So what I wanted to show you is a little bit of detail, of what is in this, and as I said the one that’s on the machine is a 38-millimeter one, and what that means is how wide the fabric is that is put into the binder and how wide the finished product will come out.

For the 38-millimeter one, I used a one and a half inch strip of fabric, folded it and the completed bias is about 3/8 of an inch. Now what I like about this is you’re going to notice how short that foot is and this is really helpful as you’re sewing because that binder can get really close to the foot and allows for very little movement and of course we have our thumb screws to be able to put this onto the machine. Now what most people get confused with is they’re expecting this portion here to lay flat on the machine but as you can see in the video this accessory rests off of the machine. The thumb screw goes into the screw hole that’s on the bed of the machine, so these are intended for the industrial machines and the machines with solid metal beds, so that they could get screwed directly into the machine and a lot of people do not realize that pivot action that this attachment has.

Now I have two pieces of fabric and both of them have been cut to one and a half inches, and I’m going to show you the struggle that most people have and my tip for feeding the fabric into the machine and getting this to run smoothly. Now most people try to feed the fabric with it in the position right in front of the foot, but if you pivot this, it allows you to better see, getting that fabric in there and just puts you in a much better angle. Now as you’re noticing, I have the wrong side of the fabric facing me. Where most people have an issue is right there and I’m gonna get recommend a stylus, and with that tip, the fabric needs to go underneath its section in the video. Now this is where a lot of people have trouble trying to do that and I’m going to give you my tip for getting that done.

Now let me pull my trusty scissor out and I am going to cut a point into my fabric. By putting a point into that fabric, and you definitely want to use a stiletto, look at how easily that goes right into that fold. And as I pull this out I want to make sure that my fabric is folded, and what I do is I give this a little bit of a finger press. Now when I lift my foot and lift my needle I can move that fabric right underneath the foot and that large thumb screw will allow you to move this right and left so that when you lower your foot. Your needle is just slightly off of that edge to top stitch that edge. Now as I cut this, it was the width of fabric, and I am going to just sew away. Now watch in the video how even at that full speed, how brilliantly and effortlessly that works because this attachment is right up to the foot.

Now I am showing you sewing these pieces shut. I’m going to do a video really soon on putting um this into a quilt sandwich, and doing that mitered corner, but I wanted to show you this finished product and also some of the crafty things that you can do with these strips. You might have noticed my lanyard and I really like fun bright colors so I made my lanyard with the strip, and I happen to have made it so that it can hold my little scissors but also weaving fabric and doing that repeatedly so that you can create your own fabric and your own patterns, how cute would that be as an inset for a waistline? Or for a garment, for a tote bag. I want you to Google and search YouTube videos for fabric weaving to see all of the different things that you could do with that. I want you to stay tuned for another video that I will be doing on mitering corners and using this on quilt fabric.

Thank you for coming and sharing your time with me, what do you want to see next on JUKI tips? Lets us know down below!