JUKI Tip: Trimming Your Tajima SAI Thread

Don’t you hate when you’re about to start an embroidery and you have that thread tail hanging out? On this JUKI Tip video today we’re going to show you how quick and easy it is to trim that right up on the machine.

In the video above, you’ll see on the screen I am going to go to the icon that looks like four needles with arrows on either side. When you tap on this icon you can move to whichever needle you need to trim with ease, without disrupting your current project.

In our video you’ll see it’s set up on needle number one and needle number one is the one with the thread that we direct you to. You’ll see me press and hold the scissor icon, and it will cut and remove that thread from your needle.

We hope this quick and easy tip helps you the next time you’re creating on the TAJIMA Sai Embroidery machine! What tip do you want to see next? Let us know down below!

New Year, New JUKI Accessories

This year, get ready to level up your crafting game because JUKI has just dropped a variety of new accessories for 2024 that’ll make your sewing adventures a breeze!

From the innovative EB-1 buttonhole device specially crafted for the TL series to the whimsical hearts and wings ruler set and the versatile tears and tails ruler set, JUKI has unleashed an exciting collection of new notions for your sewing projects.

Check out our new 5-piece scissor set, ready to tackle any cutting task with finesse or the convenient pen oiler for seamless machine maintenance, and brace yourself for the stylish new trolley bag designs available in small and large sizes. We’re about to explore all that’s new!

Whether you’re a seasoned pro or just starting your stitching journey, these new JUKI accessories will elevate your crafting experience. Join us as we take a closer look at these game-changing tools, unpacking their features and discovering how they can revolutionize how you approach your sewing projects. So, grab your threads and bobbins because we’re about to embark on an exciting exploration of JUKI’s latest offerings for 2024!

EB-1 Button Hole Device

The EB-1 by JUKI is a game-changer for sewists aiming to elevate their garment creations. Its compatibility with the TL semi-industrial sewing machine marks a revolutionary leap in buttonhole creation, empowering creators to effortlessly add that perfect finishing touch to their chic dresses or stylish shirts.

This accessory boasts various features designed to ensure precision and convenience with every stitch! From setting button diameters ranging from 5mm to 32mm seamlessly to offering a Clear Presser Foot for easy alignment, the EB-1 prioritizes user-friendly functionality. Moreover, its flexibility allows adjustments in zigzag and knife widths, stitch density, and even sewing speed, putting creative control firmly in the hands of the sewist.

One of the standout features of the EB-1 is its remarkable memory function! This function retains the latest settings, ensuring consistent performance throughout your projects. Its versatile four-direction layout for buttonhole placement opens doors for compatibility with various sewing endeavors. Including essential accessories like different height correction plates and non-slip sheets enhances stability and precision, enabling professional-quality buttonholes with ease.

Say goodbye to fighting with your buttonhole projects and welcome a new era of sewing simplicity with the EB-1. This indispensable tool guarantees flawless results, whether sewing for style or functionality!

Hearts and Wings ruler set

The new Hearts & Wings Ruler Set from JUKI isn’t just a set of tools; it’s a gateway to unleashing boundless creativity for sewists! Specifically designed to be used as templates with the quilting ruler foot, this set opens up a realm of possibilities for stitching intricate and captivating designs. Dive into a world of fun as you explore the various rulers within this kit, each offering its unique flair to elevate your sewing projects. With tools like the Cable Tool, Mini Heart, Traditional Hearts, Feathered Hearts, and Bird Bracket Chain, your creative journey becomes a canvas waiting to be adorned with captivating patterns!

Dive into nature-inspired motifs, envisioning sprawling vine-like cable patterns reminiscent of twisting branches or delicate feathered hearts mirroring the grace of natural elements. Or, explore city-themed designs with structured, geometric heart outlines, infusing an urban vibe into your creations. Try your hand at whimsy and playful designs with the Mini Heart ruler. These rulers open doors to crafting lively and fun patterns that add a touch of joy and creativity to any project! Whether mirroring nature’s serenity, capturing cityscapes’ vibrancy, or infusing playful elements, the Hearts & Wings Ruler Set empowers sewists to bring their envisioned designs to life with precision and flair.

Tears & Tails Ruler Set

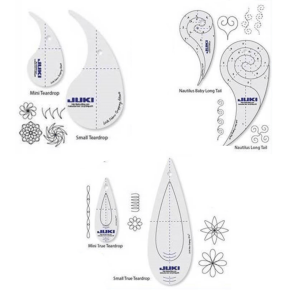
The new ruler kit we’ve released is the Tears & Tails Ruler Set! This set is a transformative addition for any sewing enthusiast diving into quilting or decorative stitching. Like the ruler set above, you’ll want to pair this set with the quilting ruler foot before diving into creative exploration!

With a diverse range of rulers, such as the Mini Teardrop, Small Teardrop, Nautilus Baby Long Tail, Nautilus Long Tail, Mini True Teardrop, and Small True Teardrop, the possibilities for crafting intriguing and diverse patterns are endless. Whether envisioning delicate tear-shaped motifs or intricate nautilus-inspired designs, this comprehensive set empowers you to craft captivating patterns that add depth and personality to your projects.

Create delicate and flowing patterns reminiscent of leaves, petals, or even gentle ripples on water using teardrop and nautilus-inspired rulers. Or to transition city-inspired designs, employ structured and linear motifs that echo the architectural elements or the bustling energy of an urban landscape. These rulers offer a gateway for sewists to craft designs from their dreams onto projects, whether in quilts, garments, or other textile creations!

JUKI 5 Piece Scissor Set

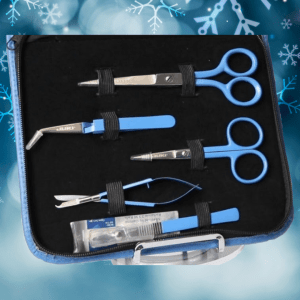
Crafted exclusively by Famore for JUKI, the 5-piece Scissor Set is a game-changer for your sewing, quilting, or crafting room! The scissor set is built with medium powder blue handles that are not just stylish but also super comfortable, and it includes a matching zipper case –the perfect home for these beauties!

These scissors and snips are like a dream team for your fabric-cutting adventures! This set has covered you, from precision cutting to tackling those pesky seams with the surgical seam ripper. Trust me, once you get your hands on these, you won’t want to let them go! This set includes scissors, snips, tweezers, and a surgical seam ripper.

JUKI Pen Oiler

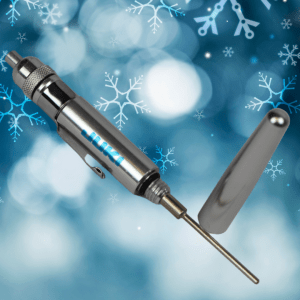
Let’s discuss a game-changer for your machine maintenance routine—the JUKI Pen Machine Oiler! Imagine having this nifty tool in hand, perfectly crafted to reach those nooks and crannies of your sewing machine that always seem impossible to lubricate. This oiler is like a secret weapon, ensuring your beloved JUKI machines perform at their best!

Whether you’re rocking a TL semi-industrial powerhouse or a long arm series beauty, this pen oiler’s got your back, keeping those gears turning smoothly with its precise applicator designed to hit all the right spots. It’s like giving your machine a spa day—because, hey, they deserve some TLC, too, right? If you’re all about keeping your sewing sanctuary in tip-top shape, this oil pen is about to become your new best friend. Smooth stitching sessions await!
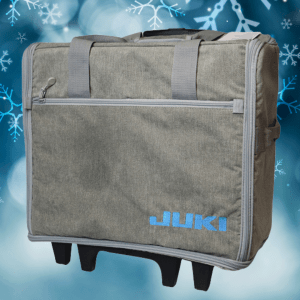
JUKI Trolley Bags

Lastly, let’s discuss the new design for our JUKI trolley bags that makes your machine-toting life a breeze! The bag has a sleek Chenille fabric exterior, spiced with classy gray details and an embroidered JUKI logo. They come with a front pocket and two inside mesh wall pockets, helping you bring all those notions you’ll need for your class or retreat!

These bags fit most sewing machines and sergers in JUKI’s lineup, giving your beloved gear a comfy ride with options to load from the front or the top. Whether you’re lugging around your MO-3000QVP or your Kokochi DX-4000QVP, these trolley bags are the perfect wingman for your sewing adventures. Curious about dimensions? They measure 10″ wide, 19″ long, and 16″ tall and 23″ wide, 12.5″ long, and 16″ tall. Those sizes are a roomy nest for your machine to relax while traveling!

So, say hello to your new trusty sidekick for your sewing escapades—the JUKI trolley bags are ready to roll!

To learn more about our latest accessories, visit us here today!

Crafting Your JUKI Sewing Ritual

Whether you’re an amateur enthusiast or a seasoned seamstress, this new year, JUKI will help you establish a ritual you can follow before diving into your sewing endeavors. These steps can significantly elevate your crafting experience! Crafting a dedicated routine for your JUKI sewing machine ensures a smooth and gratifying sewing journey.

Embrace the Ritual
Before the machine’s hum fills the air with creative promise, embark on a ritual that sets the stage for a seamless sewing session. Here’s a guide to crafting a pre-sewing routine specifically tailored for your JUKI machine:

  1. Needle Check:
    Every project starts with the first stitch. Before commencing your project, inspect the needle for any signs of wear, such as dullness or bends. Ensure it’s securely fastened and aligned correctly. Replace the needle if it shows any signs of damage or has been used for an extended period.

A damaged needle can cause many issues in your project process and creation. Your stitch quality can go down with a broken needle, as this can lead to skipped or uneven stitching. The fabric you’re working on can be damaged and lost due to nonrepairable holes. The needle can break if already chipped and damage your machine or yourself, and lastly, you won’t get the results you’re looking for.

The needles are an important first step to ensuring your machine is ready to create.

  1. Bobbin Space Cleaning:
    A clutter-free bobbin area is vital for smooth stitching. Remove the bobbin case and clean out any lint, dust, or stray threads that might have accumulated. Use a small brush or the machine’s cleaning tools to ensure the area is pristine.

Cleaning your bobbin space will help you prevent any malfunctions while creating like uneven stitches, thread breakage, or skipped stitches. We’re also aiming to avoid those thread jams, maintain consistent tension, and extend the lifespan of your machine.

Lastly, debris in the bobbin area can transfer onto the fabric, causing stains or marks, so keep your projects clean and smooth with a quick sweep of your bobbin area.

  1. Thread Space Maintenance:
    Keeping the upper thread path clean ensures consistent tension and prevents thread snags. Use a lint brush or compressed air to remove debris from the tension discs, thread guides, and around the needle. A clean thread path is crucial for optimal stitching quality.

When you don’t clean your thread space, you might notice inconsistent tension due to dust or lint accumulating, which can interfere with the tension discs or thread guides. You’ll also be able to extend the lifespan of your thread and needle with clean thread space and preserve your fabric from dealing with stains or marks from the debris.

Keeping this area clean is optimal for getting that excellent quality finish you want on your projects!

  1. Stitch Plate Selection:
    Ensure the appropriate stitch plate is installed depending on your project and the type of stitch you’ll be using. Swap to a straight stitch plate for delicate fabrics or a zigzag stitch plate for decorative or stretch stitches.

The right plate will help you achieve quality stitch accuracy, protect your needle from breaking or damage, and reduce puckering in your projects. JUKI also has different options for plate selection on light or heavy-weight fabrics.

  1. Bobbin Thread Compatibility:
    Confirm that the bobbin thread matches the upper thread in weight and type. Consistency in thread choices ensures uniform and balanced stitching.

Having the correct bobbin will also help you with tension control, as mismatched bobbin thread could lead to difficulties in achieving balanced tension. Having the correct tension will also ensure that your fabric doesn’t receive any damage.

And remember, specific sewing projects, such as quilting, may require specific types or weights of bobbin thread for optimal results.

  1. Foot Selection and Attachment:
    Choose the appropriate presser foot for your project. Attach it securely to the machine to guarantee smooth fabric feeding and precise stitching. Different feet cater to various sewing techniques; ensure you have the correct one for your intended stitches.

Having the right foot is an important step to a smooth sailing project. The right presser foot will allow you to maintain excellent stitch quality, and certain feet have markings or guides that assist in maintaining precise seam allowances or stitching lines.

For example, some sewing projects require specialized techniques that can only be achieved with specific presser feet. An edge-stitching foot helps create precise edge stitches. Check out your JUKI options by visiting here!

  1. Test Stitching:
    Before beginning your project, perform a test stitch on a scrap fabric. This allows you to verify the thread tension, stitch length, and stitch quality before starting on your main project.

Testing stitches will help ensure your machine is calibrated correctly, that your tension settings are in order, and that your stitches will finish clean. Taking the time to perform test stitching or practice stitches before beginning your main project is a valuable step.

Crafting a pre-sewing ritual for your JUKI sewing machine establishes a foundation of consistency and attention to detail. By diligently checking the essentials – from needles to thread paths and stitch plates – you pave the way for a hassle-free and enjoyable sewing experience!

Embrace this ritual as a series of steps and a meaningful ceremony that honors your craft. Let your JUKI machine reflect your dedication to precision and commitment to turning every sewing project into a masterpiece. Start your sewing journey on the right foot by embracing the art of preparation with your trusted JUKI machine!

JUKI Tip: How to Get Started with Ruler Work

In this month’s tip, JUKI National Account Trainer Alba teaches us a fun and easy way to use our new JUKI ruler set in the Hearts and Wings collection! Showcased by Alba, check out examples of patterns you can create and an easy trick on how to plan out your designs the next time you’re creating.

Follow along below for a rundown of what Alba covers on today’s JUKI Tip!

Hello, all my JUKI friends my name is Alba and I am the national accounts trainer for JUKI Home Sewing! I’d like to welcome you to my home and today I’m really excited because this is almost like a double video for you. I am not only introducing a new product but I’m going to give you a tip on getting started with that new product. So let’s get right to it and let me show you the new product!

What I’m referring to is the hearts and wings ruler set. This is absolutely beautiful, you’re getting five different rulers that I have spread out on the video and they are clear rulers so I do have them down on white paper to try and make it easy for you to see them. As you could see, they give you five different shapes and really endless possibilities and a lot of people when they get started with rulers and quilting one of the first questions they ask is “so how do I get started?” And that’s exactly my tip for you today!

Now you notice I have no machine set up because really getting started with rulers or any free motion for that fact is on paper or a dry-erase material. So you can work on paper with pen, and I do recommend getting a pen that does not have a click on/off, because that pen will close on you as you are tracing those rulers or templates. You may hear this term, ruler or a template, and they refer to the same thing.

What I am going to do, is at my local Dollar General they have a dry-erase wallpaper and for me, I put this on the back of my cutting mat and it makes it really easy for me to audition and practice with my rulers. So the first thing I am going to do is I will be doing a border with this ruler here, and what I like about the JUKI ruler is, it doesn’t show well on camera, but there are a little dots of grips fabric grips on these rulers so it makes it really easy to start using them.

To start in the video I’ll draw a center line, and what I like about the dry erase is I can just erase if I’ve make a mistake and it makes it really practical on this dry erase material but remember to use a dry erase marker that’s especially made for this. Now with free motion it really doesn’t matter where you start at the beginning or at the end because you have full 360 movements; but for me when I start I like to start at the top of my fabric with the bulk towards me so as I move I’m moving into the machine and that’s exactly what I will be doing here.

I am going to place my ruler down and you will notice on the video all the cross markings, and these are indicator markings to keep you straight, plum and even. So I am going to line up, and when using rulers you want to put some of your fingers on the ruler and some of them off the ruler guiding it and having you keep it from moving or shifting. Now if this were my machine I would be following the edge and at any point stop because that is what will give you a nice beautiful point. Now I am going to move my ruler and line up and make sure that I am staying on those lines.

Now I’m going to turn my ruler around and go to the other side. I could either start from the top or the bottom and always when you’re doing this, pause at that corner. Im going to make sure I am lined up beautifully, and look at what a beautiful design this makes for a border!

As you play with this you could put a medium size one in between and audition but this is what I like about working with a dry erase area paper pen, you’re getting to play with it and really experimenting with the movement and the shape that you will create. Now by using the dry erase, it will be slightly larger because my foot does grip about A4 of an inch from that ruler base but this is a good way to get that general idea of how that ruler will take shape and also to play with it and trying create new and exciting shapes of your own.

I want to thank you for sharing this time with me! If you enjoyed this video and others that you’ve seen make sure to hit subscribe and make sure to leave comments as well on what you’d like to see. Please come back and show me your progress that you’re making with your rulers and again this is the new hearts and wings ruler set that I am playing with a five-piece ruler set so please reach out to your local dealer and get a really nice look at this set!

Sewing Into 2024 with JUKI

Embarking on a sewing journey is akin to unraveling a treasure trove of creativity and skills waiting to be discovered. For beginners eager to delve into the craft with a reliable JUKI sewing machine this new year, here are five delightful and straightforward projects that promise a smooth learning curve!

1. Chic Coin Purse

Crafting a coin purse is an ideal starting point for newbies. When selecting fabrics for this project, consider using lightweight cotton or canvas for the exterior and coordinating cotton or polyester for the lining. These fabrics are easy to handle and come in many colors and patterns.

Using a simple design and thanks to its practicality, this project is functional and rewarding! This project also only consumes a little time, which is excellent motivation when just starting.

Recommended Notions:

  • Zipper: Opt for a standard nylon or polyester zipper in a matching or contrasting color. A zipper attachment is an important skill to learn, as this skill will be used in various projects like bags, garments, and more.
  • Thread: Use a good quality all-purpose thread for exterior and lining fabrics. Using the right thread will help your project have a longer-lasting quality and reduce thread breakage when creating your coin purse.
  • Sewing Foot: A zipper foot is essential for precise stitching when attaching the zipper. Using a zipper foot will help you easily attach the zipper and reduce mistakes in your project!

2. Hair Scrunchies

Creating scrunchies allows beginners to experiment with different textures and stretchy materials. Opt for fabrics like cotton, satin, or velvet. These materials are readily available, accessible to work with, and come in various colors and prints.

The skill of working with different fabrics is essential! As you learn to sew, you’ll learn that some fabrics have more stretch than others, what fabrics can handle constant use, what threads and needles will work best, and more.

Learning how to attach an elastic is also an excellent tool! Attaching elastic is a popular skill in garment creation, and using this project as a stepping stone is a great way to learn how to run the elastic through project pieces or attach them to fabric,

Recommended Notions:

  • Elastic: Choose a narrow, soft elastic that is comfortable to wear. The best thing to do is decide how big you want your scrunchies and then pick the correct width. The typical width of an average scrunchie usually falls within ¼ inches.
  • Thread: Use a matching thread for seamless blending. Remember any scrunchies you may have at home, and study the design and stitching to better understand how your closure should look when you finish your project!
  • Sewing Foot: A basic sewing foot works well for this project, making this perfect for all beginner sewers.

3. Stylish Eye Glass Case

When making an eyeglass case, consider using fabric with a bit of structure, like quilt-weight cotton or denim, for durability. A soft cotton or felt for the lining will help protect the glasses.

This project will teach you how to create projects with a form or shape that requires maintaining structure. These fabrics can be thicker and offer stability to more than just eyeglass cases; even used in tote bags, hats, quilts, and more. You can also learn to use different thread weights and needle sizes, as denim requires a larger needle than chiffon or cotton.

This project will also help you learn the basics of small buttons or snap closures. While zipper closures are a popular option, button closures and snaps are expected in bag creations, home décor, garments, and more. Learning this skill will help you when you step up to creating dresses, skirts, and more!

Recommended Notions:

  • Button or Snap: Opt for a small button or snap closure for easy use. JUKI machines offer button attachment accessories, and we have a selection of machines that offer buttonhole creation. Those tools would help any sewist, beginner or advanced, create quality finished closures for their projects.
  • Thread: Use a sturdy thread to ensure durability. Eyeglass cases receive a lot of use, like your scrunchies, so make sure to use a thread that can handle that form of wear and tear and even a little stretch in case your glasses fit snugly in their new case.
  • Sewing Foot: A walking foot helps when sewing through multiple layers of fabric. With a walking foot, you’ll notice even feeding, reduced slippage as you have layers placed together, and prevention of wrinkles and puckering, giving you that finished quality look you’re aiming for!

4. Quaint Coasters

Coasters are an excellent canvas to showcase your creativity. Choose absorbent fabrics, such as cotton, linen, or a cotton-linen blend, to absorb moisture from glasses effectively. Remember to bring that skill of layering into play! Placing layers in between tour fabrics will help with creating a sturdy project.

The simple and manageable design size will help you build your confidence in project creation while allowing you to experiment with different stitch designs, fabric types, patterns, and more! This will also teach you basic techniques like measuring and cutting fabric accurately, sewing straight seams, turning corners, and finishing edges neatly.

This project is also a low-cost and low-time-consuming idea, giving creators a budget-friendly option that builds their confidence.

Recommended Notions:

  • Batting or Interfacing: Adding a layer of batting or interfacing between the fabrics gives the coasters a sturdy feel, perfect for guests and homebodies.
  • Thread: Use a coordinating thread for neat finishing.
  • Sewing Foot: A walking or quilting foot helps maintain even stitches when working with multiple layers. As we mentioned before, prevent those wrinkles and puckers, and enjoy the finished quality.

5. Nook Carrier for Books

Select durable fabrics like canvas or twill for the exterior to provide adequate protection for a nook carrier or book sleeve. Use soft cotton for the lining to prevent scratches on the nook or book. This book sleeve can be used for travel, so you want to use a fabric that can handle heavy use and possibly different weather conditions.

This project is a great skill builder for beginners because it has a straightforward design that is easily customizable to your needs; you can take the opportunity to learn how to attach straps to a carrier case, an important lesson for garment and bag creation, and beginners can experiment with fabric choices, colors, patterns, and embellishments to add a personal touch to the project.

Recommended Notions:

  • Velcro or Button Closure: Choose a closure option that secures the carrier while offering easy access. Velcro options are popular thanks to how easy they are to install onto projects and their budget-friendly cost. It’s also easy for many users to use as a closure with its easy opening. In some cases, if the Velcro wears out due to heavy use, it’s relatively easy to replace without having to reconstruct the entire project.
  • Thread: Use a strong thread for structural integrity. A Book or Nook carry will be heavily used by a book lover, so keep that in mind when choosing your thread and building your project. Backstitching is a great skill to learn for enforcing the durability of your project and can be done with the press of a button on our JUKI machines.
  • Sewing Foot: A walking foot ensures smooth stitching through different fabric layers. This will help as you attach a lining to the carrier case for solid protection. Remember that these carries will be used for travel, and a good, durable fabric and filler will protect the item.

Pro Tips:

  1. Fabric Preparation: Always pre-wash and iron your fabric before starting any project to prevent shrinkage or distortion after sewing.
  2. Practice Stitches: Familiarize yourself with different stitch options on your JUKI machine before starting the projects to achieve the desired finish. Grab the fabric you plan to create for your project to test how the stitches will work with your fabric and design choice.
  3. Seam Allowances: Pay attention to seam allowances; they ensure accurate sizing and neat finishing. We recommend checking out JUKI’s ¼ Presser Foot for a seamless and measured look.

These beginner-friendly JUKI sewing projects offer an excellent way to learn while creating practical and visually appealing items. With the recommended fabric choices, notions, and sewing accessories, beginners like you can confidently embark on their sewing journey, guided by the reliability and precision of their JUKI sewing machine.

So, gather your materials, unleash your creativity, and let your sewing adventures begin! Visit our project page here for more project ideas that beginners and advanced sewists alike will love creating.