Quilting Uncovered: Exploring Different Styles

Quilting is an art form that has captured the hearts of people for centuries! Whether you’re a seasoned quilter or just starting out on your journey, choosing the right quilting design is one of the most common decisions you’ll make. The selected designs will elevate your quilt and add texture, depth, and visual interest. In this blog post, we’ll explore the various quilting design options available, including traditional, modern, and contemporary styles. We’ll also offer tips on matching quilting designs to quilt patterns and fabric choices for visually appealing results.

Traditional quilting has a rich history deeply rooted in the heritage of various cultures. It is characterized by meticulous handcraftsmanship and a focus on preserving classic motifs and techniques passed down through generations. One hallmark of traditional quilting is intricate geometric patterns, often inspired by nature or everyday life. Popular designs include the Log Cabin, Flying Geese, and Nine Patch patterns, which are meticulously pieced together to create visually stunning and symmetrical quilts. Traditional quilting emphasizes the art of storytelling, as each quilt may carry its unique narrative, capturing the essence of the quilter’s life, experiences, and cultural background.

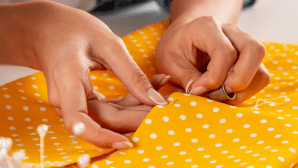
In traditional quilting, the stitch design plays a pivotal role in enhancing the overall beauty and texture of the quilt. Examples of traditional stitch designs include the timeless hand quilting method, where skilled artisans create delicate, uniform stitches using a needle and thread. This technique not only reinforces the layers of the quilt but also adds a touch of elegance and depth to the finished piece. Another standard stitch design is the classic cross-hatch pattern, achieved through machine quilting, which imparts a sense of structure and sophistication to the quilt’s surface. Traditional quilting stitch designs are often kept simple and complementary to the overall quilt pattern, celebrating the craftsmanship and patience invested in every stitch.

Colors are an essential element of traditional quilting, with a preference for a warm and earthy palette. Traditional quilts frequently showcase a harmonious blend of muted tones and natural hues reminiscent of the colors found in the countryside or the quilter’s immediate surroundings. Soft yellows, warm reds, gentle blues, and earthy greens are common choices, evoking a sense of comfort and nostalgia. While solid colors are prevalent, traditional quilts may also feature small-scale, repetitive prints or calico fabrics, adding subtle textures and visual interest to the overall design. The colors are carefully selected to create a sense of unity and balance within the quilt, emphasizing this quilting style’s timeless and enduring nature.

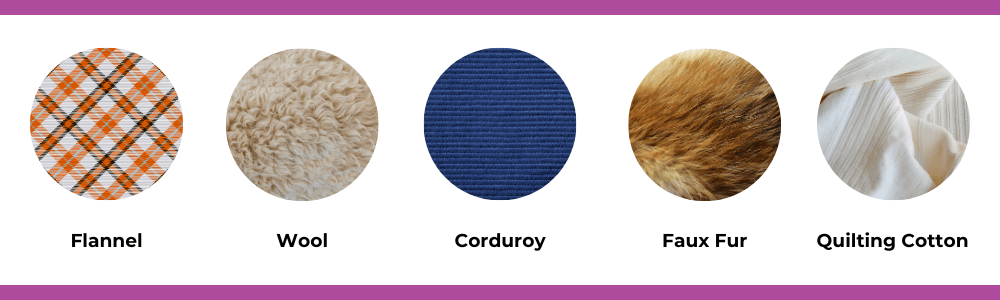
Regarding fabric options, traditional quilting celebrates using natural fibers like cotton and wool. Cotton is especially favored for its softness, breathability, and ease of manipulation during quilting. The selection of fabric is crucial to achieving the desired visual effect, and quilters often opt for high-quality cotton fabrics with a tight weave to ensure durability and longevity. Batik fabrics, which undergo a unique dyeing process, are also cherished for their intricate patterns and vibrant colors that add depth to the quilt’s design. In traditional quilting, the fabric serves as a canvas for the quilter’s creativity, ensuring that each quilt becomes a unique and cherished work of art, handed down through generations as a testament to the beauty of this timeless craft.

Modern quilting emerged as a refreshing departure from traditional norms, embracing modern style and innovative techniques. This style encourages quilters to explore new possibilities, break free from rigid patterns, and experiment with asymmetry and improvisation! Modern quilts often feature bold geometric shapes, minimalistic designs, and negative space, allowing the quilter’s creativity to shine through. The emphasis is on clean lines, open spaces, and creative quilting, giving the finished piece a modern and dynamic look. Unlike traditional quilting, which often focuses on symmetry, modern quilts celebrate asymmetry and intentional irregularity, giving the quilter greater artistic freedom to express their unique vision.

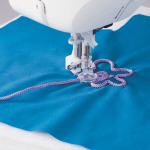
In modern quilting, the stitch design serves as a means of artistic expression, going beyond mere utility to become an integral part of the quilt’s design. Examples of modern stitch designs include free-motion quilting, ranging from geometric shapes to organic motifs like swirls and pebbles. Quilters may also experiment with unconventional stitch lengths and thread colors, adding texture and dimension to the quilt. Additionally, matchstick quilting, with its dense rows of parallel stitching, is another popular modern stitch design, creating a contemporary and linear effect that complements the overall aesthetic of modern quilts.

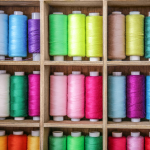
Modern quilts embrace a vibrant and eclectic color palette, often featuring bold, contrasting colors that make a statement. Bright and saturated hues, including vivid oranges, electric blues, vibrant yellows, and striking magentas, are favored. Quilters may also use high-contrast color combinations to emphasize their designs’ geometric shapes and negative space. In contrast to traditional quilting, where colors tend to be more subdued and earthy, modern quilts exude energy and a sense of playfulness. Furthermore, modern quilters often mix and match fabrics from different collections or experiment with solid-colored fabrics to create striking visual contrasts and enhance the contemporary aesthetic.

Regarding fabric options in modern quilting, quilters have many options to explore. While cotton remains a popular choice due to its versatility and availability, modern quilts may also incorporate fabrics with unique textures and contemporary prints, like linen, silk, or even metallic fabrics! Modern quilting also celebrates using unconventional materials like denim, wool, or even repurposed fabrics to unleash your creativity! The fabric options in modern quilting are limitless, encouraging quilters to think outside the box and push the boundaries of traditional quilt-making, resulting in captivating and exciting works of art that reflect the spirit of modern design.

Contemporary quilting represents a fusion of traditional techniques with modern touches. Embracing artistic expression, storytelling, and experimentation, contemporary quilts often feature a mix of traditional piecing and appliqué methods combined with innovative design concepts, such as imagery, photo transfers, or digital printing! Quilters in this style are not bound to strict rules or patterns, allowing them to incorporate various elements, fabrics, and materials. Contemporary quilts often showcase a sense of eclecticism, pushing the boundaries of traditional quilting while still preserving the essence of the art. The emphasis is on individuality, creativity, and the integration of personal stories, making each quilt a unique and expressive work of art.

In contemporary quilting, stitch design is key in enhancing the quilt’s impact! Quilters often explore a wide variety of stitch techniques, combining machine quilting with embroidery and embellishments. Contemporary stitch design examples include thread painting, where quilters use different colored threads to create detailed images and textures on the quilt’s surface. Additionally, modern quilting may incorporate dense and elaborate quilting patterns to add intricate layers of dimension and depth to the overall design. Quilters may experiment with unconventional stitch shapes, combining straight lines with organic curves, resulting in captivating juxtapositions that elevate the visual appeal of the quilt. The stitchwork in contemporary quilts is a functional element that holds the layers together and is an integral part of the quilt’s artistic expression.

Colors for contemporary quilts are diverse and often reflect the quilter’s personal style and artistic vision. While some contemporary quilts embrace bold and vibrant colors similar to modern quilting, others may take a more muted and monochromatic approach, evoking a sense of sophistication and elegance. Quilters in this style may draw inspiration from various sources, including nature, urban landscapes, or abstract art, allowing their color choices to convey emotion and mood. Contemporary quilts may incorporate unexpected color combinations or elements of minimalism with predominantly neutral palettes, focusing on the interplay of texture and stitchwork instead. The freedom to explore an extensive range of colors allows contemporary quilters to create visually striking quilts that defy expectations.

Regarding fabric options in contemporary quilting, the sky’s the limit! Quilters in this style often go beyond traditional quilting cotton and explore various options. Use hand-dyed fabrics, silk, and velvet, or even incorporate recycled materials, like repurposed clothing or vintage textiles, adding layers of history and uniqueness to their quilts. Additionally, contemporary quilters may use digitally printed fabrics to incorporate unique designs, family photos, and more.

To ensure visually appealing results, it’s crucial to consider the quilt pattern and fabric choices when selecting a quilting design. Here are a few tips to keep in mind:

Consider the Quilt Pattern: The quilt pattern can guide suitable quilting designs. For example, a quilt with intricate block patterns may benefit from simpler quilting designs to avoid overwhelming the overall design. Conversely, a quilt with a more minimalist pattern might lend itself well to elaborate quilting designs for added interest.

Enhance Fabric Characteristics: Consider the characteristics of the fabric you’re using. Solid fabrics can showcase intricate quilting designs, while busy or highly patterned fabrics might benefit from more straightforward quilting to avoid competing with the fabric’s design. Consider how the chosen quilting design will interact with the fabric’s texture, color, and pattern.

Test Before Committing: Before quilting the entire quilt, we recommend creating a small test piece using the same fabric and design to see how they interact. This allows you to assess the overall effect and make necessary adjustments before proceeding with the whole quilt.

Choosing the right quilting design is an exciting part of the process that allows you to infuse your personal style and creativity into your quilt. By exploring different quilting styles, such as traditional, modern, and contemporary, and considering various techniques like free-motion quilting, straight-line quilting, or hand quilting, you can create quilts that are not only visually appealing but also reflect your artistic vision. Remember to match the quilting design to the quilt pattern and fabric choices to achieve a harmonious and well-balanced result. So, embrace your creativity, experiment, and enjoy the journey of selecting the perfect quilting design for your next quilt!

Unleashing Creativity: JUKI Heavy User Kit

For avid sewists and professionals, having a versatile set of presser feet is essential to elevate the quality and variety of their sewing projects. The JUKI Heavy User Kit is a fantastic collection that offers a range of presser feet designed to tackle different sewing techniques and achieve professional results. In this blog, we will delve into the diverse capabilities of each presser foot in the JUKI Heavy User Kit, including the button-attaching presser foot, invisible zipper foot, rolled hemming presser foot, binder presser foot, presser foot with a guide, cording presser foot, and embroidery presser foot. Let’s explore the ways each presser foot can enhance your sewing projects!

Button Attaching Presser Foot:

The Button-attaching Presser Foot is an essential tool for any sewing enthusiast, as it simplifies the process of adding buttons to garments or fabric projects. This specialized foot is designed with two prongs that securely hold the button in place while the sewing machine stitches it onto the fabric. It ensures precise button placement and evenly spaced stitches, resulting in a professional finish. The button attaching presser foot is adjustable to accommodate various button sizes, making it versatile for different projects.

From crafting chic button-down shirts and blouses to adding decorative buttons on skirts, dresses, and jackets, this foot allows you to add functional or stylish elements to your clothing creations! Additionally, you can use it to create button closures on bags, pouches, and other accessories.

For quilting enthusiasts, this presser foot comes in handy when incorporating fabric-covered buttons as embellishments on quilted wall hangings, cushions, or even quilts themselves.

Invisible Zipper Foot:

The Invisible Zipper Foot is a game-changer for sewing enthusiasts, especially when it comes to creating seamless and polished garment finishes. This specialized presser foot allows you to insert invisible zippers into projects with ease. The foot features two grooves on the underside, which accommodate the zipper coils while the needle stitches close to them, concealing the zipper within the fabric. The result is a clean and smooth appearance that gives the illusion of an uninterrupted fabric surface.

For garment making, this foot is ideal for dresses, skirts, trousers, and blouses, where you want to maintain a sleek and professional look without visible zipper teeth. It also works wonders for creating invisible closures on cushions, pillowcases, and home decor items!

Quilters can utilize the Invisible Zipper Foot to attach hidden pockets on quilted totes, and purses, or even to seamlessly join sections of a quilt without any exposed seams.

Rolled Hemming Presser Foot:

The Rolled Hemming Presser Foot is a fantastic tool for achieving delicate and narrow hems on fabric edges. This specialized foot is designed with a narrow channel that allows you to fold and roll the fabric as you sew, creating a beautifully finished hem with minimal effort. The foot’s unique structure guides the fabric smoothly through the machine, resulting in even, consistent stitches. It is particularly useful when working with lightweight and sheer fabrics, as it prevents them from getting caught or frayed during the hemming process.

With the Rolled Hemming Presser Foot, you can take on a variety of sewing and quilting projects that demand a touch of elegance. For clothing projects, this foot is perfect for creating hems on chiffon blouses, silk dresses, or lightweight skirts, adding a professional touch to your garments. You can also use it for crafting decorative hems on table linens, napkins, and other home decor items.

Quilters can utilize the Rolled Hemming Presser Foot to add subtle finishing touches to the edges of quilted wall hangings or to create narrow borders for smaller quilt projects. Whether you’re working on fashion, home decor, or quilting projects, this foot allows you to achieve neat and dainty hems that elevate the overall appearance of your creations!

Binder Presser Foot:

The Binder Presser Foot is a versatile and time-saving tool that aids in adding beautiful binding to the edges of fabric projects. This specialized foot is designed with a slot that accommodates the folded binding strip, guiding it precisely as it’s stitched onto the fabric. It allows for quick and consistent binding application, creating a clean and professional finish!

One of the primary uses of the Binder Presser Foot is in quilting projects. It enables you to attach binding to the edges of quilts with ease, providing a neat and durable finish. You can use it to add contrasting or coordinating binding to your quilts, enhancing their overall appearance.

The Binder Presser Foot is also perfect for sewing projects that require binding, such as aprons, placemats, and fabric baskets. By using this foot, you can streamline the binding process and achieve professional-looking results on a wide range of sewing and quilting projects.

Presser Foot with a Guide:

The Presser Foot with a Guide is an invaluable accessory for sewists and quilters, providing enhanced precision and control while sewing. This specialized foot comes with an adjustable guide that allows you to sew straight lines or parallel stitching with ease. The guide keeps the fabric aligned and ensures consistent seam allowances, making it ideal for projects that require accurate stitching, such as quilting, topstitching, and adding decorative elements.

With the Presser Foot with a Guide, you can undertake a wide range of sewing and quilting projects that demand precise stitching. In quilting, this foot is excellent for creating straight-line quilting designs, channel quilting, and stitch-in-the-ditch quilting.

It also comes in handy when topstitching on garments, as it ensures evenly spaced lines and parallel stitching! Additionally, you can use the guide for sewing borders, trims, and embellishments onto various fabric projects.

Cording and Embroidery Presser Foot:

The Cording and Embroidery Presser Foot from JUKI is a versatile tool designed for free-motion sewing of cording. Its unique design includes a hole through which the cording can be fed, allowing users to effortlessly sew over the cording. By lowering the feed dog, the fabric becomes free to move in any direction, enabling the creation of elegant and intricate embroidery designs using the cording as a decorative element.

This foot is perfect for adding beautiful embellishments to garments, home decor items, and accessories. In sewing, you can use this foot to add delicate cording details to hems, necklines, cuffs, and more. It’s an excellent choice for adding a touch of sophistication and texture to any sewing project.

In quilting, this presser foot opens up a whole new realm of creative possibilities. You can use it to quilt intricate designs with cording, adding depth and dimension to your quilt. This foot also allows you to create beautiful trapunto quilting, where cording is inserted to raise certain areas of the quilt and make them stand out, adding an extra layer of visual interest to your quilting projects.

The JUKI Heavy User Kit offers a comprehensive range of presser feet that elevate your sewing projects to professional standards. Each presser foot serves a specific purpose, whether it’s attaching buttons, creating invisible zippers, achieving rolled hems, binding edges, guiding precise stitching, adding decorative cording, or incorporating embroidery. By harnessing the capabilities of these presser feet, you can explore endless creative possibilities and achieve impeccable results in your sewing endeavors. So, equip your sewing machine with the JUKI Heavy User Kit and unlock the potential to create stunning and professional-looking projects!

Sewing and Quilting in Fall

As the crisp air of autumn settles in, it’s the perfect time to embrace the cozy and creative world of fall sewing and quilting projects! From, warm blankets to stylish accessories, the possibilities are endless. In this blog post, we will explore the best fabrics, projects, and designs that capture the essence of the fall season. Whether you’re a seasoned sewist or a beginner looking for inspiration, these ideas will help you begin a delightful autumn sewing journey.

Fabrics for Fall:

When it comes to fall sewing, selecting the right fabrics is crucial. Opt for cozy and comfortable materials that evoke a sense of warmth and texture. Some popular choices include:

  • Flannel:

A beloved fabric that instantly brings warmth and comfort to mind, this soft and brushed cotton material is perfect for creating snuggly garments like shirts, pajamas, and robes. Its insulating properties make it ideal for blankets and throws, keeping you warm during chilly autumn evenings. With a variety of colors and patterns available, flannel adds a touch of rustic charm to any fall sewing project.

  • Wool:

When it comes to fall fabrics, wool is a true champion! Known for its excellent insulation, wool is perfect for sewing cozy sweaters, scarves, and outerwear. It traps heat, keeping you comfortably warm during those low temp. autumn days. Additionally, wool’s natural elasticity ensures that your projects hold their shape and drape beautifully. From lightweight merino wool to chunky wools for heavier projects, this fabric adds a touch of warmth to your fall wardrobe.

  • Corduroy:

For retro charm and texture, look no further than corduroy! This ribbed fabric is excellent for fall sewing projects like skirts, pants, hats, and jackets. With its durability and warmth, corduroy projects are perfect for transitioning from fall to winter. The fabric is available in a variety of wale sizes and colors, and offers a vintage appeal to your creations.

  • Faux Fur:

When you want to add a luxurious and cozy touch to your fall sewing projects, faux fur is the way to go! This animal-friendly fabric is perfect for creating accessories like hats, scarves, and trimmings on your projects. It instantly elevates any design, and adds a touch of opulence to your fall wardrobe. From subtle accents to bold statement pieces, faux fur is a fantastic choice for those seeking a touch of elegance.

  • Quilting Cotton:

Quilting cotton is a versatile and widely accessible fabric, making it a popular choice for fall sewing projects. With an extensive range of prints, colors, and designs, quilting cotton is suitable for various projects, including clothing, home decor, and accessories. From pumpkin-themed tablecloths to plaid dresses, this fabric allows you to be creative and capture the essence of fall.

Fall Sewing Project Ideas:

a. Blankets and Throws: When fall arrives, there’s nothing quite as comforting as wrapping yourself in a soft and inviting blanket. Get creative with warm fabrics like flannel or wool, and experiment with patchwork designs that feature autumn-inspired colors and motifs. Incorporate leaves, pumpkins, or other seasonal elements into your blanket’s design to capture the essence of fall. Whether it’s for your living room or as a thoughtful gift for a loved one, these blankets are sure to be cherished throughout the season.

b. Scarves and Wraps: As the temperatures drop, it’s time to accessorize your fall wardrobe with fashionable scarves and wraps. Sew lightweight wool or soft knit scarves in various textures, lengths, and patterns like plaid or fall leaves. These accessories not only keep you warm but also add a touch of style to your everyday outfits. Get creative with colors that complement the season’s palette, and you’ll be ready to strut your fall fashion with confidence.

c. Pumpkin-themed Home Decor: Bring the pumpkin patch into your home with charming pumpkin-themed decor items. Sew fabric pumpkins in various sizes and fabrics, and arrange them as table centerpieces or mantle decorations. For a functional twist, create pumpkin-shaped potholders that will add a delightful autumnal touch to your kitchen. Experiment with different fabrics and colors to suit your personal taste and create a warm and inviting atmosphere for family and guests.

d. Cozy Jackets and Cardigans: With the arrival of fall, layering becomes essential, and what better way to do it than with cozy jackets and cardigans you’ve crafted yourself? Choose fabrics like corduroy or sweater knits to create stylish outerwear perfect for the season. Consider adding oversized collars, patch pockets, or belted waistlines for a fashionable touch. Sewing your own jackets and cardigans allows you to customize the fit and design, making each piece uniquely yours.

Fall Quilting Designs To Try:

a. Autumn Leaves: Incorporate leaf motifs into your quilt designs using appliqué or embroidery techniques. Experiment with different shapes, sizes, and colors to capture the vibrant hues of fall foliage.

b. Harvest-inspired Patchwork: Create quilt blocks inspired by the abundance of the harvest season. Consider using fabric prints featuring pumpkins, sunflowers, or cornstalks to infuse your quilts with a rustic charm.

c. Cozy Log Cabin Quilts: The traditional log cabin quilt pattern lends itself well to the warmth and comfort of fall. Play with earthy tones and rich browns to create a quilt that embodies the cozy atmosphere of the season.

d. Plaid and Tartan: Incorporate plaid or tartan fabrics into your quilts for a timeless fall aesthetic. Mix and match different plaid patterns to create visually appealing designs that evoke a sense of nostalgia.

Fall is a wonderful season for sewing and quilting enthusiasts to embrace the rich colors, textures, and themes that it brings. By choosing fabrics like flannel, wool, corduroy, faux fur, and quilting cotton, you can create cozy and stylish projects. Whether it’s blankets and throws, scarves and wraps, pumpkin-themed home decor, or jackets and cardigans, let your creativity flourish. Additionally, consider incorporating autumn-inspired designs like leaves, harvest motifs, log cabin patterns, and plaids into your quilting projects. Enjoy the process of sewing and quilting during this beautiful season, and bring the warmth and charm of fall into your creations. Happy stitching!

Efficient Stitches: Sewing Room Organization Tips

A well-organized sewing room or dedicated sewing space can be the key to a productive and enjoyable sewing experience. From neatly storing fabrics and notions to creating a good workflow, a functional workspace allows you to focus on your creative projects without the frustration of clutter! This blog post will explore practical tips and tricks for organizing your sewing room, innovative storage solutions, and space-saving ideas. Get ready to transform your sewing space into a haven of creativity and efficiency!

Start Evaluating and Decluttering:

Start your sewing room organization journey by evaluating your current setup and decluttering unnecessary items. Sort through your fabrics, threads, and notions, and donate or discard anything you no longer need or use. By minimizing clutter, you’ll create more space and make finding and accessing the supplies you truly need easier.

Plan Your Fabric Storage:

Proper storage of fabrics is essential for easy access and preservation. We’ve gathered a few tips for getting your storage well organized.

  • Categorize and Sort: Start by categorizing your fabric based on different criteria, such as color, fabric type, or project type. This will make finding the fabric you need easier when starting a new project.
  • Use Clear Containers or Bins: Store your fabric in clear plastic containers or bins. This lets you see the contents at a glance, saving time and effort when searching for specific fabrics.
  • Fold and Label: Fold your fabric neatly and uniformly to maximize space and prevent wrinkles. Use labels or tags to identify the fabric type, color, yardage, or other relevant details. This makes it easier to locate specific fabrics without unfolding everything.
  • Vertical Storage: Consider storing your fabric vertically rather than horizontally. This method saves space and allows you to easily browse through the fabric stacks without disturbing the neatly folded fabrics.
  • Utilize Shelving or Cubbies: Install shelves or use cubbies to store your fabric. These provide a dedicated space for each fabric category and help organize your sewing room. You can even sort fabrics by size or project type within each shelf or cubby.

Organize Your Notions and Tools:

Organizing notions and tools in your sewing and quilting room is essential for maintaining a functional and efficient workspace. Start by grouping similar items, such as needles, pins, and buttons. Utilize clear plastic containers, small jars, or compartmentalized organizers to store these smaller items, ensuring they are easily accessible and visible. Consider using a pegboard or wall-mounted tool organizer to hang scissors, rulers, and other frequently used tools, keeping them within reach and saving valuable workspace.

Designate specific shelves or drawers for larger tools like cutting mats and rotary cutters to keep them safely stored and neatly organized. Additionally, labeling containers or using clear bins for items like zippers, ribbons, and trims can make it quick and easy to find what you need. By implementing a well-thought-out organization system, you’ll streamline your sewing and quilting process and have a clutter-free environment that inspires creativity!

Organizing Those Threads and Bobbins:

Practical thread and bobbin organization in your sewing and quilting room is crucial for a smooth and efficient workflow. To keep your threads easily accessible and neatly arranged, consider using a thread rack or spool holder. These can be mounted on the wall or placed on a table or shelf, providing a convenient display of your thread collection. Group threads by color or type, allowing for quick identification and selection. Alternatively, you can store threads in clear plastic containers or drawers, protecting them from dust and light exposure.

To keep your bobbins organized, use a bobbin storage case or tray specifically designed for holding bobbins securely in place. This prevents them from unwinding and tangling. You can also match bobbins with corresponding thread spools, storing them together to easily locate the appropriate combination when needed. By implementing an effective thread and bobbin organization system, you’ll save time and frustration, allowing for a more enjoyable sewing and quilting experience.

Creating Your Workflow:

Creating an efficient workflow in your sewing and quilting room is essential for maximizing productivity and enjoying a seamless creative process! Start by organizing your workspace in a way that suits your working style. Arrange your sewing machine, cutting table, and ironing station in a seamless layout, and ensure easy access to all your needed tools and materials. Consider setting up your own assembly line for different stages of the process! Such as cutting, piecing, and assembly, to keep everything organized and efficient.

Next, establish a workflow that works best for you! Start by planning your projects in advance. Gather your fabric, confirm your pattern, and have your cutting instructions ready. With a clear roadmap, you can avoid unnecessary interruptions or backtracking during the creative process.

Prioritize tasks and break your sewing down into manageable steps! This allows you to focus on one project piece at a time, cutting fabric, sewing seams, or ironing. Remember to declutter and tidy your workspace to maintain a clear and inspiring workspace. By creating an efficient workflow tailored to your needs, you’ll be able to fully immerse yourself in your sewing and quilting projects, resulting in beautifully crafted creations!

Inspiring and Personalized Decor:

Create an inspiring environment in your sewing room by adding personal touches and decorative elements. Display finished projects, hang inspirational quotes, or place around artwork that sparks your creativity. Look into incorporating good lighting to avoid eye strain during your project creation. Maybe add a pinboard or corkboard to pin inspiration, project ideas, or fabric swatches!

A well-organized sewing room is a haven for creativity and productivity. By implementing the tips and tricks in this blog post, you can create a functional and inspiring workspace that enhances your sewing experience. From efficient fabric storage to optimizing workflow and adding personal touches, these strategies will help you maximize your sewing space and enjoy a clutter-free environment. Embrace the joy of organization and watch your sewing projects flourish in a space designed for creativity and efficiency. Happy sewing!

Quilters’ Sewing 101: Answering 5 Basic Questions

Quilting is a timeless craft that has allowed us to create beautiful and functional art pieces using fabric and thread. Whether you’re a beginner or have some quilting experience, you may have questions that need clarification. In this blog post, we will address five popular questions often asked by quilters. By understanding these fundamental aspects, you’ll be on your way to confidently quilting and creating those stunning quilts you’ve been dreaming of.

What is the difference between quilting cotton and regular cotton fabric?

Quilting cotton and regular cotton fabric differ primarily in construction and intended use. Quilting cotton is designed for quilting projects and is known for its tightly woven and durable nature. It typically has a higher thread count, which means that the fabric is made up of more threads per square inch. This dense weave gives quilting cotton its sturdiness, making it ideal for stitching and holding up to repeated use and washing. Additionally, quilting cotton often features vibrant prints and patterns, which add aesthetic appeal to quilts and other sewing projects.

On the other hand, regular cotton fabric refers to the broad category of cotton textiles used in various applications, including clothing, home décor, and crafts. Regular cotton fabric comes in different weights, weaves, and finishes to suit other purposes. Unlike quilting cotton, the regular cotton fabric may have a looser weave and a lower thread count, making it lighter and more breathable. It is commonly used for making garments such as t-shirts, dresses, and pants and crafting household items like curtains, pillowcases, and tablecloths.

What is the importance of accurate seam allowances in quilting?

Accurate seam allowances play a crucial role in quilting, ensuring the final project’s overall quality, precision, and consistency. Firstly, precise seam allowances help maintain the structural integrity of the quilt by ensuring that the fabric pieces are securely joined together. Accurate seam allowances ensure that the seams are strong and reliable, preventing unraveling or fraying of the fabric over time. This is especially important for quilts that will be used, washed, and handled frequently!

Secondly, precise seam allowances contribute to the quilt design’s overall visual appeal and accuracy. Quilts often involve intricate patterns and designs that rely on precise measurements and seam allowances. Consistently accurate seam allowances ensure that the blocks and elements of the quilt fit together seamlessly, creating clean lines, even corners, and balanced proportions. Inaccurate seam allowances can lead to mismatched points, distorted shapes, or misaligned seams, which can detract from the quilt’s visual impact and overall aesthetic. Quilters can achieve a professional finish by paying attention to precise seam allowances and bringing their envisioned design to life.

How do I prevent fabric stretching while quilting?

Preventing fabric stretching is crucial in quilting to ensure accurate piecing and maintain the integrity of your quilt blocks. Here are two key techniques to help you prevent fabric stretching:

Proper handling and pinning: When working with fabric, especially bias-cut pieces, handle them with care to minimize stretching. Avoid pulling or tugging the fabric excessively, as this can distort its shape. Instead, support the fabric with one hand while guiding it through the sewing machine with the other. Additionally, use pins to secure your fabric layers together before stitching. Place the pins perpendicular to the seam line, with the heads pointing away from the sewing direction. This technique will help keep the fabric in place during sewing and prevent stretching caused by shifting layers.

Stabilizing techniques: Stabilizing the fabric can also help minimize stretching. One effective method is using spray starch or fabric sizing. Lightly spray the fabric with starch or sizing and press it with an iron before cutting and piecing. This process stiffens the fabric temporarily, making it less prone to stretching. Follow the manufacturer’s instructions and test on a scrap piece of fabric first to avoid any adverse effects. Another technique is to use a stabilizer such as lightweight fusible interfacing or wash-away stabilizer. These products provide temporary support to the fabric and can be applied to specific areas or the entire fabric piece, depending on your needs.

These techniques will help any beginner or everyday quilter!

Should I prewash my fabric before quilting?

The decision to prewash fabric before quilting is a personal choice that depends on various factors. Prewashing fabric can be beneficial in addressing potential shrinkage and removing excess dyes or chemicals. By washing the fabric before cutting and piecing, you can ensure that any shrinkage occurs beforehand, reducing the risk of distortion or warping in your finished quilt. Additionally, prewashing helps remove residual substances that may bleed onto other fabrics or affect the overall appearance of your quilt. It can be advantageous when working with different fabric types with varying shrinkage rates in the same project.

On the other hand, some quilters prefer to avoid prewashing fabric to maintain its stability and finish. Prewashing can cause the fabric to lose some of its sizing or stiffness, potentially impacting the ease of cutting and piecing. Certain fabrics, such as precuts or those with delicate prints or embellishments, may be unsuitable for prewashing due to their fragile nature. In such cases, alternative precautions like color-catching sheets or test-washing small fabric pieces can help prevent bleeding without prewashing.

Ultimately, the decision to prewash fabric before quilting is a personal preference based on the desired outcome, fabric type, and project requirements. Considering factors such as shrinkage, potential bleeding, and fabric stability can help you decide whether to prewash or not.

How can I achieve precise quilting lines or designs?
Using rulers with your JUKI sewing machine can be highly beneficial to achieve precise quilting lines or designs. Here’s a step-by-step guide on how to utilize JUKI rulers for accurate quilting:

Step 1: Prepare your fabric and JUKI ruler: Start by ensuring your fabric is properly layered and basted for quilting. Then, select the appropriate JUKI ruler for the design or quilting lines you wish to create. JUKI offers a range of rulers specifically designed for quilting purposes, such as straight rulers, curved rulers, and specialty rulers for different patterns and shapes.

Step 2: Secure and position the ruler: Place your ruler on the fabric, aligning it with the desired quilting line or design. Use fabric grips or non-slip adhesive tape to secure the ruler, ensuring it remains stable and doesn’t shift during quilting. It’s vital to position the ruler accurately to achieve precise results.

Step 3: Quilt along the ruler edge: Once the ruler is secured, guide your JUKI sewing machine’s foot along the ruler’s edge. Ensure to maintain a steady speed and apply gentle pressure to the ruler to prevent it from moving. As you quilt along the ruler, the foot of the machine will follow the ruler’s edge, resulting in clean and precise quilting lines or designs.

Remember to practice and experiment with different rulers and techniques to achieve the desired quilting effects. It’s also essential to familiarize yourself with the features and settings of your specific JUKI sewing machine to ensure optimal performance during quilting.

As a quilter, understanding the basics is essential for successful and enjoyable quilting projects. By addressing these five common questions, you can better grasp the differences between quilting cotton and regular cotton fabric, the importance of accurate seam allowances, preventing fabric stretching, deciding whether to prewash fabric and achieving precise quilting lines or designs. With this knowledge, you can confidently embark on your quilting journey, create stunning quilts, and continue expanding your quilting skills. Looking for quilting machines? Be sure to check out JUKI’s wide range of machines! Happy quilting!