JUKI’s Ruler Magic

Let’s discuss the not-so-secret weapon in the quilting world: JUKI rulers! From crafting loops that scream elegance to diving into intricate clamshell designs, these rulers are your ticket to a quilting adventure that’s as fun as it is fab. We will cover the options available from JUKI that you can use the next time you’re quilting. So, grab your favorite fabrics and buckle up as we explore the endless designs these rulers bring to the table and why they’re the most excellent tool in a quilter’s arsenal!

Ruler Base: Expanding Your Canvas

Before you start creating, you must ensure you have a stable place to create! The JUKI Ruler base stabilizes rulers when stitching designs, expanding the machine’s work surface around the needle plate. The set is also removable when unused, offering both convenience and versatility.

¼ Quilting Foot: Precision at Your Fingertips

The next step to a smooth sewing experience with rulers is using the ¼ quilting foot. This foot is a game-changer for quilting with Rulers! With a perfect ¼” distance from the needle entry point to the outer edge, this foot allows sewing with rulers as guides. Its lowered front enhances visibility around the needle area while the adjustable height accommodates various fabric thicknesses.

Rulers For Creating

Loop to Loop Ruler

Creating beautiful 3″ and 4″ loops becomes a breeze with the loop-to-loop ruler! Its 3/16″ thickness is ideal for low-shank sewing machines, ensuring seamless loops on your most cherished projects. This ruler creates looped borders on quilt edges, floral motifs, wave patterns, interlocking designs, and more!

Curved Crescent Moon Rulers

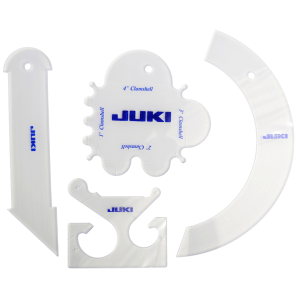
Designed by Ronda K. Meyer, these rulers deliver flawless half-circles! Their 3/16″ thickness is perfect for your low-shank sewing machine and helps quilters infuse elegance effortlessly into their creations.

Some fun design ideas you can complete with the Curved Crescent Moon Rulers are arcs and swirls, petal patterns for your floral motifs, feathers or whimsical spirals, or border elements!

Mini Straight-Line Ruler

Stitching in the ditch is a breeze with this 3/16″ thick acrylic tool! The ruler has indented edges, which helps you maintain accurate placement, and the versatile ends, one round and the other containing a 45-degree angle facilitate creating arcs, scallops, and small crosshatching.

These designs are also great if you want to create geometric patterns, create a grid pattern across your quilt, accent arcs, and scallops, and check out the ruler’s 45-degree angle to incorporate angular elements into your quilt. These angles can create unique designs, like stars, chevrons, or interlocking patterns!

Clamshell Ruler

The clamshell ruler opens doors to crafting 1″, 2″, 3″, and 4″ clamshell designs. With a 3/16″ thickness tailored for low-shank machines, this ruler invites quilters to adorn their projects with classic clamshell quilting!

You can create various patterns with the clamshell designs, integrating nested, alternating, echoing, and graduated clamshells by using your ruler in various positions. Combine these rulers to create fun and intricate designs the next time you’re quilting!

Line Art System ruler 

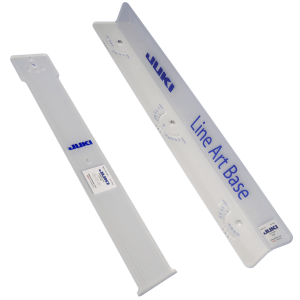
For avid creators seeking precision in straight-line designs like crosshatch, the Line Art System ruler steals the spotlight. It’s tailored perfectly for longarm quilting with a thickness of 1/4″ and measuring 3″ x 18″. It’s not just a ruler; it’s a guide to creating immaculate, geometric designs that add depth and character to your quilts.

Line Art Base 

Regarding the Line Art system ruler, the Line Art Base steps in with larger dimensions, measuring 24″ x 5″. With the same 1/4″ thickness, this ruler caters to longarm quilters looking for more extensive space to create those beautiful straight-line designs!

Ruler Set

The Ruler Sets: A Variety Sets Created For Your Needs

Let’s talk about the ruler sets now. Having a ruler set ready for quilting from JUKI is an absolute blast! These rulers aren’t just tools but gateways to endless design possibilities. Each set offers a unique set, whether crafting classic clamshell designs, precise straight lines, or intricate loops and curves. With various options, sets are a great way to create; they allow you to use multiple design ideas quickly and let you add texture and movement to your projects.

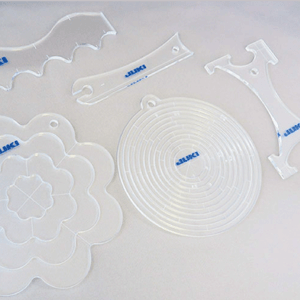
First Ruler Set: Crafting Basics

The foundation of quilting lies within the first ruler set! Serving as a template for stitching designs using the quilting ruler foot, this kit enables the formation of various patterns by combining primary lines and shapes. The beauty lies in its versatility; the kit is offered in three sets, allowing endless experimentation and possibilities.

With this set, you can create fun designs: geometric patterns, starburst or radiating designs, or interlocking patterns!

Second Ruler Set: Tears & Tails for Whimsical Elegance

Tears & Tails Set

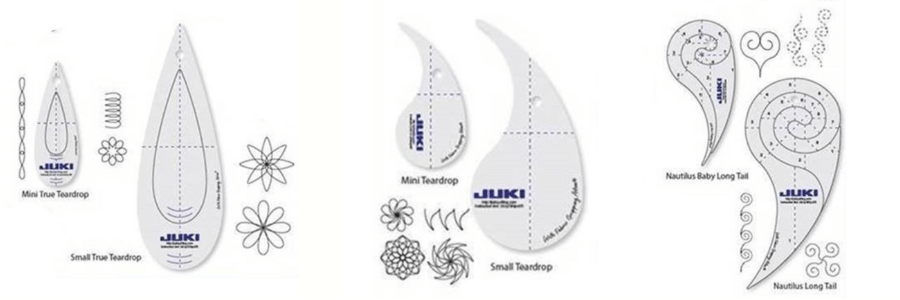
Enter the realm of whimsy and elegance with the Tears & Tails Ruler Set! One of the latest additions to our Ruler collection offers an array of rulers, including the Mini Teardrop, Small Teardrop, Nautilus Baby Long Tail, Nautilus Long Tail, Mini True Teardrop, and Small True Teardrop. Each ruler is a gateway to crafting fun and exciting patterns that infuse your quilts with personality and charm.

This set is excellent for experimenting with designs! You can test your skills at creating Floral patterns or fluttering butterflies by using the Mini True Teardrop and Small True Teardrop rulers to create symmetrical wings and the long tail rulers for elegant antennae. Or try your hand at animal-inspired designs! Use the teardrops to create feathers for birds or petals for stylized animals and the long tail rulers to form tails, fins, or antlers.

Remember, these rulers are your artistic toolkit; mixing and matching the shapes can lead to countless creative combinations!

Third Ruler Set: Hearts & Wings for Delicate Beauty

Hearts & Wings Set

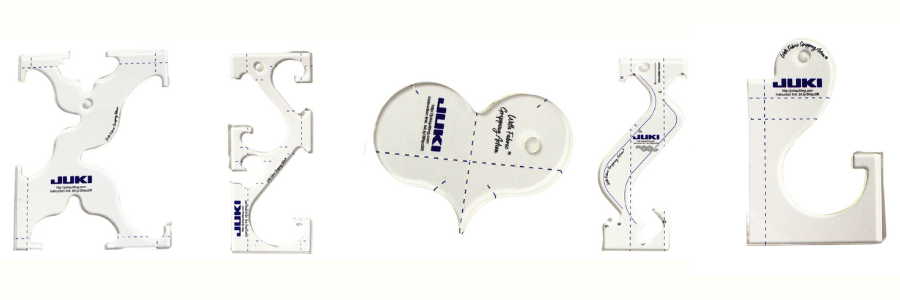
Another new addition to our ruler collection is the Hearts & Wings Ruler Set! This set is a testament to delicate beauty in quilting and features rulers like the Cable Tool, Mini Heart, Traditional Hearts, Feathered Hearts, and Bird Bracket Chain. This set invites quilters to create intricate and graceful designs that add a touch of whimsy and sophistication to their projects!

There are so many possibilities with this set! Use the Cable Tool ruler to create sinuous, twisting vines reminiscent of delicate floral tendrils. Combine these vines with small heart-shaped leaves using the Mini Heart ruler, adding a touch of whimsy to your quilt. You can utilize the Traditional Hearts ruler to craft clusters of heart-shaped flowers. Vary their sizes and arrange them to mimic a blossoming garden across your quilt. Or incorporate the Bird Bracket Chain ruler into your design, creating a scene where whimsical birds perch on blooming branches!

Using a JUKI ruler while quilting can be a game-changer for several reasons. These rulers are meticulously crafted tools designed to elevate your quilting experience. Their precision and versatility offer a level of control and accuracy that’s hard to achieve freehand. Whether the Loop to Loop Ruler is for creating uniform loops or the Clamshell Ruler is for classic designs, each ruler serves as a guide, ensuring consistency and perfection in your quilted patterns. Ultimately, using a JUKI ruler is like having a trusted partner in your quilting journey—a tool that empowers you to turn your quilting visions into stunning, professional-looking masterpieces with precision, ease, and a touch of artistic flair!

To learn more about our JUKI Rulers, visit here!

Sewing Into 2024 with JUKI

Embarking on a sewing journey is akin to unraveling a treasure trove of creativity and skills waiting to be discovered. For beginners eager to delve into the craft with a reliable JUKI sewing machine this new year, here are five delightful and straightforward projects that promise a smooth learning curve!

1. Chic Coin Purse

Crafting a coin purse is an ideal starting point for newbies. When selecting fabrics for this project, consider using lightweight cotton or canvas for the exterior and coordinating cotton or polyester for the lining. These fabrics are easy to handle and come in many colors and patterns.

Using a simple design and thanks to its practicality, this project is functional and rewarding! This project also only consumes a little time, which is excellent motivation when just starting.

Recommended Notions:

  • Zipper: Opt for a standard nylon or polyester zipper in a matching or contrasting color. A zipper attachment is an important skill to learn, as this skill will be used in various projects like bags, garments, and more.
  • Thread: Use a good quality all-purpose thread for exterior and lining fabrics. Using the right thread will help your project have a longer-lasting quality and reduce thread breakage when creating your coin purse.
  • Sewing Foot: A zipper foot is essential for precise stitching when attaching the zipper. Using a zipper foot will help you easily attach the zipper and reduce mistakes in your project!

2. Hair Scrunchies

Creating scrunchies allows beginners to experiment with different textures and stretchy materials. Opt for fabrics like cotton, satin, or velvet. These materials are readily available, accessible to work with, and come in various colors and prints.

The skill of working with different fabrics is essential! As you learn to sew, you’ll learn that some fabrics have more stretch than others, what fabrics can handle constant use, what threads and needles will work best, and more.

Learning how to attach an elastic is also an excellent tool! Attaching elastic is a popular skill in garment creation, and using this project as a stepping stone is a great way to learn how to run the elastic through project pieces or attach them to fabric,

Recommended Notions:

  • Elastic: Choose a narrow, soft elastic that is comfortable to wear. The best thing to do is decide how big you want your scrunchies and then pick the correct width. The typical width of an average scrunchie usually falls within ¼ inches.
  • Thread: Use a matching thread for seamless blending. Remember any scrunchies you may have at home, and study the design and stitching to better understand how your closure should look when you finish your project!
  • Sewing Foot: A basic sewing foot works well for this project, making this perfect for all beginner sewers.

3. Stylish Eye Glass Case

When making an eyeglass case, consider using fabric with a bit of structure, like quilt-weight cotton or denim, for durability. A soft cotton or felt for the lining will help protect the glasses.

This project will teach you how to create projects with a form or shape that requires maintaining structure. These fabrics can be thicker and offer stability to more than just eyeglass cases; even used in tote bags, hats, quilts, and more. You can also learn to use different thread weights and needle sizes, as denim requires a larger needle than chiffon or cotton.

This project will also help you learn the basics of small buttons or snap closures. While zipper closures are a popular option, button closures and snaps are expected in bag creations, home décor, garments, and more. Learning this skill will help you when you step up to creating dresses, skirts, and more!

Recommended Notions:

  • Button or Snap: Opt for a small button or snap closure for easy use. JUKI machines offer button attachment accessories, and we have a selection of machines that offer buttonhole creation. Those tools would help any sewist, beginner or advanced, create quality finished closures for their projects.
  • Thread: Use a sturdy thread to ensure durability. Eyeglass cases receive a lot of use, like your scrunchies, so make sure to use a thread that can handle that form of wear and tear and even a little stretch in case your glasses fit snugly in their new case.
  • Sewing Foot: A walking foot helps when sewing through multiple layers of fabric. With a walking foot, you’ll notice even feeding, reduced slippage as you have layers placed together, and prevention of wrinkles and puckering, giving you that finished quality look you’re aiming for!

4. Quaint Coasters

Coasters are an excellent canvas to showcase your creativity. Choose absorbent fabrics, such as cotton, linen, or a cotton-linen blend, to absorb moisture from glasses effectively. Remember to bring that skill of layering into play! Placing layers in between tour fabrics will help with creating a sturdy project.

The simple and manageable design size will help you build your confidence in project creation while allowing you to experiment with different stitch designs, fabric types, patterns, and more! This will also teach you basic techniques like measuring and cutting fabric accurately, sewing straight seams, turning corners, and finishing edges neatly.

This project is also a low-cost and low-time-consuming idea, giving creators a budget-friendly option that builds their confidence.

Recommended Notions:

  • Batting or Interfacing: Adding a layer of batting or interfacing between the fabrics gives the coasters a sturdy feel, perfect for guests and homebodies.
  • Thread: Use a coordinating thread for neat finishing.
  • Sewing Foot: A walking or quilting foot helps maintain even stitches when working with multiple layers. As we mentioned before, prevent those wrinkles and puckers, and enjoy the finished quality.

5. Nook Carrier for Books

Select durable fabrics like canvas or twill for the exterior to provide adequate protection for a nook carrier or book sleeve. Use soft cotton for the lining to prevent scratches on the nook or book. This book sleeve can be used for travel, so you want to use a fabric that can handle heavy use and possibly different weather conditions.

This project is a great skill builder for beginners because it has a straightforward design that is easily customizable to your needs; you can take the opportunity to learn how to attach straps to a carrier case, an important lesson for garment and bag creation, and beginners can experiment with fabric choices, colors, patterns, and embellishments to add a personal touch to the project.

Recommended Notions:

  • Velcro or Button Closure: Choose a closure option that secures the carrier while offering easy access. Velcro options are popular thanks to how easy they are to install onto projects and their budget-friendly cost. It’s also easy for many users to use as a closure with its easy opening. In some cases, if the Velcro wears out due to heavy use, it’s relatively easy to replace without having to reconstruct the entire project.
  • Thread: Use a strong thread for structural integrity. A Book or Nook carry will be heavily used by a book lover, so keep that in mind when choosing your thread and building your project. Backstitching is a great skill to learn for enforcing the durability of your project and can be done with the press of a button on our JUKI machines.
  • Sewing Foot: A walking foot ensures smooth stitching through different fabric layers. This will help as you attach a lining to the carrier case for solid protection. Remember that these carries will be used for travel, and a good, durable fabric and filler will protect the item.

Pro Tips:

  1. Fabric Preparation: Always pre-wash and iron your fabric before starting any project to prevent shrinkage or distortion after sewing.
  2. Practice Stitches: Familiarize yourself with different stitch options on your JUKI machine before starting the projects to achieve the desired finish. Grab the fabric you plan to create for your project to test how the stitches will work with your fabric and design choice.
  3. Seam Allowances: Pay attention to seam allowances; they ensure accurate sizing and neat finishing. We recommend checking out JUKI’s ¼ Presser Foot for a seamless and measured look.

These beginner-friendly JUKI sewing projects offer an excellent way to learn while creating practical and visually appealing items. With the recommended fabric choices, notions, and sewing accessories, beginners like you can confidently embark on their sewing journey, guided by the reliability and precision of their JUKI sewing machine.

So, gather your materials, unleash your creativity, and let your sewing adventures begin! Visit our project page here for more project ideas that beginners and advanced sewists alike will love creating. 

JUKI’s Tips and Tricks to Bag Creating!

In today’s blog, we’ll be introducing you to some tips and tricks to keep in mind when you start your journey in bag creation! Whether you need help deciding on which foot accessories to keep in your arsenal or what fabrics are best for your tote bag projects, we’re here to get you started on the basics. So follow along below as we cover hardware, interfacing, and more!

When new sewists join the sewing world, one of the top projects we recommend trying your hand at is bag making. Bag projects offer sewists a chance to learn foundational skills like manipulating fabrics and testing new techniques for zipper attaching or button closers. Bag creation can also be quick projects, like tote bags, which are fun and versatile, perfect for beach days and market shopping.

If you find yourself loving the process of bag creation or want to try your hand at it, we’ve put together a selection of tools and tips to keep in mind!

The first thing to know when creating is what type of hardware you’ll want to use on your handbag. Some bags won’t need many pieces, while detailed ones could require multiple hardware options to create pockets, adjustable straps, etc. Below we’ve listed some of the more common hardware pieces bag makers keep on hand.

Bag Making Hardware:

  • Magnetic snaps come in a range of colors and sizes. They are easy to insert.
  • Cap rivets are used for finishing and reinforc­ing leather and bag details.
  • D-rings are D-shaped metal rings used for fastening handles to bags.
  • Adjustable sliders are used to thread a strap and to adjust the length.
  • Eyelets are small round metal pieces used to finish and reinforce fabric holes.

Once you’ve decided on which hardware pieces you’ll use, the next step is determining your strap! The best part about creating your own bag is the opportunity to choose every detail. Handles can be made from countless fabrics, and bags can have multiple straps depending on your style and bag type.

Some options for bag straps can be webbing tape, leather strapping, or chains! Whether you’re looking for durability, like a webbing tape strap, or a classy touch like leather and chain, you can get creative in dressing up your bag with the right strap! There are different ways to attach handles to your bag, so we recommend researching other techniques and seeing which one will match your bag design best. You can also use techniques for adding adjustable straps, which are perfect for those travel bags and heavyweight!

The next step you want to focus on is choosing your interfacing material. When you want your bags to have a defined body and shape, using interfacing is perfect for creating that look. If your bag still looks sagging, feel free to double your stabilizing fabric and layer, as this will help you create a stiffer body. Remember, always apply interfacing to the back of the fabric before you start stitching, so this will not be visible. Keep in mind that you also have options on fusible and non-fusible interfacing, depending on whether you choose to sew the interfacing with your fabric or iron-on.

Interfacing options:

  • Woven: Stiff material that looks like fabric,
  • Non-woven: These interfacing fabrics are compressed fibers, with one side covered with adhesive
  • Knit: Need some stretch? Knit fabric can accomplish a tight stretch for those projects!

Before you start constructing your bag, let’s cover tips that can create a clean finish for your purse, wristlet, and more. In addition, these tips can assist you in adding a more professional touch to your projects.

  1. Attaching your handles

We recommend basting your handles before attaching them to your bags so that the fabric is hardened and firm. A fun tip for sewing is taping down your handles so that you can seamlessly sew over the fabric and attach your handles with ease.

2. Seam Allowance

Don’t forget to trim and clean up those seam allowances for a clean, finished look in your bag projects.

3. Boxed Corner

A technique that’s easy and quick to learn, adding a corner boxing can create more space in your bag and a professional bottom look. Using the 90-degree method, fold the corner flat, matching up the two side seams once you’ve cut out your fabric. The side seams should lie directly one over the other. Then stitch and backstitch to reinforce the closing.

Don’t forget to have the right feet on hand! Below we’ve listed our top 3 choices for bag creators to have in their kits. These feet options allow you to sew on unique fabrics, attach zippers and create clean finishes.

  1. Smooth Foot: Work on fabrics like leather, vinyl, suede, and more with ease using the smooth foot. This will allow you to use these types of fabrics without causing the material to stick to your foot like a metal one would.  
  2. Piping Foot: Reinforce your lines and enjoy a clean finish on your projects.
  3. Zipper Attaching foot: Attach zippers for pockets and bag closures using the zipper attaching foot.

When creating your bag, other ideas to keep in mind are what features you wish for it to have! Additional options for your bag designs include placing pockets, card slots, bag flaps, phone holders, etc. These additional pieces are perfect when trying new techniques and allow you to test your skills by attaching zippers, bag closers, pockets…

Don’t forget to have suitable needles and thread on hand. Your needle should be strong to handle thick fabrics when you begin layering your bag pieces. For thread, focus on finding heavyweight thread types that can keep your seams strong and together.

We hope this has helped you find the pieces you need to create your next bag project! Whether you’re an expert who has been creating for years, or a new sewist trying your hand at bag making, these projects are a great way to step up your technique game! So, are you a bag creator and want to share your favorite tips with new bagmakers? Let us know down below!