Personalize Back-to-School Gear

As the back-to-school season approaches, there’s excitement in the air for students and parents alike! This time of year often comes with the hunt for the perfect school supplies. But why settle for ordinary when you can make their school items uniquely theirs? Enter the TAJIMA Sai 8-needle embroidery machine from JUKI, a game-changer for personalizing back-to-school gear with intricate and vibrant designs! In this blog, we will cover ways you can bring a personal touch to your child’s school gear with the TAJIMA Sai.

Transform Those School Essentials

Whether it’s a laptop sleeve, sneakers, binder zipper bag, or pencil bag, the TAJIMA Sai allows you to add a personal touch to all your child’s school items. The versatility and precision of this machine mean that you can create detailed embroidery on various fabrics and surfaces, turning everyday items into something extraordinary.

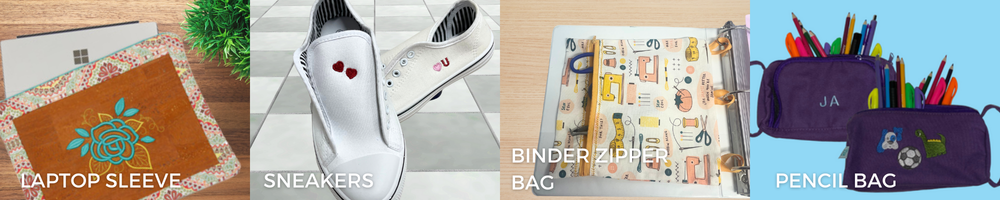
Laptop Sleeve: Keep your child’s laptop safe and stylish. With the TAJIMA Sai, you can embroider their name, initials, or favorite quote on their laptop sleeve. Choose from a wide range of fonts and colors to match their personal style.

Learn how to create your very own laptop sleeve here! Using the TAJIMA Sai, you can easily elevate this project with your touch of personalization.

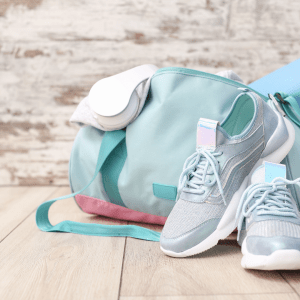
Sneakers: Stand out in the school hallway with customized sneakers. Add patterns, icons, or your child’s favorite sports team’s logo. The possibilities are endless, and with the TAJIMA Sai’s 8-needle system, you can mix and match colors seamlessly!

Design your very own sneakers by visiting here!

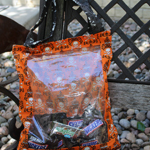
Binder Zipper Bag: Organize your child’s school supplies in a personalized binder zipper bag. Embroider their name, class schedule, or motivational words to inspire them throughout the day. It’s a perfect blend of function and flair.

Create your own binder zipper bag by visiting us here and learning more about the Writer Plus program below to add that touch of personalization!

Pencil Bag: Always keep your child’s pencil bag intact. With custom embroidery, you can add their name, favorite hobby icons, or even cute designs that reflect their personality.

Learn how to personalize your pencil bag with the TAJIMA Sai by visiting here!

TAJIMA Writer Plus Program

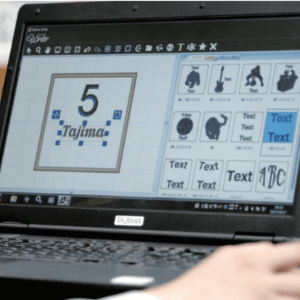
The TAJIMA Writer Plus program is your gateway to endless creativity. This software comes pre-installed with various design options that you can easily apply to your projects. Here’s a closer look at what it offers:

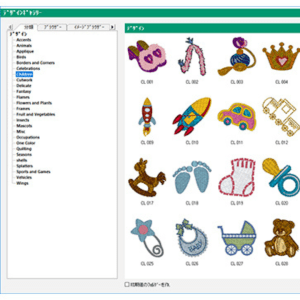
Pre-Installed Designs: The program includes a rich library of pre-installed designs, such as floral patterns, geometric shapes, animal motifs, and more. These designs are perfect for quick projects and adding a touch of fun to your child’s school items.

Custom Design Creation: Feeling creative? The TAJIMA Writer Plus program allows you to create your designs from scratch! You can draw inspiration from your child’s interests, hobbies, or favorite themes. Whether a complex pattern or a simple monogram, the software gives you the tools to bring your vision to life.

Easy-to-Use Interface: Even if you’re new to embroidery, the TAJIMA Writer Plus program is user-friendly. The intuitive interface makes selecting, customizing, and embroidering your designs easy. Plus, the program supports various file formats, so you can import and work with external designs effortlessly.

Design Ideas for Your Embroidery Projects

Names and Initials: Adding your child’s name or initials is a classic way to personalize their school items. Choose from different fonts and thread colors to make it truly theirs.

Favorite Sports Teams: Show off their school spirit or support their favorite professional sports team by embroidering their logo or mascot. It’s an excellent way for your child to connect with fellow fans and display their loyalty!

Hobbies and Interests: Whether they love music, art, science, or sports, you can reflect their passions on their gear. Embroider icons like musical notes, paintbrushes, basketballs, or telescopes showcase what they love.

Inspirational Quotes: Keep your child motivated with inspirational quotes or affirmations. A few words of encouragement on their pencil bag or laptop sleeve can go a long way in keeping their spirits high!

Fun Patterns and Icons: From cute animals and whimsical patterns to edgy graphics and abstract designs, the TAJIMA Sai allows you to experiment with various styles. Mix and match designs to create something uniquely theirs.

Back-to-school season is the perfect opportunity to express your child’s individuality through their school supplies. With the TAJIMA Sai 8-needle embroidery machine and the TAJIMA Writer Plus program, you can quickly transform everyday items into personalized masterpieces. Whether adding their name, showcasing their interests, or simply having fun with different patterns, embroidery brings a touch of uniqueness to everything you create. So, head back to school in style and make this year your child’s most personalized one!

April Showers Bring JUKI Flowers

As nature awakens and the sky blesses us, it’s the perfect time to equip ourselves with stylish and practical creations that brave the elements. With the help of JUKI machines, suitable fabrics, and the correct notions, let’s explore five innovative sewing projects designed to embrace the rainy season.

  1. Waterproof Tote Bags

Materials Needed:

  • Waterproof or water-resistant fabric
  • Nylon webbing for straps
  • JUKI sewing machine with a walking foot

Create fashionable and functional tote bags using waterproof or water-resistant fabrics. These tote bags will keep your belongings safe and dry during unexpected showers. Utilize a JUKI machine equipped with a walking foot for sewing through multiple layers of waterproof fabric, ensuring sturdy seams that withstand moisture.

To take your waterproof tote bags to the next level, consider incorporating additional features that amp up style and functionality. Integrate exterior pockets for easy access to essentials like your phone or keys, ensuring they’re always within reach. For added convenience, include internal compartments or organizers to keep your belongings neatly sorted and easily accessible. Incorporating key holders or clips inside the bag helps keep your keys secure and easily locatable, saving you precious time on the go.

Additionally, explore various closure options such as magnetic snaps, zippers, or drawstrings to suit your preferences and enhance the bag’s security. With the versatility and reliability of JUKI machines, you can effortlessly bring these creative enhancements to life, transforming a simple tote bag into a stylish and practical accessory that meets all your needs. Now, using our EB-1, you can easily add button holes using your TL series machine.

2. Raincoats

Materials Needed:

  • Waterproof or water-resistant fabric
  • Waterproof zippers
  • Seam sealer tape
  • JUKI sewing machine with a Smooth Foot

Elevate your rainy-day attire with custom-designed raincoats that blend style and functionality seamlessly. Start by selecting high-quality waterproof or water-resistant fabric to ensure maximum protection against the elements. With your trusty JUKI sewing machine equipped with a Smooth Foot, you’ll effortlessly navigate the slick surface of waterproof fabrics, ensuring smooth and precise stitching without snagging or sticking.

Consider incorporating practical and stylish features such as strategically placed pockets to add extra flair to your raincoat. Exterior pockets provide convenient storage for essentials like keys, wallets, or smartphones, while interior pockets keep valuables safe and dry. Additionally, you can amp up the functionality of your raincoat with waterproof zippers, which not only enhance protection against rain but also lend a sleek and modern aesthetic to your design.

For maximum weatherproofing, seal all seams with seam sealer tape to prevent water from seeping through! This simple yet crucial step ensures that your raincoat remains fully waterproof, keeping you dry and comfortable even during heavy downpours. To further enhance protection from the elements, consider adding a detachable hood to your raincoat design, providing versatility and practicality for unpredictable weather conditions.

3. Bucket Hats

Materials Needed:

  • Waterproof or water-resistant fabric
  • Fusible interfacing
  • Grommets for ventilation
  • JUKI sewing machine with a zigzag stitch

Elevate your rainy-day style with a custom-designed bucket hat that combines practicality with fashion-forward flair. Start by selecting high-quality waterproof or water-resistant fabric that keeps you dry and adds a touch of style to your ensemble. Enhance the structure and stability of your hat by incorporating fusible interfacing, providing a sturdy foundation for the brim and crown. With your JUKI sewing machine equipped with a zigzag stitch, you’ll effortlessly secure seams and add decorative detailing to your bucket hat.

To enhance comfort and breathability, consider adding grommets for ventilation! Strategically placed grommets allow air to circulate, preventing overheating and ensuring maximum comfort while wearing the hat. Additionally, grommets add a stylish touch to your design, elevating the overall aesthetic of your bucket hat. For added customization, explore other ways to vamp up your bucket hat. Add a contrasting fabric band for a pop of color or embellish with decorative stitching or appliques for a unique and personalized look. You can also experiment with different brim widths or crown heights to create a hat that perfectly complements your style and personality!

4. Picnic Blanket with Waterproof Bottom

Materials Needed:

  • Waterproof or water-resistant fabric for the bottom layer
  • Quilting cotton or other fabric for the top layer
  • Batting for insulation
  • JUKI sewing machine with a walking foot and quilting guide

Prepare for outdoor picnics in style with a custom-made picnic blanket that provides comfort and shields against moisture! Start by selecting a waterproof or water-resistant fabric for the bottom layer, ensuring protection from damp ground surfaces. For the top layer, opt for quilting cotton or another fabric of your choice, adding a touch of personality to your picnic ensemble. To provide insulation and enhance comfort, include batting between the layers, ensuring a cozy and inviting picnic experience.

With your trusty JUKI sewing machine equipped with a walking foot and quilting guide, you’ll effortlessly bring your picnic blanket to life with professional-quality stitching. The walking foot ensures smooth and even stitching through multiple layers of fabric and batting, preventing shifting or puckering for a flawless finish. Additionally, the quilting guide ensures straight and evenly spaced quilting lines, securely anchoring the layers together and adding durability to your blanket.

Consider incorporating additional features to enhance functionality and style to further vamp up your picnic blanket. Add convenient pockets for storing utensils, napkins, or other picnic essentials, keeping everything organized and within reach. For added versatility, include straps or handles for easy transportation and storage when not in use. You can also personalize your picnic blanket with decorative stitching, appliques, or embroidery, adding a unique and personalized touch to your outdoor gatherings.

5. Umbrella Carriers

Materials Needed:

  • Waterproof or water-resistant fabric
  • Straps or webbing for handles
  • Snap closures or zippers for closure
  • JUKI sewing machine with a zipper foot

Prepare for rainy days in style with custom-designed umbrella carriers that keep your wet umbrellas contained and your surroundings dry. Start by selecting high-quality waterproof or water-resistant fabric, ensuring that any residual moisture from the umbrella is contained within the carrier. For added convenience, incorporate straps or webbing handles to easily transport your umbrella carrier while on the go. Additionally, consider adding snap closures or zippers to secure closure, preventing accidental spills or leaks.

With your reliable JUKI sewing machine equipped with a zipper foot, you’ll effortlessly attach zippers or snap closures to your umbrella carrier, ensuring a secure and convenient closure mechanism. The zipper foot provides precise stitching along the edges of the closure, guaranteeing a professional finish that withstands daily use.

Explore additional features that enhance functionality and style to further vamp up your umbrella carrier. Incorporate exterior pockets for storing small items such as keys, wallets, or sunglasses, keeping them easily accessible while on the move. For added versatility, consider adding adjustable or removable shoulder straps, allowing you to carry your umbrella hands-free when necessary.

Personalize your umbrella carrier with decorative accents such as contrast stitching, appliques, or embroidery, adding a touch of personality to your rainy-day essentials.

Choosing Suitable Fabrics and Notions for Rainy Projects

When selecting fabrics for rainy-day projects, opt for materials labeled as waterproof, water-resistant, or treated with a durable water-repellent (DWR) finish. Nylon, polyester, vinyl-coated fabrics, or laminated cotton are excellent choices as they effectively repel water.

Waterproof zippers, seam sealer tape, and fusible interfacing are essential for notions.

Additionally, nylon webbing for straps, grommets for ventilation, and snap closures or zippers for closures enhance the functionality and durability of rain-resistant creations.

Utilizing JUKI Machines for Rainy-Day Projects

JUKI machines equipped with specialty feet, such as walking feet, Teflon feet, and zipper feet, are invaluable for sewing with waterproof or water-resistant fabrics! These feet ensure smooth stitching and prevent materials from sticking or bunching, allowing for precise and professional-looking finishes on rain-ready projects.

April showers pave the way for May flowers, but they inspire a world of creativity for sewing enthusiasts! With the suitable fabrics, notions, and versatility of JUKI machines, you can embark on a rainy-day sewing adventure, creating stylish, practical, and weather-ready projects that brave the elements in style. Embrace the rainy season with these innovative sewing endeavors, each stitch a testament to preparedness and creativity, all made possible with JUKI’s precision and reliability.

Stitching Love with JUKI

Valentine’s Day can be an opportunity for couples to strengthen their bond through shared activities and heartfelt moments! What better way to commemorate this occasion than by delving into an array of delightful sewing projects designed for two?

With the precision and versatility of JUKI machines complemented by the embroidery finesse of Tajima Sai and the printing features of the RICOH Ri 100 machines, let’s explore an assortment of heartwarming projects tailor-made for crafting love-filled memories together.

1. Culinary Harmony: Matching Aprons

Picture this: it’s Valentine’s Day, a day filled with love, laughter, and shared moments in the kitchen! As you whip up a delicious meal together, the matching aprons will bring a touch of laughter, a playful reminder of your shared love for culinary adventures and cheesy projects. It’s not just about the gift—it’s about the shared experiences, the laughter, and the beautiful memories you’ll create while cooking up a storm together, making this Valentine’s Day truly unforgettable.

To create your set this Valentine’s, here are a few things to have on hand. Choose durable and easy-to-clean fabrics suitable for aprons, such as cotton, linen, or canvas. Also, select a pattern that suits your skill level and desired style! Various apron styles are available, from simple waist aprons to full bib aprons with pockets, so find one that fits your cooking needs. Ensure the pattern is adjustable to fit different body sizes so you and your partner feel comfy in the kitchen!

Personalize these aprons with embroidered initials, whimsical patterns, or cute culinary motifs using the precision and creativity of our Tajima Sai or with the precision and versatility of JUKI machines complemented by the embroidery finesse of Tajima Sai and printing features of the RICOH Ri 100 machines. Let’s explore an assortment of heartwarming projects tailor-made for crafting love-filled memories together. Pay attention to details that can create a cohesive look. This includes matching or coordinating fabric patterns, colors, trims, or embellishments for both aprons! You can also add pockets and topstitch for added durability and aesthetic appeal.

For sewing aprons for the kitchen, you can use a standard or walking foot. A standard presser foot is suitable for most lightweight to medium-weight fabrics commonly used for aprons. A walking foot can help feed the fabric evenly and prevent shifting if you’re working with thicker fabrics or multiple layers. You can also consider using a zigzag stitch or an overcasting stitch to finish the edges of the apron for a clean and durable finish.

2. Dreamy Comfort: Personalized Pillow Covers

Valentine’s Day is a canvas for celebrating our unique love stories, and what better way to paint that picture than with personalized pillow covers? Imagine the joy of snuggling up to pillows adorned with inside jokes, shared memories, or heartfelt messages. It’s a chance to turn ordinary cushions into a delightful daily reminder of your special moments together!

For your own Personalized Pillow Covers, choose fabrics that complement your home decor or convey the theme or message you want to personalize. Take accurate measurements of your pillows before cutting the fabric to ensure a proper fit, and add seam allowance for a better finish. Add a closure! Choose an envelope closure, zipper closure, button closure, or even a snap, depending on your preference and sewing skill level.

Remember the inside! Depending on the fabric used and the desired finish, consider adding an inner lining or interfacing to give the pillow cover structure and durability. You can also add piping, trims, or decorative edges to enhance the aesthetic appeal of the pillow cover.

For adding piping, trims, or decorative edges, consider using a JUKI Piping Foot or a JUKI Overcasting Foot. The JUKI Piping Foot, designed with a groove for the piping cord, enables precise stitching close to the cord for a professional finish when attaching piping or decorative trims along the pillow cover edges. Alternatively, the JUKI Overcasting Foot is suitable for adding trims or finishing edges to prevent fraying, allowing for decorative overcasting stitches along the pillow cover’s perimeter.

Personalized pillow covers offer plenty of room for creativity! Experiment with initials, love quotes, or adorable motifs using the intricate capabilities of Tajima Sai embroidery machines, or check out our

With the precision and versatility of JUKI machines complemented by the embroidery finesse of Tajima Sai and the printing features of the RICOH Ri 100, let’s explore an assortment of heartwarming projects tailor-made for crafting love-filled memories together and add a personalized and heartfelt photo or hand-drawn design to your pillow covers.

3. Snugly Warmth: Cozy Blankets

Creating a cozy blanket for your partner this Valentine’s Day is a heartfelt gesture that encapsulates warmth, comfort, and love! Sewing or quilting a blanket allows you to pour love into every stitch, selecting the softest fabrics, personalized touches, and perhaps even embroidering initials or a heartfelt message.

Find a theme for your love quilt! Whether it’s a theme of your relationship or following the Valentine theme and using colors and designs that resonate with romance, this will be the basis for your fabric options. Traditional Valentine’s colors like red, pink, and white work well, but you can also opt for softer hues or a combination of your partner’s favorite colors.

If you’re into quilting, create a patchwork blanket using heart-shaped fabric pieces or a quilt design with love-themed patterns. Quilting can add a charming and intricate touch to the blankets!

To help you design this project, we recommend checking out JUKI’s new Hearts and Wings Ruler Set! This set offers the Cable Tool, Mini Heart, Traditional Hearts, Feathered Hearts, and Bird Bracket Chain rulers. Each ruler serves as a unique template, helping you bring individuality to your quilt! Whether you’re a seasoned quilter or a novice, the Hearts & Wings Ruler Set is an excellent addition to your tool set.

You can also add an extra touch of love with love quotes, poems, or meaningful messages embroidered into the blanket design using your Tajima Sai or your machine’s letter stitch options. Adding decorative elements like lace trims, ribbons, or sewn-on heart-shaped patches enhances the blanket’s romantic vibe.

4. Unified Fashion: Embroidered Sweaters

Creating matching embroidered sweaters for your partner this Valentine’s Day is a heartfelt gesture that goes beyond a typical gift! It’s a beautiful way to express your love and unity as a couple. Sewing these sweaters allows you to infuse them with personalized touches, such as initials, meaningful symbols, or a special message, uniquely representing your bond.

Regarding the design, consider Valentine’s Day motifs like hearts, Cupid’s arrows, lovebirds, flowers, or romantic phrases. Opt for thread colors that evoke the Valentine’s Day palette—red, pink, white, and shades of purple. Metallic threads can add a touch of sparkle to your designs!

Remember to use a stabilizer to prevent puckering or stretching while embroidering, and use the smallest hoop necessary to secure the sweater without stretching it too much. When embroidering, plan the placement of your design thoughtfully. Centering it on the chest or towards the hemline can create a balanced look. Avoid areas that might cause discomfort when worn. Use the embroidery capabilities of the Tajima Sai machine to add monograms, intricate designs, or symbols that symbolize unity and warmth onto your sweaters!

Want to try out your hand at creating personalized sweaters? Use your digital sewing machine and check out the letter features, or use your Tajima Sai and follow along here for a demonstration on creating your own set!

5. Personal Footprints: Customized Shoes

From whimsical designs to meaningful initials or inside jokes intricately woven into the fabric, these shoes aren’t just footwear—they’re a token of your love. Gift them the joy of walking in style and stepping into every adventure with a reminder of your love!

For this project, select shoes made of a fabric that can accommodate embroidery. Canvas or denim shoes work well. We recommend testing your embroidery design on a similar fabric or scrap material to gauge how the stitches will appear on the shoe material. Adjust the design or thread colors as needed for better visibility or effect. Remember to use stabilizers appropriate for shoes! Self-adhesive or tear-away stabilizers can work well for this project, supporting the fabric during embroidery without leaving residue.

When it’s time to embroider, hoop the shoe fabric carefully and securely without damaging the shoe. Use smaller embroidery hoops suitable for the shoe’s size, ensuring the material remains taut but not overly stretched. Adjust your embroidery machine settings according to the shoe fabric. Test different stitch densities, speeds, and tensions to ensure a smooth and accurate embroidery process. Also, enjoy the pre-installed designs of the Tajima Sai program and add initials, patterns, or unique designs onto the canvas shoes!

Catch our February project live next week as we show you how to use the Tajima Sai to create your own pair here!

Celebrate your love and togetherness this Valentine’s Day by embarking on these heartwarming embroidery projects. With the precision of the JUKI and the capabilities of the Tajima Sai machine, transform simple fabrics into cherished tokens of your shared love and commitment!

Happy Valentine’s Day, JUKI lovers! We can’t wait to see your projects!

5 Projects you can create this Spooky Season!

It’s almost time for spooks and candy JUKI Lovers! For today’s blog, we will share our top 5 favorite Halloween projects you can begin creating this weekend. So whether you’re going trick-or-treating, or staying at home, follow along below for ideas you can start today!

Halloween Patchwork Quilt

Stay warm this fall and create a Halloween patchwork quilt! Using a variety of Halloween fabric pieces, think witches, pumpkins, and ghosts, you can begin making your very own patchwork quilt. Quilts are the perfect accessory to any home, used and loved by everyone.

We recommend checking out your local quilt shop for holiday quilt bundles. Great options when you want to create a patchwork quilt, and don’t have the scraps, are browsing charm bundles, jelly rolls, and mini-charms! Also, don’t forget to grab batting for your quilts and have fun by bringing texture to the surface using free-motion quilting techniques.

Some great tools to have when quilting is your Open Toe Quilting Presser Foot, Quilting Rulers, and a ¼” Presser Foot for finishing.

Costume Cape

The perfect addition to so many costumes, a cape can be used for various characters ranging from royals to superheroes. To use this cape multiple times, create your piece using basic colors like white, red, or black so you can enjoy this project through the years.

For creating a cape, we recommend having fabrics like stretch velvet, fleece, or wool! Usually, you’ll use about 2 yards of fabric for an adult cape and 1 yard for a child’s cape. This is an excellent apparel project for a beginner to try their hand at. For more advanced sewers, you can add features like trims and a hood for a more finished and professional look.

We recommend having a Cording Foot on hand if you plan to attach a string inside for the cape hood. Also, use a Decorative Stitch Presser Foot to add designs on your cape’s ends for extra personalization!

Spooky Placemats and Table Runner

Decorate your home with a spooky table runner and matching placemats! A fun and easy home project, you can accessorize and personalize your kitchen and dining table with fun fabric designs and colors.

When creating placemats and table runners, we recommend having some tools on hand. Inside your placemats and table runner, you’re going to place a fleece or batting; this will stabilize your project. Spray glue is an excellent adhesive for this! Once you’ve pieced together your mat, you can choose to leave it as is or add designs with free motion quilting.

For yardage, we recommend 2-3 yards of fabric. With one yard, you can create up to 8 basic-sized placemats, and with your other yards, you can create your table runner depending on your table length! Keep a ¼ presser foot on hand when you’re ready to complete your project, so you can quickly finish the edging.

Halloween Garland

Decorate your archways and doorways with a fun garland! Easily created with less than a yard of fabric for the hanging pieces and string, this décor piece is the perfect touch. For the hanging details, we recommend using backing fabric for stabilization.

For this project, keep your ¼” presser foot nearby! Perfect for creating a clean edging on each hanging piece and the edging on the hanging string, this accessory can be the only foot you need for the project.

Trick–or–Treat Bag

Lastly, don’t forget to have your trick-or-treat bag ready! Wishing you a happy spooky season, download our free instructions for our see-through trick-or-treat bag here. With a finished size of 14″ x 16″, this bag will carry all those treats home!

Happy Halloween, JUKI Lovers!

5 Bags You Can Create with JUKI!

So many sewists love bag-making! Whether they’re creating beautiful handbags, fun beach totes, or designing team bags, this is a fun project any sewist can start doing, no matter their skill level. From simple tote bags to more complex purses, bag-making is an excellent project for those who want to learn new skills and up their sewing game. Today’s blog covers five different types of bags you can create! We cover the basics of starting your bag-making journey, from their level of expertise to the sewing feet and notions you’ll need.

Tote Bag

Level: Beginner
If you’re new to bag making and want to try your hand at a fun and easy project, look into patterns for tote bags! Whether they’re simple with a few panels or a little more fun with optional pockets and different handle styles, the tote bag is one of the best projects for beginners. Tote bags are great for their versatility as well! Use this project for the beach, grocery shopping, farmers’ markets, etc.

If you’re making tote bags, we recommend checking out these fabrics for the outside: canvas, denim, and twill, and for your bag’s lining, cotton, all-purpose muslin, and broadcloth all work. Use firmer fabrics to add the structure and shape you want your bag to take. For a lighter feel, use fabrics like cotton.

You can either use leftover fabric from which your bag was created or webbing for a firmer handle to create a handle.

Electronic Carrier Case

Level: Beginner to Intermediate
Here is where we start testing our skills! You’ll want to add zippers for storage and safety for an electronic carrier case. You’ll need to learn how to use specific feet to attach zipper closures for this bag, like an invisible zipper foot. We recommend using online resources like YouTube to learn your new skill and purchasing a pattern to learn the process and understand the pieces it takes to create your project.

For electronic cases, we recommend looking into soft padding options to place inside to keep your electronics from hitting one another. The case can be created from any fabric, making this a fun project to personalize to your style! From vinyl leather to cotton, you can get creative with the design of your carrier.

Features you can add to your project are:
• Pockets for your electronic chargers
• Different closures like magnetic buttons or velcro
• A strap as a wristlet or bag
Level up: Test your skill with mesh netting fabric! The best way to sew and attach this fabric piece to your projects is to use a ballpoint needle or Universal machine needle size 70/10-80/12 with a strong polyester thread. These are great for the outside of carrier cases and add more storage space for details like headphones, iPad pens, and more.

Wristlet Wallet

Level: Beginner-Intermediate
Fun and perfect for those family day trips or nights out, a wristlet is a great way to raise those sewing skills and try something new! Some skills you can pick up while creating wristlets are adding in pockets, attaching zippers, and creating straps. You can also learn to attach closures like buttons, clasps, and velcro.

For outside fabric options, we recommend leather, cotton, or synthetic. If you want to add durability to your projects, attach inner linings using fabric like polyester or nylon to reinforce the structure.

Level up: A fun way to add to your skill set is using clear vinyl! Placed in wallets to make certain pockets visible, like your ID, you can sew this in to add that professional touch. When using clear vinyl, make sure you have a clean and free workspace; this will reduce the chances of your vinyl smudging or scratching. Use a non-stick foot, a leather needle size 90/14 or denim needle size 90/14, and if you can, a strong, 100% polyester thread. Slow and steady wins the race with clear vinyl, so keep that in mind when creating!

Hand Bags

Level: Intermediate – Expert
If you’re ready for a fun and more challenging project, try your hand at creating a handbag! Think of those purses you love seeing for events and going out. These bags come in many styles, from large to small and extravagant to everyday use. Research different patterns and see what options out there catch your eye.

Fabrics for handbags vary depending on their use. Creating for everyday use? Look into fabrics like leather and vinyl for a classic and long-lasting look! These fabrics offer a protective layer that won’t allow liquids to fall through, longer-lasting color, and durability from usage. On the other hand, if your handbag is for travel use, look into fabrics like tweed and canvas! These fabrics are easy to use, come in various colors, and offer that stability when placing some weight in your bag.

Put your skills to the test and add in features like organizational pockets, zipper closures for the bag and pockets, and placing a flat bottom. Look into interfacings and stabilizers to stiffen your bag and create structure. Some interfacing we recommend are woven, non-woven, decovil, fusible fleece, foam, or felt.

Duffle Bag

Level: Intermediate – Expert
Are you a gym-goer? Is your child in sports? Then, try your hand at a duffle bag for your traveling needs! Perfect for those weekend trips and sports games, you can design your duffle bag specifically for your needs. Add pockets for sports equipment, a water bottle pocket, space for your travel-size toiletries, and more.

You want to keep in mind bag weight, usage, and durability when selecting fabrics. Choices like leather, vinyl, nylon, and cotton are standard picks for duffle bags. Look into webbing fabric for creating the handles, as this will help handle the weight. Don’t forget to purchase lining fabric to structure your duffle bag and create shape!

Features you can include are inner and outer pockets, zipper closures, and zippered pockets. Focus on what you need and create pockets for your cleats, toiletries, snacks, books, electronics, and chargers.

Level up: Add bag hardware pieces like D-Rings and Hooks to your duffle bag handles to adjust the strap depending on the user comfortably. This is great for bags that will be shared with family members and friends, making it comfortable for everyone to use. We recommend using basting tape to keep the D-rings and hooks in place while stitching.

Don’t Forget to Personalize!
Whether you’re a beginner or an expert, adding a personal touch to any bag is easy by using an embroidery machine or direct-to-garment printer. Embellish bags with your name, team names and logos, and art designs. Using a machine like the Tajima Sai, you can easily embroider up to 8 color designs at once with a touch of a button.

Using a direct-to-garment printer like the RICOH Ri 100, you can create your fabric and use this for your next bag project. Then, add your artwork, Photoshop designs, family and memory photos, and more, quickly making something uniquely ‘you!’

Get Started Today!
We hope this gave you some ideas you can implement on your next bag project! Whether you’re new to sewing bags and starting small with a tote or wristlet, or an advanced sewer looking for ideas, these projects are great for challenging yourself and building up your skills. So which bag would you create first? Let us know down below!