
In today’s blog, we’ll be introducing you to some tips and tricks to keep in mind when you start your journey in bag creation! Whether you need help deciding on which foot accessories to keep in your arsenal or what fabrics are best for your tote bag projects, we’re here to get you started on the basics. So follow along below as we cover hardware, interfacing, and more!
When new sewists join the sewing world, one of the top projects we recommend trying your hand at is bag making. Bag projects offer sewists a chance to learn foundational skills like manipulating fabrics and testing new techniques for zipper attaching or button closers. Bag creation can also be quick projects, like tote bags, which are fun and versatile, perfect for beach days and market shopping.
If you find yourself loving the process of bag creation or want to try your hand at it, we’ve put together a selection of tools and tips to keep in mind!
The first thing to know when creating is what type of hardware you’ll want to use on your handbag. Some bags won’t need many pieces, while detailed ones could require multiple hardware options to create pockets, adjustable straps, etc. Below we’ve listed some of the more common hardware pieces bag makers keep on hand.
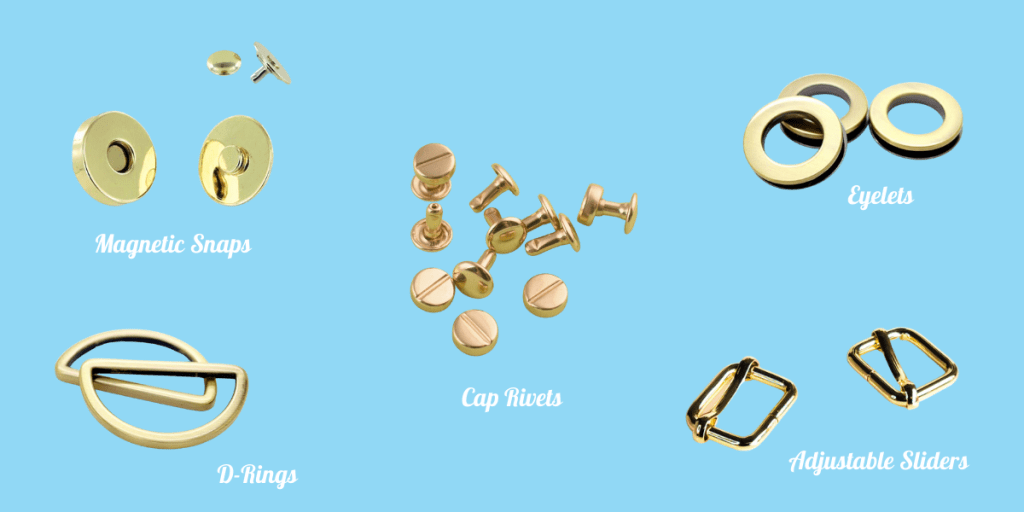
Bag Making Hardware:
- Magnetic snaps come in a range of colors and sizes. They are easy to insert.
- Cap rivets are used for finishing and reinforcing leather and bag details.
- D-rings are D-shaped metal rings used for fastening handles to bags.
- Adjustable sliders are used to thread a strap and to adjust the length.
- Eyelets are small round metal pieces used to finish and reinforce fabric holes.
Once you’ve decided on which hardware pieces you’ll use, the next step is determining your strap! The best part about creating your own bag is the opportunity to choose every detail. Handles can be made from countless fabrics, and bags can have multiple straps depending on your style and bag type.
Some options for bag straps can be webbing tape, leather strapping, or chains! Whether you’re looking for durability, like a webbing tape strap, or a classy touch like leather and chain, you can get creative in dressing up your bag with the right strap! There are different ways to attach handles to your bag, so we recommend researching other techniques and seeing which one will match your bag design best. You can also use techniques for adding adjustable straps, which are perfect for those travel bags and heavyweight!
The next step you want to focus on is choosing your interfacing material. When you want your bags to have a defined body and shape, using interfacing is perfect for creating that look. If your bag still looks sagging, feel free to double your stabilizing fabric and layer, as this will help you create a stiffer body. Remember, always apply interfacing to the back of the fabric before you start stitching, so this will not be visible. Keep in mind that you also have options on fusible and non-fusible interfacing, depending on whether you choose to sew the interfacing with your fabric or iron-on.
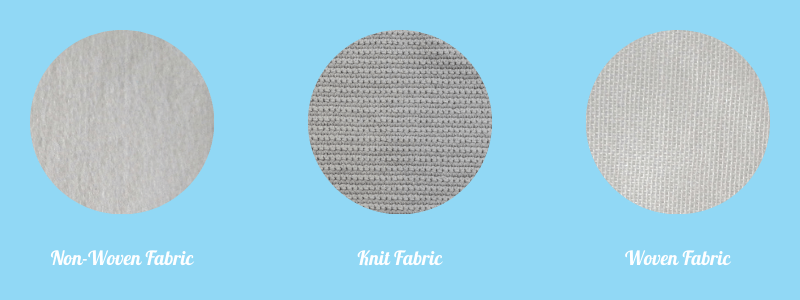
Interfacing options:
- Woven: Stiff material that looks like fabric,
- Non-woven: These interfacing fabrics are compressed fibers, with one side covered with adhesive
- Knit: Need some stretch? Knit fabric can accomplish a tight stretch for those projects!
Before you start constructing your bag, let’s cover tips that can create a clean finish for your purse, wristlet, and more. In addition, these tips can assist you in adding a more professional touch to your projects.
- Attaching your handles
We recommend basting your handles before attaching them to your bags so that the fabric is hardened and firm. A fun tip for sewing is taping down your handles so that you can seamlessly sew over the fabric and attach your handles with ease.
2. Seam Allowance
Don’t forget to trim and clean up those seam allowances for a clean, finished look in your bag projects.
3. Boxed Corner
A technique that’s easy and quick to learn, adding a corner boxing can create more space in your bag and a professional bottom look. Using the 90-degree method, fold the corner flat, matching up the two side seams once you’ve cut out your fabric. The side seams should lie directly one over the other. Then stitch and backstitch to reinforce the closing.
Don’t forget to have the right feet on hand! Below we’ve listed our top 3 choices for bag creators to have in their kits. These feet options allow you to sew on unique fabrics, attach zippers and create clean finishes.
- Smooth Foot: Work on fabrics like leather, vinyl, suede, and more with ease using the smooth foot. This will allow you to use these types of fabrics without causing the material to stick to your foot like a metal one would.
- Piping Foot: Reinforce your lines and enjoy a clean finish on your projects.
- Zipper Attaching foot: Attach zippers for pockets and bag closures using the zipper attaching foot.
When creating your bag, other ideas to keep in mind are what features you wish for it to have! Additional options for your bag designs include placing pockets, card slots, bag flaps, phone holders, etc. These additional pieces are perfect when trying new techniques and allow you to test your skills by attaching zippers, bag closers, pockets…
Don’t forget to have suitable needles and thread on hand. Your needle should be strong to handle thick fabrics when you begin layering your bag pieces. For thread, focus on finding heavyweight thread types that can keep your seams strong and together.
We hope this has helped you find the pieces you need to create your next bag project! Whether you’re an expert who has been creating for years, or a new sewist trying your hand at bag making, these projects are a great way to step up your technique game! So, are you a bag creator and want to share your favorite tips with new bagmakers? Let us know down below!
