Join us in meeting Hannah, daughter of Cyndi Grome, one of the operators of Grome’s Sewing Center located in Austin, Texas!
Keeping San Antonio in Stitches Since 1950 Grome’s Sewing Center is so passionate about helping sewists like you create their dream projects! At Grome’s Sewing Center, they want their customers to come in and feel welcomed to find the right machine for their needs, browse their machine accessories, choose your notions, and pick the perfect fabric for your designs. Follow along below as Hannah shares everything you should know before visiting!
Follow along below for the transcript version of our interview with Hanna from Grome’s Sewing Center.
Hi everyone I’m Hannah from Grome’s Sewing Machine Company in both San Antonio and Universal City Texas. Welcome!
Grome’s Sewing Machine Company is a family-owned and operated business that’s been running since 1950. My great great grandfather, Isador Grome, started Grome’s Sewing Machine Company with his son Lou Grome and then Lou brought in Richard my grandfather, and then my grandfather brought in my mom and my mom took over the business, brought in her sister Irma, and now I’m the fifth generation here at Grome’s Sewing Machine Company working here alongside my mother Cindy Grome.
What JUKI machines can a customer find at Grome’s Sewing Machine Company?
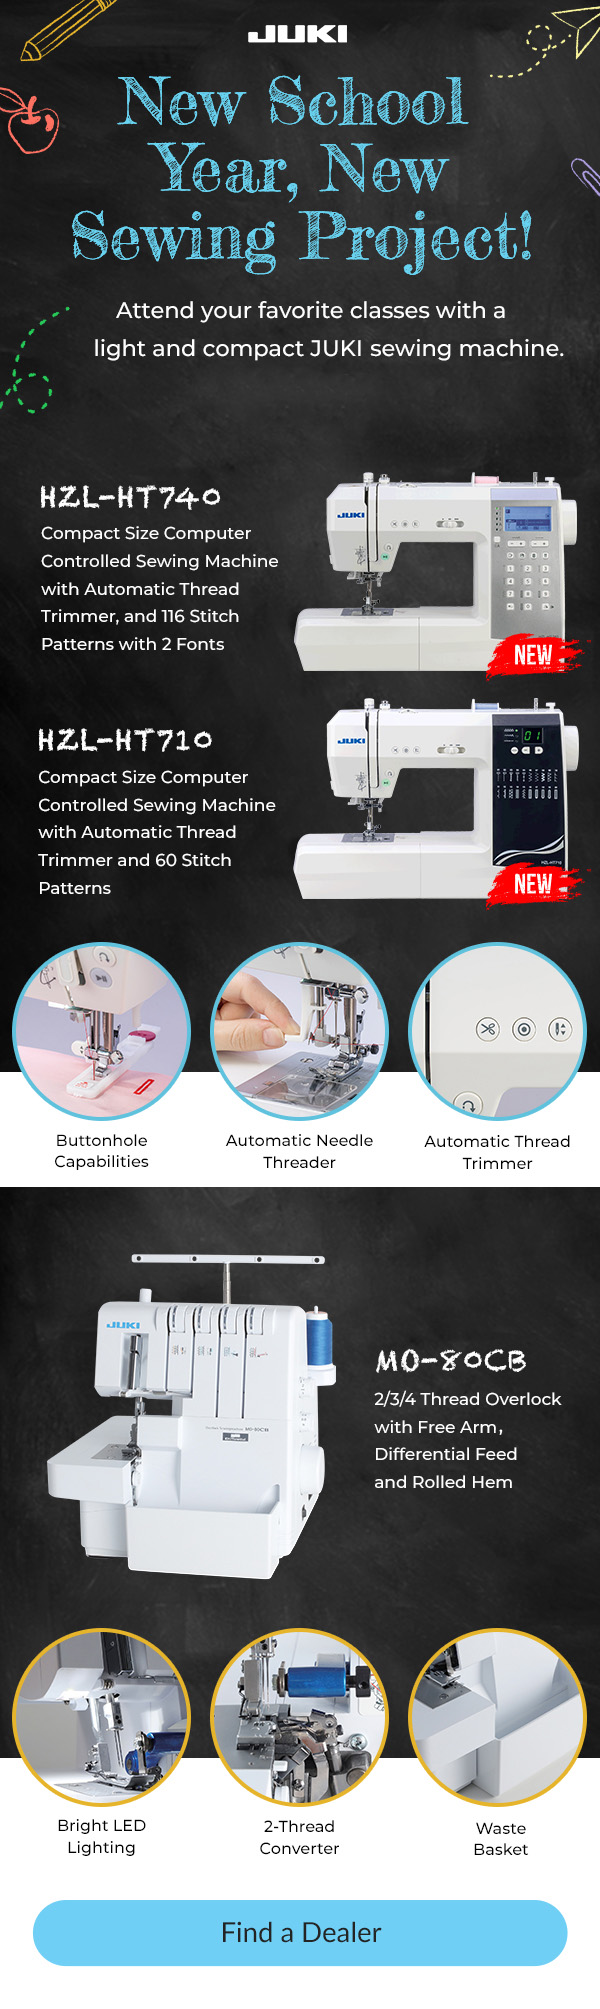
You can find a lot of great JUKI machines and accessories here at Grome’s Sewing Machine Company. We have your favorite quilting machines, like your J350, we even have the infamous TL series, which is great for bag makers and Quilters alike. We have the J150, the DX4000, DX3000 F600, so if there’s any JUKI machine that you need for your sewing needs you can come to Grome’s and you’ll know that you’ll be able to find exactly what you need. And our sales staff can help you fit into just the perfect machine for you.
We have a wide array of JUKI accessories like the JUKI quilting rulers, as well as all of the JUKI feet, and we have the extension tables, we have the thread stands, so whatever accessory that you’re looking for Grome’s has it.
What are the benefits of being a Grome’s customer?
Purchasing from Grome’s has a great amount of benefits. Not only do we service your JUKI machines here in our store with certified technicians, and technicians who’ve gone to many dealer trainings and technician trainings to know how to work your machine inside and out; we also do in-person classes. So when you purchase your machine from us we can sit down with you, make sure you know how to thread your machine, wind a bobbin, and we have classes where you can learn how to use all the decorative functions of your machine as well. It’s a really great deal!
What can customers expect to find while shopping at Grome’s?
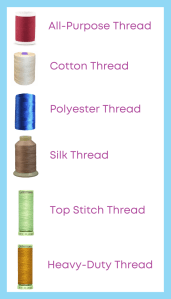
As you can see behind me we have a beautiful selection of fabrics in-house. We also have all of your quilting, sewing, and embroidery notions. We have everything that you need to finish your products. We have all of the amazing threads that you’re going to want, we have quilting threads, embroidery threads, general sewing threads, stretch cover lock threads, serger threads, everything you can think of.
We have kits that we make here in-house as well for all of your fun projects. If you want like a three-yard fabric project we got it. If you want patterns, we got it. You want books? We got it. You want anything special order? Shoot! Give us a call, we can find it for you and try to order it. So Grome’s, we got so much and we’ve been doing this like I said for 73 years so if you’re talking about something you can rest assured we know what you’re looking for and we can help you find it.
What makes Grome’s unique?
One of the best and most unique things about Grome’s Sewing Machine Company is that we are a family business that has been passed down generation through generation. We know the ins and outs of sewing machines all the way back from when my great grandfather brought the first zigzag sewing machine to the San Antonio area from Europe. So when it comes to knowledge base we’ve got my mom, I don’t know how she does it, but she can just pull up parts out of her head like a crazy person! But she’s amazing and we have the family support and knowledge base to help you figure out if you’re having issues with your machine, we can walk you through it, we can help you solve problems, we have techniques that we’ve known because we all work together here. You know I may be the fifth generation, the youngest here, but I always bring a fun and new modern twist to maybe some of the more contemporary things that my mom brings to our table. So we’re a fun family here that has a knowledge base that just kind of blends together and helps to help you create all your beautiful projects on your JUKI machines.
Does Grome’s have a message for future customers?
Grome’s is a great place in our community to come together and sew with each other, create projects, find all of the items that you need to create your amazing beautiful designs and ideas. We are always having great classes, with great instructors and we have events all throughout the year that we just keep scheduling and scheduling and scheduling and it’s a lot of fun. We do our best to try to get the entire community involved with the multiple events that we have throughout the year. We’re always running you know sales and having just a fun time together. I mean that’s what the sewing industry is about, it’s an art, we like to have fun and create.
We would be so honored if you would come to visit us here at Grome’s or even shop with us online. We are doing so much to grow our business here in the next few years and we would love for you to join our journey and we hope to see you soon. On our social media pages we have our Facebook at Grome’s Sewing Machine or Instagram at Grome’s Sewing. We have our YouTube at Grome’s Sewing and we’re always just trying to do our best to put out so much content for you because this is what it’s all about, is serving you all and creating your JUKI projects with your JUKI machines and helping you to create even more beautiful designs, ideas, quilts, and project garments and all of such. So we look forward to seeing you soon visiting us at Grome’s Sewing Machine Company, thank you!
To learn more about Grome’s Sewing Center, visit their website here! Thank you for joining us today in getting to know Hannah from Grome’s Sewing Center. We hope you get a chance to visit the next time you’re in the area!
Facebook: https://www.facebook.com/GromesSewingMachine
Instagram: https://www.instagram.com/gromessewing/
YouTube:https://www.youtube.com/@gromessewing
Website: https://www.gromes.com/