Get ready to add a touch of enchantment to your Halloween sewing projects with JUKI! Our DX and HZL series machines are the ultimate companions for sewists and quilters looking to bring their Halloween costume ideas to life. With a wide array of decorative stitches and innovative features, these machines will transform your creative visions into reality. Whether you’re stitching intricate spiderwebs onto a witch’s cloak or crafting spooky embroidery for a ghostly gown, the DX and HZL series ensures precision and ease.
Don’t miss this opportunity to unlock the full potential of your Halloween costume designs and make this October unforgettable with JUKI’s exceptional sewing technology. It’s time to sew magic into every stitch and enchantment into every costume!
Learn more by visiting your nearest JUKI dealer here.
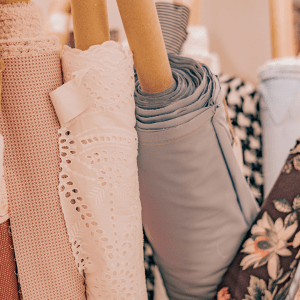
Quilting is a timeless craft that has allowed us to create beautiful and functional art pieces using fabric and thread. Whether you’re a beginner or have some quilting experience, you may have questions that need clarification. In this blog post, we will address five popular questions often asked by quilters. By understanding these fundamental aspects, you’ll be on your way to confidently quilting and creating those stunning quilts you’ve been dreaming of.
What is the difference between quilting cotton and regular cotton fabric?
Quilting cotton and regular cotton fabric differ primarily in construction and intended use. Quilting cotton is designed for quilting projects and is known for its tightly woven and durable nature. It typically has a higher thread count, which means that the fabric is made up of more threads per square inch. This dense weave gives quilting cotton its sturdiness, making it ideal for stitching and holding up to repeated use and washing. Additionally, quilting cotton often features vibrant prints and patterns, which add aesthetic appeal to quilts and other sewing projects.
On the other hand, regular cotton fabric refers to the broad category of cotton textiles used in various applications, including clothing, home décor, and crafts. Regular cotton fabric comes in different weights, weaves, and finishes to suit other purposes. Unlike quilting cotton, the regular cotton fabric may have a looser weave and a lower thread count, making it lighter and more breathable. It is commonly used for making garments such as t-shirts, dresses, and pants and crafting household items like curtains, pillowcases, and tablecloths.
What is the importance of accurate seam allowances in quilting?
Accurate seam allowances play a crucial role in quilting, ensuring the final project’s overall quality, precision, and consistency. Firstly, precise seam allowances help maintain the structural integrity of the quilt by ensuring that the fabric pieces are securely joined together. Accurate seam allowances ensure that the seams are strong and reliable, preventing unraveling or fraying of the fabric over time. This is especially important for quilts that will be used, washed, and handled frequently!
Secondly, precise seam allowances contribute to the quilt design’s overall visual appeal and accuracy. Quilts often involve intricate patterns and designs that rely on precise measurements and seam allowances. Consistently accurate seam allowances ensure that the blocks and elements of the quilt fit together seamlessly, creating clean lines, even corners, and balanced proportions. Inaccurate seam allowances can lead to mismatched points, distorted shapes, or misaligned seams, which can detract from the quilt’s visual impact and overall aesthetic. Quilters can achieve a professional finish by paying attention to precise seam allowances and bringing their envisioned design to life.
How do I prevent fabric stretching while quilting?
Preventing fabric stretching is crucial in quilting to ensure accurate piecing and maintain the integrity of your quilt blocks. Here are two key techniques to help you prevent fabric stretching:
Proper handling and pinning: When working with fabric, especially bias-cut pieces, handle them with care to minimize stretching. Avoid pulling or tugging the fabric excessively, as this can distort its shape. Instead, support the fabric with one hand while guiding it through the sewing machine with the other. Additionally, use pins to secure your fabric layers together before stitching. Place the pins perpendicular to the seam line, with the heads pointing away from the sewing direction. This technique will help keep the fabric in place during sewing and prevent stretching caused by shifting layers.
Stabilizing techniques: Stabilizing the fabric can also help minimize stretching. One effective method is using spray starch or fabric sizing. Lightly spray the fabric with starch or sizing and press it with an iron before cutting and piecing. This process stiffens the fabric temporarily, making it less prone to stretching. Follow the manufacturer’s instructions and test on a scrap piece of fabric first to avoid any adverse effects. Another technique is to use a stabilizer such as lightweight fusible interfacing or wash-away stabilizer. These products provide temporary support to the fabric and can be applied to specific areas or the entire fabric piece, depending on your needs.
These techniques will help any beginner or everyday quilter!
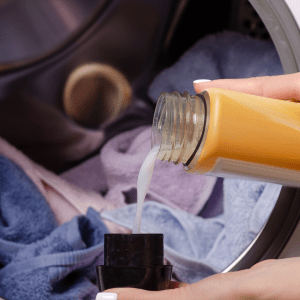
Should I prewash my fabric before quilting?
The decision to prewash fabric before quilting is a personal choice that depends on various factors. Prewashing fabric can be beneficial in addressing potential shrinkage and removing excess dyes or chemicals. By washing the fabric before cutting and piecing, you can ensure that any shrinkage occurs beforehand, reducing the risk of distortion or warping in your finished quilt. Additionally, prewashing helps remove residual substances that may bleed onto other fabrics or affect the overall appearance of your quilt. It can be advantageous when working with different fabric types with varying shrinkage rates in the same project.
On the other hand, some quilters prefer to avoid prewashing fabric to maintain its stability and finish. Prewashing can cause the fabric to lose some of its sizing or stiffness, potentially impacting the ease of cutting and piecing. Certain fabrics, such as precuts or those with delicate prints or embellishments, may be unsuitable for prewashing due to their fragile nature. In such cases, alternative precautions like color-catching sheets or test-washing small fabric pieces can help prevent bleeding without prewashing.
Ultimately, the decision to prewash fabric before quilting is a personal preference based on the desired outcome, fabric type, and project requirements. Considering factors such as shrinkage, potential bleeding, and fabric stability can help you decide whether to prewash or not.
How can I achieve precise quilting lines or designs? Using rulers with your JUKI sewing machine can be highly beneficial to achieve precise quilting lines or designs. Here’s a step-by-step guide on how to utilize JUKI rulers for accurate quilting:
Step 1: Prepare your fabric and JUKI ruler: Start by ensuring your fabric is properly layered and basted for quilting. Then, select the appropriate JUKI ruler for the design or quilting lines you wish to create. JUKI offers a range of rulers specifically designed for quilting purposes, such as straight rulers, curved rulers, and specialty rulers for different patterns and shapes.
Step 2: Secure and position the ruler: Place your ruler on the fabric, aligning it with the desired quilting line or design. Use fabric grips or non-slip adhesive tape to secure the ruler, ensuring it remains stable and doesn’t shift during quilting. It’s vital to position the ruler accurately to achieve precise results.
Step 3: Quilt along the ruler edge: Once the ruler is secured, guide your JUKI sewing machine’s foot along the ruler’s edge. Ensure to maintain a steady speed and apply gentle pressure to the ruler to prevent it from moving. As you quilt along the ruler, the foot of the machine will follow the ruler’s edge, resulting in clean and precise quilting lines or designs.
Remember to practice and experiment with different rulers and techniques to achieve the desired quilting effects. It’s also essential to familiarize yourself with the features and settings of your specific JUKI sewing machine to ensure optimal performance during quilting.
As a quilter, understanding the basics is essential for successful and enjoyable quilting projects. By addressing these five common questions, you can better grasp the differences between quilting cotton and regular cotton fabric, the importance of accurate seam allowances, preventing fabric stretching, deciding whether to prewash fabric and achieving precise quilting lines or designs. With this knowledge, you can confidently embark on your quilting journey, create stunning quilts, and continue expanding your quilting skills. Looking for quilting machines? Be sure to check out JUKI’s wide range of machines! Happy quilting!
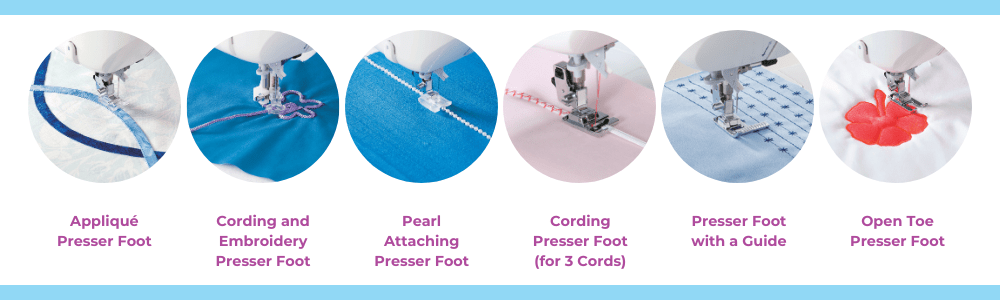
The Creative Set Accessory Kit by JUKI is a treasure trove for sewists looking to expand their creative possibilities. With an assortment of specialized presser feet and essential accessories, this kit allows you to add unique and professional touches to your sewing projects. In this blog post, we’ll explore the presser feet included in the Creative Set and their various applications. From appliqué to pearl attaching and cording, we’ll also provide project ideas that showcase the versatility and potential of these fantastic accessories.
The appliqué presser foot is designed to facilitate the application of appliqué designs onto fabric. It allows for precise stitching along the edges of the appliqué pieces, securing them in place seamlessly. Use the appliqué foot for quilts, garments, and home decor projects to add decorative fabric shapes or motifs. Create beautiful appliqué designs on t-shirts, table runners, or personalized pillows.
This presser foot is a versatile tool for embellishing your sewing projects with decorative cords or embroidery threads. It has a groove on the underside that holds the cord or thread, allowing it to be stitched securely in place. Use this foot to add texture and dimension to garments, handbags, or home decor items. Create unique corded or embroidered designs on collars, cuffs, or even the edges of tote bags or cushion covers.
The pearl-attaching presser foot is designed to attach pearls or beads to fabric. It has a channel that holds the pearls in place as you sew, ensuring even spacing and secure attachment. This foot is perfect for adding elegant and eye-catching details to bridal wear, evening gowns, or accessories like clutches and headbands. Create stunning pearl trims on necklines, bodices, or along the edges of a veil.
The cording presser foot for three cords is ideal for incorporating multiple cords into your sewing projects. It allows you to guide and stitch three cords simultaneously, creating beautiful raised designs or decorative trims. Use this foot to add intricate corded details on garments, such as piping on collars or bodices. You can also use it to create unique corded accents on bags, belts, or home decor items like curtains or cushions.
The presser foot with a guide is a versatile accessory that helps you achieve accurate and consistent seam allowances. The guide runs along the fabric’s edge, ensuring precise stitching and alignment. This foot is perfect for projects that require precise topstitching or edge stitching, such as quilt bindings, bag handles, or garment details like collars and cuffs.
The open-toe presser foot provides excellent visibility, making it ideal for projects that require precise stitching along marked lines or intricate patterns. Its open front lets you see the stitching area clearly, making it suitable for quilting, appliqué, or free-motion embroidery. Use this foot to create intricate quilt designs, stitch along curves, or add decorative motifs to the fabric.
Project Ideas:
Quilted Appliqué Pillow: Use the appliqué presser foot to create beautiful fabric shapes on a quilted pillow cover, adding texture and visual interest.
Embellished Tote Bag: Utilize the cording and embroidery presser foot to add decorative cords or threads to a plain tote bag, creating a unique and personalized accessory.
Pearl-Trimmed Evening Dress: Attach pearls using the pearl attaching presser foot to the neckline or bodice of an evening dress, adding an elegant and sophisticated touch.
Corded Collar Blouse: Incorporate multiple cords with the cording presser foot (for 3 cords) to create a striking corded collar detail on a blouse, making it a standout garment.
Topstitched Quilted Table Runner: Use the presser foot with a guide to achieve precise topstitching on a quilted table runner, enhancing its visual appeal.
The Creative Set Accessory Kit by JUKI provides a range of specialized presser feet and accessories to elevate your sewing projects. These presser feet open up endless creative possibilities, from appliqué and cording to pearl attaching and topstitching. Incorporate these accessories into your sewing projects and bring your unique ideas to life. Unleash your creativity and let the JUKI Creative Set inspire your sewing journey!
Stay tuned for a future JUKI Tip to showcase these accessories!
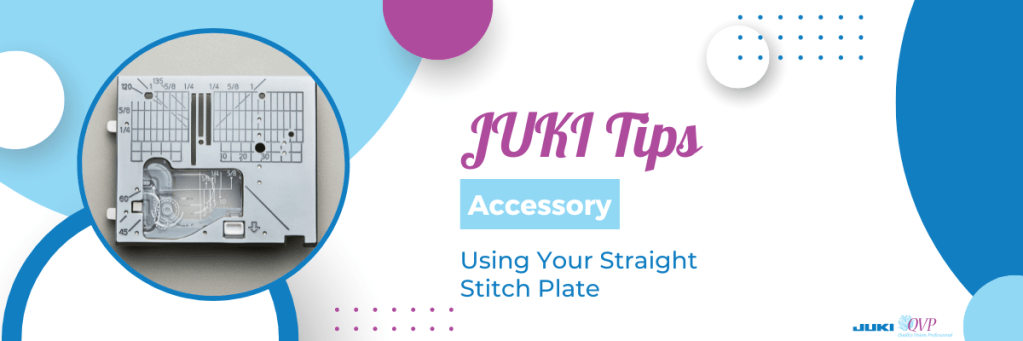
In this month’s tip, JUKI National Account Trainer Alba showcases how to use the straight stitch plate and straight stitch presser foot. Going over when, and how to use them, follow along to begin using yours on your next project. In this video, we talk about the DX series and the TL series.
Follow along below for a rundown of what Alba covers on today’s JUKI Tip!
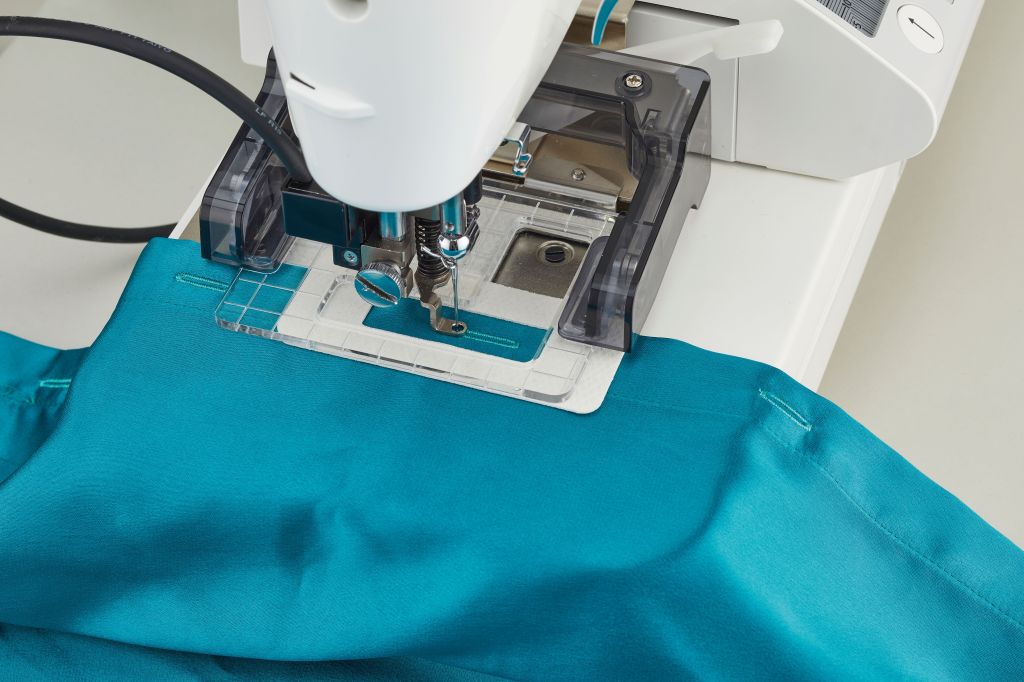
Hello all my JUKI friends, my name is Alba, and welcome back to my studio. Today I am going over a tip, a trick, for JUKI machines, and in the last session that I did several of you asked about straight stitch plate and straight stitch foot. What are they? When do I use them? Why would I want to use them? How do I use them?
So today I am going to be showing you the straight stitch plate and foot. How they get installed, how you use them, and also some tips on when you use them and when they make your sewing easier. I will be showing you this on two machines, on the DX-2000 QVP and on the DX-4000 QVP.
Both of these machines, this goes on a little bit differently. On the DX-2000 QVP the straight stitch plate is built into the machine, so it’s a lever that you’re touching to activate this feature and I wanted to show that because it is just such a great way to do that; and on the DX-4000 QVP it is an actual plate that you’re changing out but there’s also a feed dog system that you’re switching out when you go to the straight stitch plate,
I’m really looking forward to getting up close and personal with both of these machines and showing you how to do that. Now when you use a straight stitch plate, for some people if they’re using a straight stitch on their machine that straight stitch plate is always on, and for others, it’s only on for certain scenarios that they use it. What a straight stitch plate does, is it turns a machine with lots of decorative stitches that has that sideway needle movement into a straight stitch only machine. It stabilizes that needle bar so that the straight stitch is straighter and also the opening in the plate is smaller so that when you are sewing, the fabric that you’re sewing onto, does not get pushed into the feed dogs; and if that’s ever happened to you that alone is a reason to switch out to a straight stitch plate.
Welcome back everyone just like I promised I am right in front of the machine and I wanted to get really up close, very personal with the machine, so that you could see exactly what I am doing; and I am just making sure that I am at a straight stitch because I will be talking about the straight stitch plate and feed dog. Now the first thing I wanted to do is, most of you are familiar with the straight stitch plate that has a hole that just the needle goes into as opposed to the zigzag plate which this opening goes wide across and is sometimes referred to as the shape of the Jelly Bean.
What JUKI does differently on their full-size, 12-inch throat, machines is that they give you the feed dogs that match up to the plate, so that you’re getting full contact with the foot and the plate at all times. Now, I’m going to move a little bit closer and I’m going to show you removing the plate as well as putting on the new feed dog. Right now, I do not have a foot or needle in my machine just for safety reasons and to give you the clearest view possible.
So this is the zigzag plate and this is to allow the needle to move to different positions, to do decorative stitching. And because this needle moves on a straight stitch the straight stitch plate gives it a bit more stability because its opening is only allowing for that needle drop. For no movement whatsoever. So that is the main difference between that straight stitch plate and the zig-zag plate.
Now, I’m going to zoom in on that feed dog system and I am just lifting that out and pulling it out of my machine. If you notice my zigzag plate matches up to my zigzag feed dog, that’s a nice close-up shot, and I want you to see the difference in how narrow the two are.
I am going to put in the straight stitch feed dogs, and you could see that just slid in really easily, and it just went right into place, and this allows for me to clean in between my feed dogs and also be able to get into this area for cleaning really nicely.
Now I’m gonna place my straight stitch plate on my machine and just pop it back down and it sets into place, and as you could see right here is where that needle would be dropping. So as I said, especially when you’re doing triangles and you’re doing half Square triangles, when you’re sewing right on the edge of the fabric to sew, that fabric will sometimes get pushed down into the feed dog system and because this opening is smaller that allows for that not to happen.
Now, the DX-2000 QVP does not have the plate and the feed dog system like we just saw on the DX-4000QVP. It’s a little bit different and I’m going to get into how to activate this and again I’m going to remove my foot and I’m going to zoom in so that you can see. Right now I have that zigzag opening and I mentioned that this machine has a straight stitch plate built into it and this mechanism here when I activate that plate it slides up and gives me a straight stitch plate.
Let me show you how easily that’s done. I am removing my bobbin cover and with a quick slide of that mechanism, I’m going to do this with the tweezer so that you can see that, so here it is all the way to the left and I have that zigzag opening right here where that needle drops, and when I slide that over, my looks like a stitch finger on a serger came forward and look at where my needle is dropping into and I’m going to try and get just a little bit closer and zoom a little bit more but you could see that that is allowing for stitching to take place in a smaller opening which is why you would want to use that straight stitch plate so again with the automatic this is on the DX-2000 QVP and the changing of the plate was done on the DX-4000 QVP
I hope you enjoyed that demonstration of putting in a straight stitch plate, and some of the uses for straight stitch plate, and when and why you would use it. When I am piecing, and I know I’m going to be piecing for a long time, or even if I’m doing garment sewing where I’m constructing, I like to put in my straight stitch plate because as I said it just gives me that feel and that Stitch quality like a straight Stitch machine would. For any time when you’re working with very fine sheer fabrics that tend to get pulled down into that feed dog system, the straight Stitch plate eliminates that.
Until next time for the next tip and trick with JUKI, I will see you then. I want to thank you for joining me, please make comments during the video and at the end so that we know what to present and what you would like to see just like the few people who commented that they needed to understand that straight stitch plate better! I was able to do that for you, so please leave your comments and share the video with your friends.
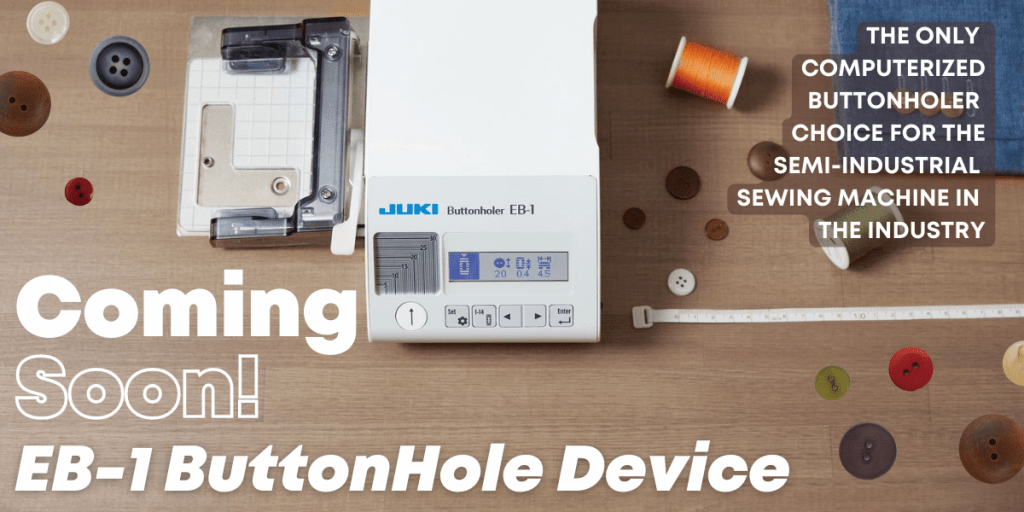
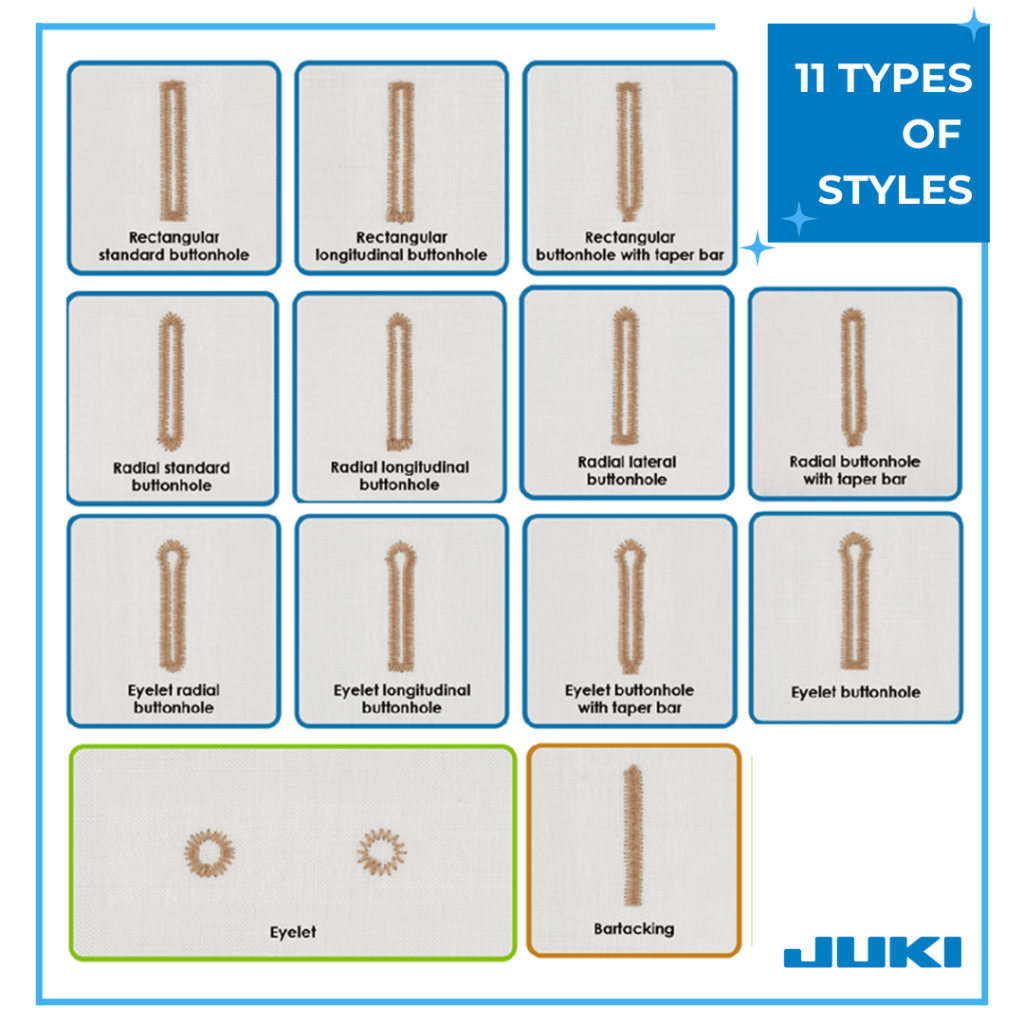
Coming soon, the EB-1 is an innovative computerized buttonholer tailored for semi-industrial sewing machines. Unparalleled in the industry, this accessory stands out with its 11 pre-set buttonhole patterns complete with bartack and eyelet functionality. The bartacking stitch proves versatile, accommodating tasks like pocket corner sewing, zipper end reinforcement, and belt loop attachment. Meanwhile, the eyelet function serves both functional and decorative purposes, allowing string passage and enhancing clothing aesthetics.
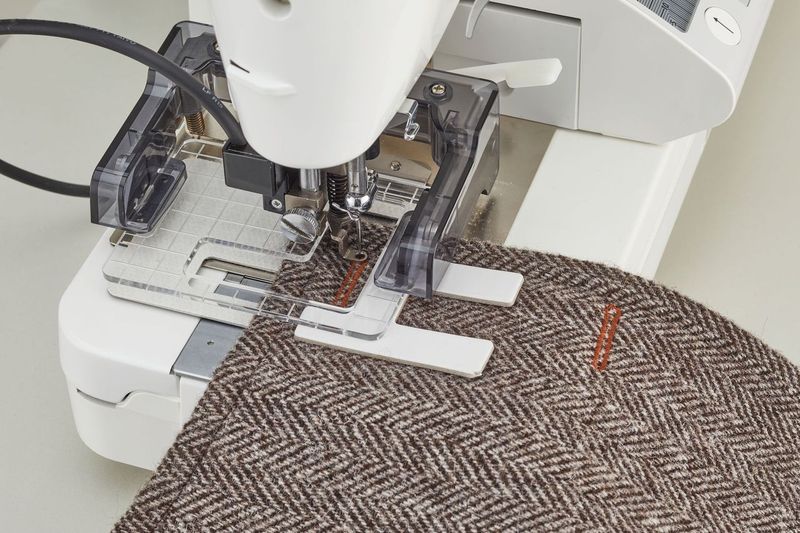
Elevate your garment craftsmanship with the EB-1, revolutionizing buttonhole creation on your TL machine. Whether fashioning elegant dresses or stylish shirts, this accessory lends a flawless final touch. Operating by maneuvering the presser frame with material, the EB-1 enables buttonhole pattern rotation by 90 degrees along the X and Y axes, facilitating the sewing of both vertical and horizontal buttonholes. Moreover, its impeccable design averts jamming, facilitating seamless stitching even on denser fabrics.
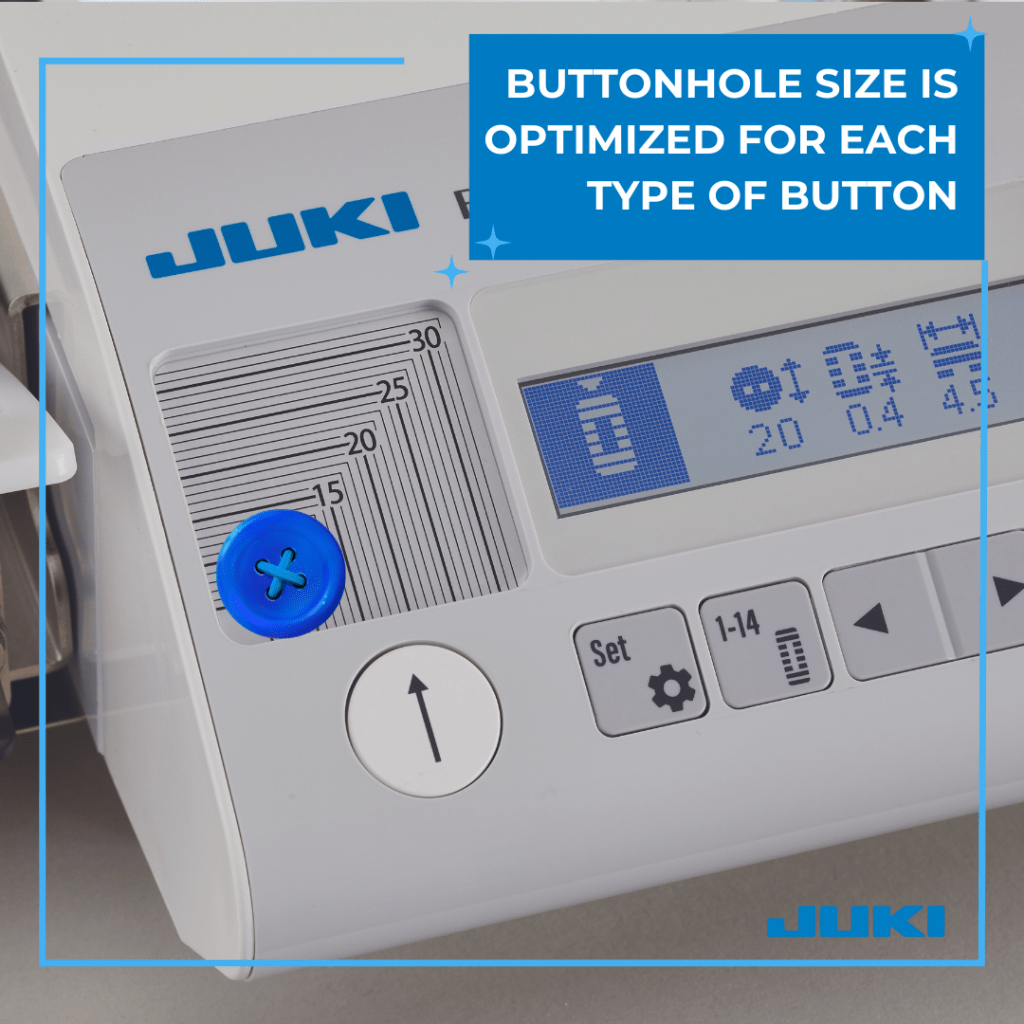
Facilitating precision, the EB-1 incorporates a 1 cm grid for effortless project alignment on both the X and Y axes. The transparent presser foot streamlines the initial positioning, ensuring accurate buttonhole placement. Being a computerized tool, the EB-1 empowers users to select from a plethora of buttonhole stitch patterns and intricate settings. With the capacity to input button diameter in 1mm increments, the EB-1 automates appropriate buttonhole sizing, catering to buttons ranging from 5mm to 32mm in diameter.
Features
Professional Level Stitch Quality
Beautiful buttonhole stitch
Buttonhole size is optimized for each type of button
Flexible seam button
Capable of creating a basting stitch
Accessible features
Included Accessories
Difference-in-Height Correction Plate: used when sewing buttonholes on multilayered parts of the material.
Non-Slip Sheet: can be placed on a slippery fabric so that it does not easily slip. The sheet can also be cut to adjust its length as desired.
Difference-in-Height Correction Plate
Non-Slip Sheet
Learn more about the NEW EB-1 at your nearest JUKI Dealer, releasing later this year, 2023. To find your local JUKI Dealer, click here today!