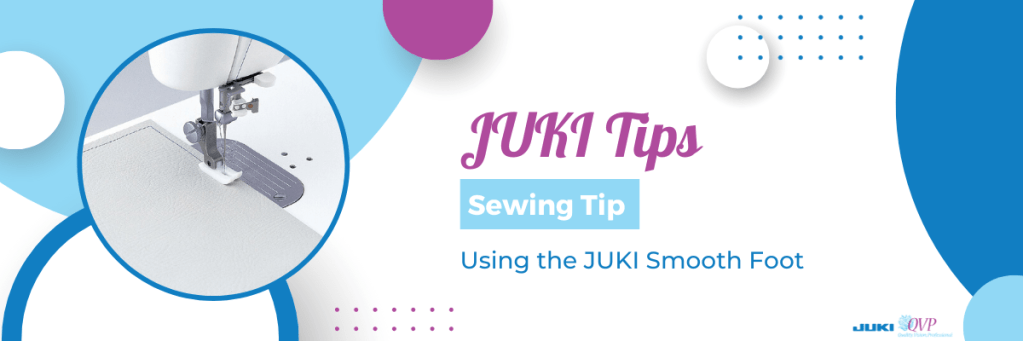
In this month’s tip, JUKI National Account Trainer Kelly showcases how to use the JUKI Smoot Foot, an accessory available on both the TL series and the DX series, which allows you to create with fun fabrics like vinyl, leather, suede, and more!
Follow along below for a rundown of what Kelly covers on today’s JUKI Tip!
Hi, I’m Kelly with JUKI America, and on today’s tip if you like to sew on a variety of fabrics and get a professional finish every time, invest in the JUKI smooth foot. The JUKI smooth foot is white on the bottom because it’s made out of resin material that’ll enable a smooth feed for fabrics like leather, cork, and vinyl! I love to make bags on my JUKI Haruka, but recently I chose to make a leather tote bag from an old long leather coat I had, and I realized quickly that I needed the smooth foot to get a superior feed for that type of fabric. Watch above as we demonstrate!
With my stitch length set at three and a half, the leather does not want to move through the machine with the standard presser foot. Let me change to the smooth foot and show you the difference.
The only change I made was to put on the smoked foot, and you can see now top stitching this leather is easy.
Take a look at the beautiful stitch quality on the leather!
Topstitching is made easy on leather with this wonderful smooth foot.
It also sews beautifully on the cork!
The smooth foot is available for the TL series and our computerized sewing machines. You can go to JUKIHome.com and then select accessories to find the smooth foot that’ll work with your machine. You can visit your local JUKI retailer to purchase the smooth foot for your JUKI. Have fun with your JUKI making bags with all kinds of fabrics, with your smooth foot by JUKI!
A well-organized sewing room or dedicated sewing space can be the key to a productive and enjoyable sewing experience. From neatly storing fabrics and notions to creating a good workflow, a functional workspace allows you to focus on your creative projects without the frustration of clutter! This blog post will explore practical tips and tricks for organizing your sewing room, innovative storage solutions, and space-saving ideas. Get ready to transform your sewing space into a haven of creativity and efficiency!
Start Evaluating and Decluttering:
Start your sewing room organization journey by evaluating your current setup and decluttering unnecessary items. Sort through your fabrics, threads, and notions, and donate or discard anything you no longer need or use. By minimizing clutter, you’ll create more space and make finding and accessing the supplies you truly need easier.
Plan Your Fabric Storage:
Proper storage of fabrics is essential for easy access and preservation. We’ve gathered a few tips for getting your storage well organized.
Categorize and Sort: Start by categorizing your fabric based on different criteria, such as color, fabric type, or project type. This will make finding the fabric you need easier when starting a new project.
Use Clear Containers or Bins: Store your fabric in clear plastic containers or bins. This lets you see the contents at a glance, saving time and effort when searching for specific fabrics.
Fold and Label: Fold your fabric neatly and uniformly to maximize space and prevent wrinkles. Use labels or tags to identify the fabric type, color, yardage, or other relevant details. This makes it easier to locate specific fabrics without unfolding everything.
Vertical Storage: Consider storing your fabric vertically rather than horizontally. This method saves space and allows you to easily browse through the fabric stacks without disturbing the neatly folded fabrics.
Utilize Shelving or Cubbies: Install shelves or use cubbies to store your fabric. These provide a dedicated space for each fabric category and help organize your sewing room. You can even sort fabrics by size or project type within each shelf or cubby.
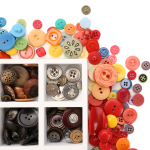
Organize Your Notions and Tools:
Organizing notions and tools in your sewing and quilting room is essential for maintaining a functional and efficient workspace. Start by grouping similar items, such as needles, pins, and buttons. Utilize clear plastic containers, small jars, or compartmentalized organizers to store these smaller items, ensuring they are easily accessible and visible. Consider using a pegboard or wall-mounted tool organizer to hang scissors, rulers, and other frequently used tools, keeping them within reach and saving valuable workspace.
Designate specific shelves or drawers for larger tools like cutting mats and rotary cutters to keep them safely stored and neatly organized. Additionally, labeling containers or using clear bins for items like zippers, ribbons, and trims can make it quick and easy to find what you need. By implementing a well-thought-out organization system, you’ll streamline your sewing and quilting process and have a clutter-free environment that inspires creativity!
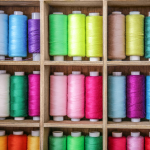
Organizing Those Threads and Bobbins:
Practical thread and bobbin organization in your sewing and quilting room is crucial for a smooth and efficient workflow. To keep your threads easily accessible and neatly arranged, consider using a thread rack or spool holder. These can be mounted on the wall or placed on a table or shelf, providing a convenient display of your thread collection. Group threads by color or type, allowing for quick identification and selection. Alternatively, you can store threads in clear plastic containers or drawers, protecting them from dust and light exposure.
To keep your bobbins organized, use a bobbin storage case or tray specifically designed for holding bobbins securely in place. This prevents them from unwinding and tangling. You can also match bobbins with corresponding thread spools, storing them together to easily locate the appropriate combination when needed. By implementing an effective thread and bobbin organization system, you’ll save time and frustration, allowing for a more enjoyable sewing and quilting experience.
Creating Your Workflow:
Creating an efficient workflow in your sewing and quilting room is essential for maximizing productivity and enjoying a seamless creative process! Start by organizing your workspace in a way that suits your working style. Arrange your sewing machine, cutting table, and ironing station in a seamless layout, and ensure easy access to all your needed tools and materials. Consider setting up your own assembly line for different stages of the process! Such as cutting, piecing, and assembly, to keep everything organized and efficient.
Next, establish a workflow that works best for you! Start by planning your projects in advance. Gather your fabric, confirm your pattern, and have your cutting instructions ready. With a clear roadmap, you can avoid unnecessary interruptions or backtracking during the creative process.
Prioritize tasks and break your sewing down into manageable steps! This allows you to focus on one project piece at a time, cutting fabric, sewing seams, or ironing. Remember to declutter and tidy your workspace to maintain a clear and inspiring workspace. By creating an efficient workflow tailored to your needs, you’ll be able to fully immerse yourself in your sewing and quilting projects, resulting in beautifully crafted creations!
Inspiring and Personalized Decor:
Create an inspiring environment in your sewing room by adding personal touches and decorative elements. Display finished projects, hang inspirational quotes, or place around artwork that sparks your creativity. Look into incorporating good lighting to avoid eye strain during your project creation. Maybe add a pinboard or corkboard to pin inspiration, project ideas, or fabric swatches!
A well-organized sewing room is a haven for creativity and productivity. By implementing the tips and tricks in this blog post, you can create a functional and inspiring workspace that enhances your sewing experience. From efficient fabric storage to optimizing workflow and adding personal touches, these strategies will help you maximize your sewing space and enjoy a clutter-free environment. Embrace the joy of organization and watch your sewing projects flourish in a space designed for creativity and efficiency. Happy sewing!
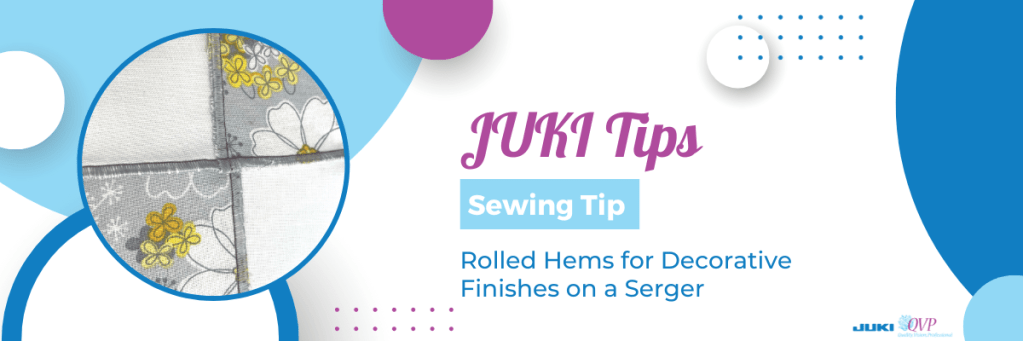
In this month’s tip, JUKI National Account Trainer Alba showcases how to use rolled hems as a decorative touch to your quilt projects and create this on the Serger. In this video, we’ll be using our latest MO-3000QVP model.
Follow along below for a rundown of what Alba covers on today’s JUKI Tip!
Hello all my JUKI friends, welcome to another JUKI tips and tricks. My name is Alba and today we’re talking sergers.
I am working on the MO3000, but this can be done with any serger. So, today I’m talking about rolled hems, and mostly everyone uses a roll hem to finish up a hem. I’m going to take it to my next quilt project and use it as a decorative finish. I’m working on a chandelier Quilt Block. it is a very easy block to do, and I just wanted to give it a Decorative Touch. So what I have done on this one, is I’ve added is a rolled hem, and I’m doing a wide rolled hem so that it catches more of the fabric and I am going to create that Quilt Block using that rolled hem as my actual seam and that Decorative Touch. Now when you are doing this I would not recommend using woolly nylon, which is typically used for a rolled hem, because when you do press your blocks the woolly nylon may melt at the higher settings. Now, I’m going to bring this to the machine and finish up this Quilt Block.
I am at the MO 3000, but you can use any serger that allows you to do a rolled hem. Now the trick to doing that rolled hem, is placing the fabric right side out and my wrong sides together; so opposite of how you would normally put your fabric together. Now here at my intersection, I am going to show you just like we alternate the seams, I have alternated and nested those rolled hems. So I will be bringing this to my machine and sewing, and I am going to get as close as I can to show you exactly what I’m doing.
Now I am lining up my fabric just before my needles, and I am bumping it up against the knife, and I have left the knife up to catch any of those little fraying edges that can happen on cotton fabric. Now, I am going to start slowly and then build up speed, and I am going to go over all of those. Now I have not pinned, so I am just Gathering and making sure my pieces are together, and I’m sewing all the way down that edge, and surging off and I am going to cut right to the edge because I know that all of my seams will be covered in another seam.
Now I am going to bring this to the table, and I am going to just finger press but you would really want to bring that to your iron, but look at how lovely that is with that thread detail and that’s going to be 3D where it will be dimensional and just give this Quilt Block a lot of texture. So just a tip that rolled hems are not just for hems they’re great for decorative touches. So I would love to see this also on garments as an exposed seam.
I’m so glad you were able to join me with this tip, and I wanted you to get a really closeup look at how pretty that just three-dimensional finish looks on that Quilt Block. So don’t forget to give me your messages and give me some other things that you’d like to see tips on. Make sure to like and share with all of your friends so that they could get these amazing JUKI tips see you next time, bye-bye!
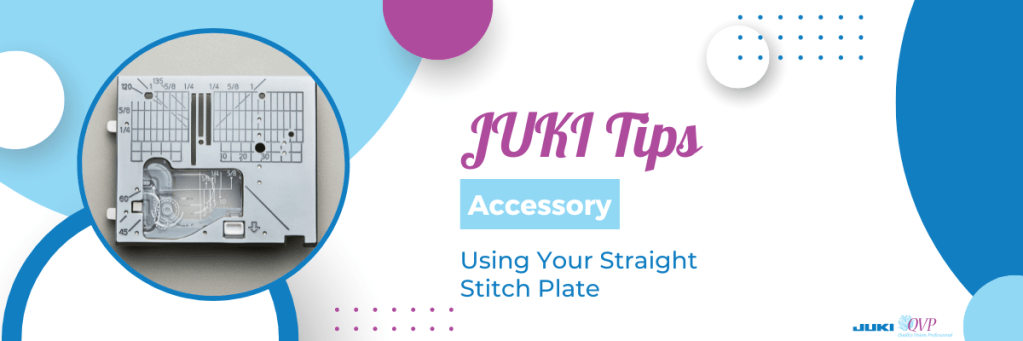
In this month’s tip, JUKI National Account Trainer Alba showcases how to use the straight stitch plate and straight stitch presser foot. Going over when, and how to use them, follow along to begin using yours on your next project. In this video, we talk about the DX series and the TL series.
Follow along below for a rundown of what Alba covers on today’s JUKI Tip!
Hello all my JUKI friends, my name is Alba, and welcome back to my studio. Today I am going over a tip, a trick, for JUKI machines, and in the last session that I did several of you asked about straight stitch plate and straight stitch foot. What are they? When do I use them? Why would I want to use them? How do I use them?
So today I am going to be showing you the straight stitch plate and foot. How they get installed, how you use them, and also some tips on when you use them and when they make your sewing easier. I will be showing you this on two machines, on the DX-2000 QVP and on the DX-4000 QVP.
Both of these machines, this goes on a little bit differently. On the DX-2000 QVP the straight stitch plate is built into the machine, so it’s a lever that you’re touching to activate this feature and I wanted to show that because it is just such a great way to do that; and on the DX-4000 QVP it is an actual plate that you’re changing out but there’s also a feed dog system that you’re switching out when you go to the straight stitch plate,
I’m really looking forward to getting up close and personal with both of these machines and showing you how to do that. Now when you use a straight stitch plate, for some people if they’re using a straight stitch on their machine that straight stitch plate is always on, and for others, it’s only on for certain scenarios that they use it. What a straight stitch plate does, is it turns a machine with lots of decorative stitches that has that sideway needle movement into a straight stitch only machine. It stabilizes that needle bar so that the straight stitch is straighter and also the opening in the plate is smaller so that when you are sewing, the fabric that you’re sewing onto, does not get pushed into the feed dogs; and if that’s ever happened to you that alone is a reason to switch out to a straight stitch plate.
Welcome back everyone just like I promised I am right in front of the machine and I wanted to get really up close, very personal with the machine, so that you could see exactly what I am doing; and I am just making sure that I am at a straight stitch because I will be talking about the straight stitch plate and feed dog. Now the first thing I wanted to do is, most of you are familiar with the straight stitch plate that has a hole that just the needle goes into as opposed to the zigzag plate which this opening goes wide across and is sometimes referred to as the shape of the Jelly Bean.
What JUKI does differently on their full-size, 12-inch throat, machines is that they give you the feed dogs that match up to the plate, so that you’re getting full contact with the foot and the plate at all times. Now, I’m going to move a little bit closer and I’m going to show you removing the plate as well as putting on the new feed dog. Right now, I do not have a foot or needle in my machine just for safety reasons and to give you the clearest view possible.
So this is the zigzag plate and this is to allow the needle to move to different positions, to do decorative stitching. And because this needle moves on a straight stitch the straight stitch plate gives it a bit more stability because its opening is only allowing for that needle drop. For no movement whatsoever. So that is the main difference between that straight stitch plate and the zig-zag plate.
Now, I’m going to zoom in on that feed dog system and I am just lifting that out and pulling it out of my machine. If you notice my zigzag plate matches up to my zigzag feed dog, that’s a nice close-up shot, and I want you to see the difference in how narrow the two are.
I am going to put in the straight stitch feed dogs, and you could see that just slid in really easily, and it just went right into place, and this allows for me to clean in between my feed dogs and also be able to get into this area for cleaning really nicely.
Now I’m gonna place my straight stitch plate on my machine and just pop it back down and it sets into place, and as you could see right here is where that needle would be dropping. So as I said, especially when you’re doing triangles and you’re doing half Square triangles, when you’re sewing right on the edge of the fabric to sew, that fabric will sometimes get pushed down into the feed dog system and because this opening is smaller that allows for that not to happen.
Now, the DX-2000 QVP does not have the plate and the feed dog system like we just saw on the DX-4000QVP. It’s a little bit different and I’m going to get into how to activate this and again I’m going to remove my foot and I’m going to zoom in so that you can see. Right now I have that zigzag opening and I mentioned that this machine has a straight stitch plate built into it and this mechanism here when I activate that plate it slides up and gives me a straight stitch plate.
Let me show you how easily that’s done. I am removing my bobbin cover and with a quick slide of that mechanism, I’m going to do this with the tweezer so that you can see that, so here it is all the way to the left and I have that zigzag opening right here where that needle drops, and when I slide that over, my looks like a stitch finger on a serger came forward and look at where my needle is dropping into and I’m going to try and get just a little bit closer and zoom a little bit more but you could see that that is allowing for stitching to take place in a smaller opening which is why you would want to use that straight stitch plate so again with the automatic this is on the DX-2000 QVP and the changing of the plate was done on the DX-4000 QVP
I hope you enjoyed that demonstration of putting in a straight stitch plate, and some of the uses for straight stitch plate, and when and why you would use it. When I am piecing, and I know I’m going to be piecing for a long time, or even if I’m doing garment sewing where I’m constructing, I like to put in my straight stitch plate because as I said it just gives me that feel and that Stitch quality like a straight Stitch machine would. For any time when you’re working with very fine sheer fabrics that tend to get pulled down into that feed dog system, the straight Stitch plate eliminates that.
Until next time for the next tip and trick with JUKI, I will see you then. I want to thank you for joining me, please make comments during the video and at the end so that we know what to present and what you would like to see just like the few people who commented that they needed to understand that straight stitch plate better! I was able to do that for you, so please leave your comments and share the video with your friends.
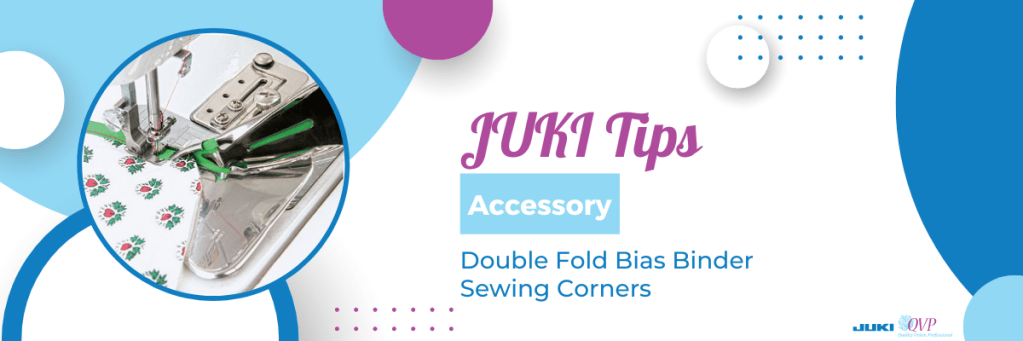
On this JUKI tip, we use the Double Fold Bias Binder and show you how to sew corners with this accessory and create a fun sewing experience!
Follow along below for a rundown of what Alba covers on today’s JUKI Tip!
Hello all my JUKI friends, my name is Alba and welcome to another tips and tricks with JUKI! Today I am talking about the double-fold bias binder and I have one in front of me, and I wanted to show you the components of this. I did another video previously on how to load the fabric and just tips with getting it to run smoothly, but today I’m going to be showing you how to use it with quilts and doing those mitered corners.
I wanted to show you the binder itself so that you could get a little bit familiar with this tool. First, it comes with the foot that’s very short allowing you to really get a nice top stitch onto that, and also two thumb screws. Now this pivots and opens up and this section here with that wide opening is where you would put your thumb screws, to screw it right into the bed of the machine.
Now there’s also a set of screws right by where you feed your bias, and this allows you to move closer and further away from your foot, depending on the machine, depending on the material that you’re using, and likewise, that big screw allows you to move left and right to get this positioned perfectly.
Now with this I feed my bias in, and I just pushed that fabric that I got it all the way into there, and I have it being held by my needle right now. So as I am sewing this I want to make sure that I’m holding my quilt right into that corner and as I’m coming to a stop I want my needle to be right at the edge of the fabric. You will see where my needle is, and where my fabric is, I went right to the edge; and I am touching my scissor button and what I will be doing is releasing enough of that bias and I want to give that a little finger press. I am going to move this fabric closer to me and you want to make sure that you have enough to be able to work with. What I am going to be doing, again with that finger press, I am going to open this up and kind of force that bias.
This will allow me to pull that tape back through, and a long silk pin would come in really handy for just holding that in place. In fact, I am going to put a pin into that corner to hold it; I have that nice miter, and I’m going to put my pin right in there and I am going to bring that fabric all the way towards me.
I am going to position this right underneath the foot so that my needle catches that very corner. Now with my stiletto, I’m using tweezers here, I’m making sure that my fabric is tucked all the way in, and I am going to sew. You would do this on all four of your Corners.
Now you can see that beautiful corner that I’ve just completed, and I want you to see how beautifully that is top stitched right at the edge and it catches the front and the back beautifully, and I’m just gonna allow you to get a really close look at that.
Now at that corner, I did add a PIN to secure, you could also add some fusible web tape, that quarter-inch fusible web tape, and press that first inch and force that miter in place. But, with the bias binder, that double-fold bias binder, gives you the ability not only to do curves but to do those beautifully mitered corners.
How beautiful is that for your quilts, your crafting projects, everything that you could imagine. I really like to do this when I’m sewing garments and I am not lining like a jacket. I would do this on my inside seams and those are called Hong Kong scenes and it just gives a beautiful professional look to that garment.
Thank you for coming and sharing your time with me, what do you want to see next on JUKI tips? Lets us know down below!